Table of Contents
Advertisement
1. Overview
2. Operation
3. Kill Dry Function
4. Assigning Parameters for Expression Control
5. Modes / Algorithms
6. Auto Intensity Swell
7
Factory Reset
What's new in Specular V3 :
Expression Pedal / Tap‐Tempo pedal input
Kill‐Dry function
Preset system is now decoupled from algorithms, which means it's now possible to store any
algorithms to any preset location.
Multi‐colored LED uniquely identifies algorithms.
Tap‐Tempo (with subdivisions) is now available for the Echo algorithm.
New artwork.
Specular Reverb V3 has identical sounds as V2, with the exception of the mode Echo, which now
has 800 ms of maximum delay time (V2's Echo has 600 ms).
Same compact footprint as Specular V2.
Table of Contents
* Important ‐ must read *
CHAPTER 1 ‐ Overview
User Manual
S P E C U L A R
V 3
REVERB
2 ‐ 4
5 ‐ 7
8
9 ‐ 10
11 ‐ 16
17 ‐ 18
19
1
2
Advertisement
Table of Contents

Related Manuals for GFI System SPECULAR REVERB V3


Summary of Contents for GFI System SPECULAR REVERB V3
- Page 1 User Manual S P E C U L A R REVERB Table of Contents 1. Overview 2 ‐ 4 2. Operation 5 ‐ 7 * Important ‐ must read * 3. Kill Dry Function 8 4. Assigning Parameters for Expression Control 9 ‐ 10 5. Modes / Algorithms 11 ‐ 16 6. Auto Intensity Swell 17 ‐ 18 7 Factory Reset 19 CHAPTER 1 ‐ Overview What’s new in Specular V3 : Expression Pedal / Tap‐Tempo pedal input ...
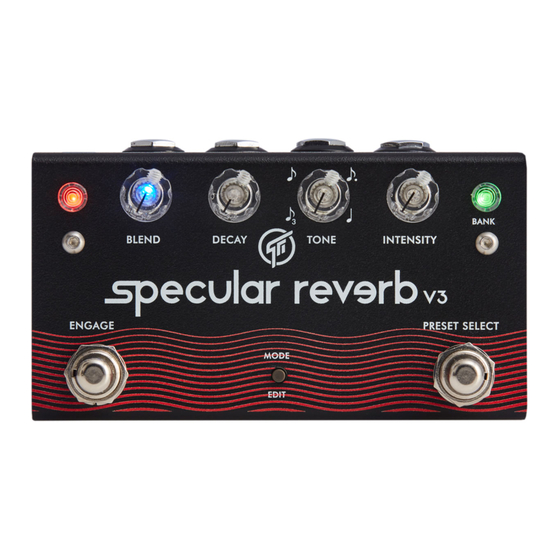
- Page 2 Illuminated knobs indicates patch number : 1‐2‐3‐4 Patch‐1 Patch‐2 Patch‐3 Patch‐4 Modes indicator LED Bank indicator LED Green ‐ Bank 1 LED COLOR MODES Red ‐ Bank 2 SPATIUM MODULATED SHIMMER ECHO TREMBLE VOICES INFINITY Engage/Bypass switch Preset Select switch Mode/Edit button Mono Input 2.1 mm use this if using only 1 input negative‐center EXPRESSION PEDAL Stereo cable (TRS plug) * It is also possible to use a stereo cable (TRS plug) with the Tap‐Tempo pedal, but you mono cable (TS plug)* need to make sure the female socket jack on the pedal is TRS but wired for mono connec‐...
- Page 3 CHAPTER 2 ‐ Operation From this point onward : [Engage] will refer to the Engage footswitch, [Preset Select] will refer to the Preset Select switch, and [Mode/Edit] will refer to the Mode/Edit push button Preset System The 8 preset locations are organized in 2 banks, where each bank contains 4 patches. BANK 1 BANK 2 Patch 1 Patch 2 Patch 3 Patch 4 Patch 1 Patch 2 Patch 3 Patch 4 SAVE PRESET 1. Tap [Preset Select] as many times as needed to reach the desired preset location. 2. Hold [Engage] until the Preset LED flashes 3x. LOAD PRESET 1. Tap [Preset Select] to select the desired preset location. 2. Tap [Engage] once to load the selected preset. Presets are selected by going through each location in the ‘Up’ direction (1, 2, 3, …), while going through these steps the sound does not get updated until selection is confirmed by pressing [Engage]. ...
- Page 4 MODES 1. Tap [Modes / Edit] to browse through the 7 modes. TAP TEMPO Tap‐Tempo is available only when using the Echo algorithm. To initiate temp‐tempo press and hold [Preset Select], when the Tempo LED (Bank LED) stops flashing you can start tapping the desired tempo on [Preset Select]. You may set the subdivision using the TONE knob. 8th‐note Dotted‐8th 8th‐note Triplets Quarter‐note T O N E Set the knob’s cursor to point to any one of the four subdivision symbols, do tap‐tempo and the resulting tempo shall be subdivided as per indicated subdivision. CHAPTER 3 ‐ Kill Dry Function Kill‐Dry function is activated by turning the BLEND knob all the way to maximum value (clockwise direction). ...
- Page 5 CHAPTER 4 ‐ Assigning Parameters for Expression Control You can assign up to 4 parameters to be controlled by the expression pedal, and these assignments can be specified on per‐preset basis. You can make changes to the assignment in the EDIT mode. Entering EDIT mode : Press and hold [Mode / Edit]. When the Modes LED starts blinking the pedal has entered EDIT mode where you can make changes to the parameter assignment. In EDIT mode the four knobs act like switches, turning the knobs to anywhere above the 12 o’clock direc‐ tion assigns that knob for expression control, and turning the knobs to anywhere below the 12 o’clock direction disables expression control on that knob. Parameter NOT assigned Parameter assigned to expression control to expression control for example you want to assign the expression pedal to control the Blend and Intensity parameter : turn the Blend and Intensity knobs to anywhere above the 12 o’clock direction and turn all the other knobs to anywhere below the 12 o’clock direction . ON OFF OFF ON BLEND ...
- Page 6 CHAPTER 5 ‐ Modes / Algorithms Spatium This is the ‘mother’ reverb whose basic character is shared by all other modes in this pedal. The design is influenced more by psychoacoustic principles rather than geometric representation (room, hall, chamber, etc.). In general, we thrived for a reverb that sounds good over the whole span of Decay settings, this yields a versatile reverb that can be used to achieve anything from subtle ambience, medium sized room, all the way to very large majestic spaces with seemingly endless reverb tails. ...
- Page 7 Echo this mode is unique compared to the other atmospheres in the sense that it’s not ‘reverb with echoes added in’, instead, it’s a ‘reverbed echo’. The effect that is in focus here is the echo, with reverb being the additive component. controls reverb level BLEND DECAY TONE INTENSITY controls echo regeneration controls echo time controls echo level This is the only modes in the pedal that can use tap‐tempo. See page 5 for information. Maximum delay time : 800 ms. Tremble adds amplitude modulation (tremolo) to the reverb. Only the reverberated signal is affected, while the direct signal remains intact. The result is a very interesting pulsating ambience that injects rhythm to the standard reverb sound. controls reverb level BLEND DECAY TONE INTENSITY controls Tremolo intensity (depth) standard reverb control controls Tremolo speed. ...
- Page 8 Voices adds a pitch‐shifted secondary voice on top of the late reverberation. There are three interval choices : Unison (no shift), Perfect Fifth (7 semitones), and Octave (12 semitones). The Intensity knob is parti‐ tioned into 3 regions, each region represents a distinct voice. BLEND DECAY TONE INTENSITY controls voice selection standard reverb control Perfect Fifth Unison Octave (no pitch shift) INTENSITY Infinity This mode allows you to capture a brief snapshot of the sound you are playing, and hold it indefinitely, then you can play over it (with reverberation). Later on, you can fade out the sustained sound, and imme‐ diately fade in a new one. Here’s how you do it : 1. Adjust Blend and Decay knob to get the desired amount of reverb mix and reverb time. Leave Damping and Intensity knobs at midpoint. 2. Press and hold [Select / Atmosphere], when both LEDs starts flashing the pedal began to continuously capture a snapshot of whatever you are playing. When you release the footswitch, the pedal will take the last 0.25 seconds of the captured sound and hold it indefinitely. ...
- Page 9 CHAPTER 6 ‐ Auto Intensity Swell When you activate this feature the pedal automatically sweeps the Intensity parameter to the maximum value, hold it there, and sweeps it back to the previously set value ‐ It’s like having someone turns the INTENSITY knob while you’re playing. Used judiciously, this feature introduces useful dynamic elements to the delay texture. ENGAGE PRST SELECT Press and hold [Preset Select]. current value ‐ The parameter controlled by INTENSITY knob gradu‐ ally sweeps to maximum value (as if someone slowly turns the Intensity knob all the way up). As long as you hold the footswitch down, the Intensity parameter stays at its maximum value and both LEDs flash continuously. ...
- Page 10 Output impedance : 500 Ohm. Web : www.gfisystem.com GFI System Current consumption : ~ 100 mA. Jakarta, Indonesia. Weight : 0.5 Kg (1.0 lbs). Dimension : 12 (L) x 6.5 (W) x 3.6 (H) cm ...
Need help?
Do you have a question about the SPECULAR REVERB V3 and is the answer not in the manual?
Questions and answers
The display on my specular tempus is blank what do I do
If the display on your GFI System Specular Reverb V3 is blank, you should perform a hard reset. To do this:
1. Unplug the pedal.
2. Press and hold both footswitches (Engage and Preset Select).
3. While holding the switches, restore power to the pedal.
This will reset the pedal to factory default settings and may fix display or functionality issues.
This answer is automatically generated
Can I do an update I'm running the first version
The user manual does not mention an update path from the first version to the GFI System SPECULAR REVERB V3. It only states differences between V2 and V3.
This answer is automatically generated