Table of Contents
Advertisement
Advertisement
Table of Contents

Related Manuals for Keysight Technologies Ixia XGS12


Summary of Contents for Keysight Technologies Ixia XGS12
- Page 1 XGS12 Chassis Platform Assembly Guide Release 9.05 ...
- Page 2 A WARNING notice denotes a hazardous without prior agreement and written https://support.ixiacom.com/support- situation that, if not avoided, could result consent from Keysight Technologies, Inc. services/warranty-license-agreements. in death or serious injury. as governed by United States and The license set forth in the EULA international copyright laws.
- Page 3 Contact Us Ixia headquarters 26601 West Agoura Road Calabasas, California 91302 +1 877 367 4942 – Toll-free North America +1 818 871 1800 – Outside North America +1.818.871.1805 – Fax www.ixiacom.com/contact/info Support Global Support +1 818 595 2599 support@ixiacom.com Regional and local support contacts: APAC Support +91 80 4939 6410 support@ixiacom.com...
-
Page 4: Table Of Contents
Contact Us About this guide Note icons and messages Typographical conventions Textual conventions Chapter 1 Introduction Chapter 2 XGS12 Chassis Modules Chapter 3 Install XGS12 Chassis Unpack and Mount the Chassis Remove and Insert Processor Module Remove and Insert Power Supply Module Remove and Insert Fan Module Chapter 4 Log on to XGS12 Chassis Chapter 5 XGS12-SD Configuration... - Page 5 Chapter 8 Troubleshooting LED Indicators IP Addressing Issues Troubleshooting Licensing Issues – v –...
-
Page 6: About This Guide
About this guide This section explains the notational and typographical conventions used in this documentation, and provides a list of related documentation. Section contents: Note icons and messages Typographical conventions Textual conventions Note icons and messages The following table describes the note icons and messages used in this document. Name Icon Description... -
Page 7: Textual Conventions
About this guide Convention Description Italic text Italic text indicates: A text reference to the name of a field, option, or parameter. Document and book titles. The first reference to a new term. Special identification or emphasis in a statement. monospace Text shown in a monospace font is used to indicate: text... -
Page 8: Chapter 1 Introduction
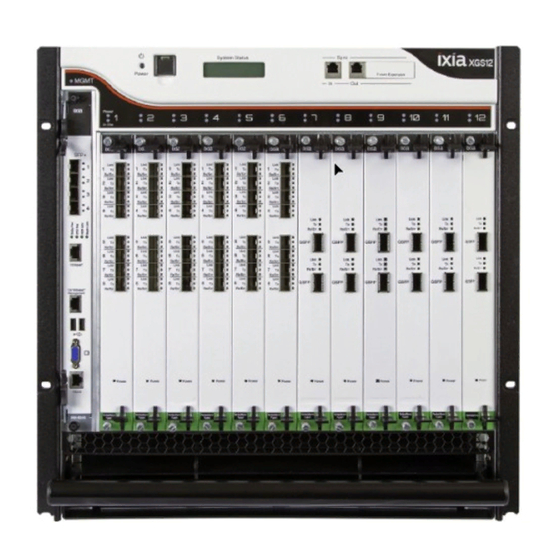
Introduction HAPTER This document describes how to install the XGS12 chassis and its various modules. The XGS12 Chassis is the next generation high performance platform capable of supporting all XM form factor load modules, including full chassis configurations of the Xcellon load modules. It is a 12-slot chassis with high speed backplane (160 Gbps between each adjacent two cards) designed for aggregation across load modules. - Page 9 Chapter 1 Introduction – 2 –...
-
Page 10: Chapter 2 Xgs12 Chassis Modules
XGS12 Chassis Modules HAPTER The modules that make up the chassis are as follows: Chassis Frame Module Chassis Fan Module Chassis Power Supply Module Chassis Processor Module The Processor Module is plugged into the front of the chassis, in slot 0. The power supplies and fans are accessible from the rear of the chassis. - Page 11 This page intentionally left blank. – 4 –...
-
Page 12: Chapter 3 Install Xgs12 Chassis
Install XGS12 Chassis HAPTER The following sections describe the installation procedure: Unpack and Mount the Chassis on page 7 Remove and Insert Processor Module on page 8 Remove and Insert Power Supply Module on page 9 Remove and Insert Fan Module on page 11 XGS12 Chassis Installation Precautions The following precautions should be followed while installing the XGS12 chassis: A two person lift is recommended when installing the chassis into the rack. - Page 13 Chapter 3 Install XGS12 Chassis Operator intervention may be required to power cycle the XGS12 chassis or restart a software program in the event the XGS12 chassis operation is upset or stopped by electrostatic discharge. – 6 –...
-
Page 14: Unpack And Mount The Chassis
Chapter 3 Install XGS12 Chassis XGS12 Rack Screw Mount Locations Unpack and Mount the Chassis 1. Cut tape and open the carton. 2. Remove accessories box, top foam inserts, and side packing inserts. 3. Lift chassis out of the carton. 4. -
Page 15: Remove And Insert Processor Module
Chapter 3 Install XGS12 Chassis WARNING :The weight of the chassis components are as follows: Empty chassis with air baffles = 70 lbs Empty chassis without air baffles = 48 lbs 3 power cords = 6 lbs Power supply assembly = 29 lbs Fan Assembly = 10 lbs CPU card = 10 lbs Do not attempt to lift the fully assembled chassis. -
Page 16: Remove And Insert Power Supply Module
Chapter 3 Install XGS12 Chassis 1. Unfasten the screws. 2. Pinch the clips and then pull outwards. Removing processor module To insert the processor module: 1. Slide the module into the slot. 2. Pinch on the clips and push them in. 3. - Page 17 Chapter 3 Install XGS12 Chassis To remove the power supply module: 1. Loosen the thumbscrew in the upper left corner of the power supply module. 2. Pull the power clamp handles. 3. Hold the two handles provided on the power supply module and pull them. To remove the individual power supplies: 1.
-
Page 18: Remove And Insert Fan Module
Chapter 3 Install XGS12 Chassis 4. Tighten the thumbscrew at the upper left corner of the power supply module. 5. Replace the rear cover and fasten it with the screws. Remove and Insert Fan Module XGS12 Chassis Back View The fan module is located on the rear side of the chassis. For details see the image To remove the fan module: 1. - Page 19 Chapter 3 Install XGS12 Chassis To install the fan module: 1. Push the rubber grommets over the metal standoff on the chassis. 2. Fasten the four screws tightly. – 12 –...
-
Page 20: Chapter 4 Log On To Xgs12 Chassis
Log on to XGS12 Chassis HAPTER The Username for an XGS12 (Windows 7 and Windows 10) remote desktop session is ixia and the password is the CPU module serial number found on the sticker located in front of the CPU module. Note: The chassis windows wallpaper is not displayed. - Page 21 This page intentionally left blank. – 14 –...
-
Page 22: Chapter 5 Xgs12-Sd Configuration
XGS12-SD Configuration HAPTER This section describes the tasks needed to configure the XGS12-SD chassis. In this section: Connecting the XGS12-SD Processor module Initial Configuration XGS12-SD – 15 –... -
Page 23: Connecting The Xgs12-Sd Processor Module
Chapter 5 XGS12-SD Configuration Connecting the XGS12-SD Processor module This section describes the process of connecting the XGS12-SD Processor module. To connect the module you need to do the following: 1. Insert and remove the Processor Module. 2. Connect the RJ45 management port (4) as the designated management port to your lab management switch. -
Page 24: Initial Configuration Xgs12-Sd
Chapter 5 XGS12-SD Configuration Initial Configuration XGS12-SD To perform initial system configuration for the XGS12-SD chassis, do the following: 1. Connect the monitor, USB mouse and keyboard, and then start the chassis. 2. When the chassis boots up, log on to the chassis. The user name is ixia and the password is the CPU module serial number found on the sticker located at the back of the chassis. - Page 25 Chapter 5 XGS12-SD Configuration 4. Select Properties . Select Internet Protocol Version 4 (TCP/IPv4) . 5. Select Properties and then select the Use the following IP address option. 6. Enter the IP address, subnet mask and default gateway. – 18 –...
-
Page 26: Chapter 6 Ixia Test Applications Support
Ixia Test Applications Support HAPTER This section provides the details of the Ixia Test Applications supported by XGS12 chassis platform. In this section: Ixia Applications support for XGS12-SD – 19 –... -
Page 27: Ixia Applications Support For Xgs12-Sd
Chapter 6 Ixia Test Applications Support Ixia Applications support for XGS12-SD This section provides the details of the Ixia Test Applications supported by XGS12-SD chassis. IxLoad When running the IxLoad client application to add your new XGS12-SD chassis in the Chassis Chain pane, the IxOS Windows machine IP address should be used: IxNetwork To start IxNetwork and assign ports from an :XGS12-SD chassis, do the following:... - Page 28 Chapter 6 Ixia Test Applications Support Note: It is recommended that you periodically check the Ixia compatibility matrix https://support.ixiacom.com/support-overview/product-support/product-compatibility- matrix ) to determine the correct Ixia software application versions that are validated for interoperability. – 21 –...
- Page 29 This page intentionally left blank. – 22 –...
-
Page 30: Chapter 7 Common Administrative Tasks
Common Administrative Tasks HAPTER This topic describes, for reference, some of the common tasks that system administrators will perform on the XGS12 system. In this section: Start a Windows Remote Desktop Connection – 23 –... -
Page 31: Start A Windows Remote Desktop Connection
Chapter 7 Common Administrative Tasks Start a Windows Remote Desktop Connection To start a Remote Desktop Connection session to the XGS12 system: 1. If you do not know the IxOS IP address, ping the unit's host name. The host name appears on the label on the back of the unit. The ping command will return the IxOS IP address. - Page 32 Troubleshooting HAPTER This section provides guidance for interpreting the operational status of your XGS12 unit, and troubleshooting issues that may arise. If you need assistance, contact Ixia Technical Support using the contact information provided in Contact Us on page iii In this section: LED Indicators IP Addressing Issues Troubleshooting Licensing Issues...
- Page 33 Chapter 8 Troubleshooting LED Indicators The XGS12 chassis provides LED indicators that provide a visual presentation of the operational status of the device and its individual ports. LED/LCD Display The XGS12-SD chassis has front panel LEDs for each load module slot. The following table describes the purpose and meaning of each indicator: Label Color...
- Page 34 Chapter 8 Troubleshooting Color Description Processor module - Link LED Green Port has link. Ethernet LEDs for Note: Link and Activity each port LEDs are included for all Ethernet ports. Act LED Flashes when port has activity. – 27 –...
- Page 35 Chapter 8 Troubleshooting IP Addressing Issues The XGS12-SD chassis model requires the following management IP addresses: the IxOS address If your network implements a DHCP service, the XGS12 IP addresses will automatically be assigned by that service, unless you choose to assign static IP addresses instead. When assigning static IP addresses, you must observe the following requirements: The two management IP addresses must be in the same subnet.
- Page 36 Chapter 8 Troubleshooting Troubleshooting Licensing Issues Following is a list of licensing issues that can result in operational problems: Licensing: An IxOS license is required to run both BreakingPoint and IxLoad. License invalidation: Time discrepancies between the network and theXGS12 system will invalidate the installed licenses.
- Page 37 This page intentionally left blank. – 30 –...
- Page 38 © Keysight Technologies, 2020 Ixia, a Keysight Business 26601 West Agoura Road Calabasas, California 91302...
Need help?
Do you have a question about the Ixia XGS12 and is the answer not in the manual?
Questions and answers