Advertisement
Quick Links
PROGAUGE-
Tachometer
USER'S GUIDE
Thank you for purchasing this PIVOT product.
Please read these instructions carefully before installing or using this device.
Please do not lose this user's guide, as you will held liable for the cost of reissuing it.
Improper use or disregard of these warnings
WARNING
may result in the injury or death of people.
●Do not work in areas where there is
excessive exhaust
Due to vehicle exhaust emission poisoning
or fire may result in a damage to humans.
● D u r i n g i n s t a l l a t i o n b e s u r e t o
remove the minus cable from the
battery
So as to prevent fire and damage resulting
from shorting of circuits, etc...
●Do not operate while driving
Operating or checking the display during
driving may cause an accident; please use
with the utmost consideration for safety.
CONTENT
WARNING/CAUTION/CONTENTS .........
CAUTION・NOTE
CAUTION
NOTE・CONTENTS
CONTENTS
FEATURES .......................................
FEATURES
FEATURES
PART NAMES ....................................
PART NAMES
PART NAMES
CONNECTING THE WIRES ..................
CONNECTING THE WIRES
CONNECTING THE WIRES
METER INSTALLATION ........................
METER INSTALLATION
METER INSTALLATION
SETTINGS .......................................
SETTINGS
SETTINGS
BASIC OPERATIONS ...........................
BASIC OPERATIONS
BASIC OPERATIONS
TROUBLESHOOTING ........................
TROUBLESHOOTING
TROUBLESHOOTING
FEATURES
PT6 units can be connected easily to Toyota, Daihatsu and MINI models by simply connecting the coupler to the
diagnostic monitor connector and for all other model cars be wired directly.
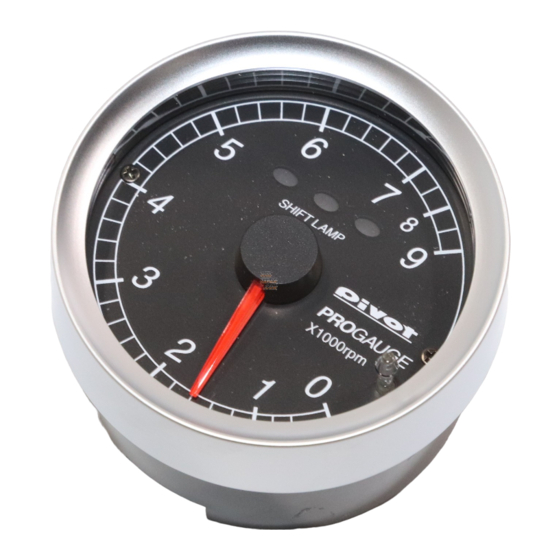
Our PT6 is a compact (only 60ø) tachometer with a built-in sequential shift lamp
like those used in F-1 racing that can be used in all types of driving from sports
driving to eco-driving.
1 8
Compatible with
wide range
cylinder
All 1-8 cylinder cars compatible.
Function
Two types of display
Two types of display; Real-time / Peak reading.
R EA L
The engine revolution can be seen in real time.
P EAK
Show the peak reading after the engine begins running.
6
7
8
5
SHIFT LAMP
4
PRO
Real display
Shift Lamp
(Setting range: 3000–9000 rpm, 200 rpm unit)
In order to prevent over-revving while shifting, an F-1 sequential type shift
has been included, which shows a green lamp 1000 rpm before the set
engine rpm and a red lamp at the shift point.
Normal
1000 rpm before
All lamps off
The lamp in the middle
lights up in green
Opening Demo
When the key is turned ON the needle will move to the extreme left sever-
al times for searching position. Then it will move to the maximum value
and finally to reading for current measurement item.
PT6
●Do not crush the cable
Please be careful that the cable does
not get crushed by the seat rail or car
door steel plate, nor cut by any sharp
steel plate as this may cause a poor
c o n n e c t i o n o r a n e l e c t r i c s h o r t
leading to fire or other danger.
● Please securely fasten the
product to a stable place and
be sure to store bundle away all
wires with tape, etc...
It is very dangerous to pull tangled
wires by force or allow tangled wires
to interfere with driving.
Check the contents
1
1
1
2
3
1
1
1
2
All-in-one Unit
types of Display
Two types of display; Real / Peak.
No separate controller necessary.
6
7
8
5
SHIFT LAMP
4
PRO
Peak display
Shift Point
The lamps to the left
and right blink red
CAUTION
●Do not use electrotap
Wiring should be carried out using the
attached "Cut Connector" or by soldering,
make sure to securely insulate all wiring
parts with insulation tape, and confirm
that no wires are sticking out.
●This product is for DC12V cars
Installation cannot be carried out on cars
with other voltage batteries.
●Just after installation do not exert
any strong force on the product
When double-sided tape is used for an
installation be warned that when hot the
tape temporarily losses adhesiveness.
Double-sided
Meter
Adjustable Stand
Tapes ×2
4-pin OBD
White Extension
Power Cable with fuse 3A
Wire
No Wiring
(some car models)
With some car models it is possible to connect
directly using the coupler to the diagnostic
monitor connector.
Opening Holes
Fastening with double-sided tape
means no need for opening holes.
POINT
Some tips for setting the Shift Point !
For Sports driving
The shift point should be calculated by subtracting the over-rev at shifting from the rpm at which
the maximum engine torque occurs.
Note: In general it would be about 90% near the red-zone. (e.g., If the red-zone is 7500 rpm, then use 6800 rpm.)
For Eco-driving
When using for Eco-driving, it is best to use a lower rpm point as the shift point, so set the point
at 1000 rpm higher than normal and shift when the green lamp comes on.
Note: The above is for your reference only; please make settings as desired.
PART NAMES
1
Switch
Use to change modes and/or settings.
2
Shift Lamp (LED)
Blinks at the set rpm.
3
Needle
Show the current values.
4
Illumination
(night illumination)
Normally illuminated when on display.
5
Wide Scale Display
The display has been made easier to read
by enlarging the 500 to 7000 rpm area.
(PT6 / As of February, 2021 No.10)
PROGAUGE
STEPPING DRIVE
ø60
TACHO METER
Improper use or disregard of these warnings may cause injury
to persons, damage the product and other things.
●If you are not confident about doing the wiring
yourself, please consult your local pro shop or garage
When installing this product, we recommend that if techni-
cal knowledge becomes necessary please consult a
qualified mechanic.
●Do not install the product in any place subject to
high temperature or any place where water may
be splashed
Make sure to replace all screws and parts to
their original place
●Do not install the product in a place where it will
cause distraction
●Do not, in any manner, process, take apart, or
make changes to this product.
Cushion
Allen Wrench
Tape
Earth
User's Guide,
Zip tie
Terminal
Wiring Chart
SHIFT LAMP
The sequential lamp system gives you
warning lights as you approach the set rpm.
No need for
Translucent
Illumination
The translucent LED systempro-
vides a clear even display.
6
7
8
9
5
SHIFT LAMP
5
4
PROGAUGE
X1000rpm
3
0
1
2
Cut Connectors
×4
2
1
3
1
Advertisement

Subscribe to Our Youtube Channel
Related Manuals for Pivot PROGAUGE-PT6


Summary of Contents for Pivot PROGAUGE-PT6
- Page 1 Tachometer PROGAUGE USER’S GUIDE STEPPING DRIVE Thank you for purchasing this PIVOT product. ø60 TACHO METER Please read these instructions carefully before installing or using this device. Please do not lose this user’s guide, as you will held liable for the cost of reissuing it.
- Page 2 CONNECTING THE WIRES Connect to the Power and RPM signal = Use cut connector (or solder) Car models with a ● or ◎ mark in the : Type For Popular Models (other than TOYOTA, DAIHATSU and MINI) “ECU Wiring Diagram List” :...
- Page 3 METER INSTALLATION Install in an easy-to-view location. Install with the adjustable stand Installation with the cushion tape Holder band Double-sided tape (included) Hexagonal Hexagonal bolt bolt Clean to remove with washer oil & dust Fasten using the 1. Installing the adjustable stand 2.
- Page 4 The auto-power window function and/or This is due to the minus terminal on the battery being Re-connect the minus terminal and follow re-setting instructions for any other electronic devices are re-set. disconnected. affected devices. PIVOT CORPORATION TEL0263-46-5901 87-3, Shimookada Okada, Matsumoto-shi, Nagano, 390-0313 Japan...
Need help?
Do you have a question about the PROGAUGE-PT6 and is the answer not in the manual?
Questions and answers