
Related Manuals for PureTools PT-PMS-62S


Summary of Contents for PureTools PT-PMS-62S
- Page 1 User Manual PT-PMS-62S User Manual 6x2 HDMI 2.0 Seamless Matrix Switcher Model PT-PMS-62S Designed in Germany © 2019 PureLink GmbH All rights reserved. V1.0...
- Page 2 User Manual PT-PMS-62S Preface Read this user manual carefully before using this product. Pictures shown in this manual are for reference only. Different model layouts and specifications are subject to the physical product. This manual is for operation instructions only, not for any maintenance usage.
- Page 3 PT-PMS-62S REACH | 1907/2006/EU ROHS | 2011/65/EU PureLink hereby declares that this product PureTools PT-PMS-62S complies with Directives 1907/2006/EU und 2011/65/EU. EMC / LVD (Electro Magnetic Compatibility / Low Voltage Directive) PureLink GmbH hereby declares that this product PureTools PT-PMS-62S complies with Directives 2014/30/EU and 2014/35/EU.
- Page 4 User Manual PT-PMS-62S SAFETY PRECAUTIONS To ensure the best from the product, please read all instructions carefully before using the device. Save this manual for further reference. Unpack the equipment carefully and save the original box and packing material ...
-
Page 5: Table Of Contents
1. Product Introduction ........................1 1.1 Features ..........................1 1.2 Package List ........................2 2. Specification ..........................3 2.1 PT-PMS-62S Matrix Switcher ..................3 2.2 PT-HDBT-200-RX HDBaseT Receiver ................5 3. Panel Description ........................6 3.1 Matrix Switcher Front Panel ................... 6 3.2 Matrix Switcher Rear Panel .................... - Page 6 User Manual PT-PMS-62S 7.4.3 Relay Control ...................... 20 7.5 CEC Control ........................21 7.6 Tags Setting ........................24 7.7 RS232 Control ........................ 25 7.8 Network Setting ......................27 7.9 Password Setting ......................28 7.10 GUI Upgrade ......................... 29 8. RS232 Control ........................... 30 8.1 RS232 Control Software ....................
-
Page 7: Product Introduction
User Manual PT-PMS-62S 1. Product Introduction Thanks for choosing the PT-PMS-62S 6x2 multi-format seamless presentation matrix switcher with one PT-HDBT-200-RX receiver! The matrix switcher simplifies meeting room and presentation space system integration by providing three HDMI inputs, one VGA input, one DP input, one USB-C input, one HDBaseT output and one HDMI output. -
Page 8: Package List
Controllable via RS232 local and pass-through, IR local and pass-through, TCP/IP, relay, CEC and on OSD. 1.2 Package List 1x PT-PMS-62S 6x2 HDMI 2.0 Seamless Matrix Switcher 2x Mounting Ears with 6 Screws 4x Plastic Cushions ... -
Page 9: Specification
User Manual PT-PMS-62S 2. Specification 2.1 PT-PMS-62S Matrix Switcher Video Input Video Input (3) HDMI, (1) VGA, (1) Display Port, (1) USB-C (3) Type-A female HDMI, (1) 15-pin female VGA, (1) Type-A female Video Input Connector Display Port, (1) Type-C USB 3.0... - Page 10 User Manual PT-PMS-62S Audio Output (1) Balanced audio (L+R) for 1.HDMI output audio de-embedding (1) Digital SPDIF audio (L+R) for 1.HDMI output audio de-embedding Audio Output (1) Balanced audio (L+R) for 2.HDBT output audio de-embedding (1) Digital SPDIF audio (L+R) for 2.HDBT output audio de-embedding...
-
Page 11: Hdbt-200-Rx Hdbaset Receiver
User Manual PT-PMS-62S General Power Consumption 71W (Max) Dimension (W*H*D) 436.4mm x 44mm x 356.5mm Net Weight 2.8KG 2.2 PT-HDBT-200-RX HDBaseT Receive Receiver (RX) Input (1) HDBT IN Input Connector (1) RJ45 Output (1) HDMI Output Connector (1) Type-A female HDMI... -
Page 12: Panel Description
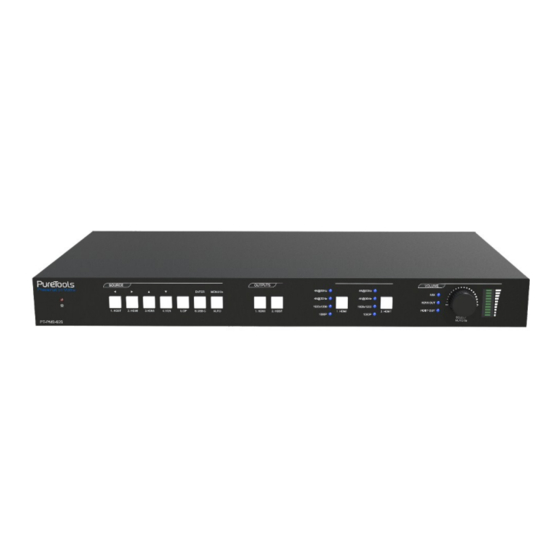
User Manual PT-PMS-62S 3. Panel Description 3.1 Matrix Switcher Front Panel SOURCE OUTPUTS RESOLUTION VOLUME Presentation Matrix PT-PMS-62S ① Power LED: The LED illuminates red when the device is powered on. ② SOURCE: Total seven buttons with blue backlight. 1. HDMI input selector / Left Key for On Screen Display control (OSD). -
Page 13: Matrix Switcher Rear Panel
User Manual PT-PMS-62S 3.2 Matrix Switcher Rear Panel INPUTS AUDIO OUT CONTROL NO COM NC NO COM NC RS232 RELAY1 RELAY2 IR EYE TCP/IP FIRMWARE OUTPUTS 1. HDMI 2. HDMI 3. HDMI AUDIO 4. VGA 5. DP 6. USB-C 1. HDMI 2. - Page 14 User Manual PT-PMS-62S ③ AUDIO OUT: 1: One balanced audio output (5-pin) and one digital SPDIF audio output for 1.HDMI output audio de-embedding. 2: One balanced audio output (5-pin) and one digital SPDIF audio output for 2.HDBT output audio de-embedding.
-
Page 15: Receiver Front And Rear Panel
User Manual PT-PMS-62S 3.3 Receiver Front and Rear Panel HDBT IN DC 12V UPDATE B UPDATE A CTRL ① MODE SWITCH: Put the Mode switch in the CTRL position for normal operation and to allow RS232 control pass-through. Put the switch in the UPDATE A position to update the Valens IC program. -
Page 16: System Connection
User Manual PT-PMS-62S 4. System Connection 4.1 Usage Precaution Make sure all components and accessories included before installation. System should be installed in a clean environment with proper temperature and humidity. All of the power switches, plugs, sockets, and power cords should be insulated ... -
Page 17: Button Control
User Manual PT-PMS-62S 5. Button Control 5.1 Manual Switching When the switcher is in manual switching mode, the AUTO button LED goes out. Please follow the below steps to switch input source to output channel. 1) Press any one of six input buttons to select input source, and the corresponding button LED turns blue. -
Page 18: Resolution Selection
User Manual PT-PMS-62S Reboot: If power is restored to the switcher, it will automatically reconnect the input before powered off. Source removed: When an active source is removed, the switcher will switch to the first available active input starting at 1.HDMI input. -
Page 19: Ir Remote Control
User Manual PT-PMS-62S 6. IR Remote Control Connect IR receiver to the IR EYE port, the switcher can be controlled by the following IR remote. ① Select input source ② Press AUTO to enable auto switching mode, and then select output channel. -
Page 20: Gui Control
User Manual PT-PMS-62S 7. GUI Control The switcher also be controlled via TCP/IP. The default IP settings are: IP Address: 192.168.0.178 Subnet Mask: 255.255.255.0 Type 192.168.0.178 in the internet browser, it will enter the below log-in webpage: Username: admin Password:... -
Page 21: Video Switching
User Manual PT-PMS-62S 7.1 Video Switching HDMI OUTPUT: Switch the selected input source to HDMI output. Click AUTO to enable/disable auto switching mode. HDBT OUTPUT: Switch the selected input source to HDBT output. Click AUTO to enable/disable auto switching mode. -
Page 22: Resolution Selection
User Manual PT-PMS-62S 7.2 Resolution Selection HDMI OUTPUT: Select the HDMI output video resolution. HDBT OUTPUT: Select the HDBT output video resolution. ... -
Page 23: Audio Control
User Manual PT-PMS-62S 7.3 Audio Control 1. HDMI Embedded: Select the external balanced audio (5-pin) to be embed in 1.HDMI video input. 2. HDMI Embedded: Select the external balanced audio (5-pin) to be embed in 2.HDMI video input. -
Page 24: Configuration
User Manual PT-PMS-62S 7.4 Configuration PoC Setting 7.4.1 Turn on or off PoC for HDBT output port. ... -
Page 25: Edid Management
User Manual PT-PMS-62S EDID Management 7.4.2 Select the compatible built-in EDID for the selected input source. Upload user-define EDID by the below steps: Step 1: Prepare the EDID file (.bin) on the control PC. Step 2: Select the user-defined. -
Page 26: Relay Control
User Manual PT-PMS-62S Relay Control 7.4.3 Set Momentary or Latching relay control mode for Relay 1 and Relay 2. After setting the auto stop time, click Momentary, the projector screen starts to be rolled up or dropped down until the auto stop time is up. -
Page 27: Cec Control
User Manual PT-PMS-62S When clicking Latching, the NO connection closes, and the NC connection opens. When the delay time is up, the NO connection opens, and the NC connection closes. 7.5 CEC Control If the input source devices and display devices support CEC, they can be controlled by the below control buttons to replace IR remote. - Page 28 User Manual PT-PMS-62S 2) Display Control Select the output display which needs to be controlled, and then press function buttons.
- Page 29 User Manual PT-PMS-62S 3) User-defined The switcher also provides user-defined CEC functions, the CEC command can be edited and saved in the Trigger box. Select the input source, and then type CEC command in the Trigger 1 or Trigger ...
-
Page 30: Tags Setting
User Manual PT-PMS-62S 7.6 Tags Setting INPUTS: Modify the label of input sources. Preset: Modify the label of presets. ... -
Page 31: Rs232 Control
User Manual PT-PMS-62S 7.7 RS232 Control 1) Port Mode HDBT Transmitter Pass Through: Establish RS232 pass-through communication between the switcher and HDBaseT receiver (e.g.PT-HDBT-200-RX). The RS232 port of the switcher can be used to transfer commands to control the third-party device which is connected to the HDBaseT receiver. - Page 32 User Manual PT-PMS-62S 2) Command Select Local or HDBT Out control mode. Local: Send RS232 commands to control the local third-party which is connected to the RS232 port of the switcher. HDBT Out: Send RS232 commands to control the far-end third-party (e.g.
-
Page 33: Network Setting
User Manual PT-PMS-62S 7.8 Network Setting Static IP or Dynamic Host Configuration Protocol (DHCP). Modify the static IP Address, Subnet Mask, and Gateway. ... -
Page 34: Password Setting
User Manual PT-PMS-62S 7.9 Password Setting Modify the login password. Lock or unlock the front panel buttons. ... -
Page 35: Gui Upgrade
User Manual PT-PMS-62S 7.10 GUI Upgrade Please visit at http://192.168.0.178:100 for GUI online upgrade. Type the username and password (the same as the GUI log-in setting, modified password will be available only after rebooting) to login the configuration interface. After that, click Administration in the source menu to get to Upload Firmware as shown below: Select the desired update file and press Apply, it will start upgrading then. -
Page 36: Rs232 Control
User Manual PT-PMS-62S 8. RS232 Control Connect the RS232 port to control device (e.g. PC) with RS232 cable. The switcher can be controlled by sending RS232 commands. 8.1 RS232 Control Software Here take the software docklight as an example. Installation ... - Page 37 User Manual PT-PMS-62S Close this window by clicking “OK”. The next pop-up window can also be closed with "Continue". An empty project is enough to send and receive commands easily (The default setting is always “Start with a blank project / blank script“) Close this window by clicking “Continue”.
- Page 38 User Manual PT-PMS-62S Now you are in the main view, where commands are sent and feedback is received. The next step is to select the correct COM port of the PC. To do this, double-click on "COM1" in the corresponding setup window.
- Page 39 User Manual PT-PMS-62S Select the right COM port. In order to be able to send commands, open communication with the device by clicking on "Play". (1) Then the keyboard function must be activated, so that commands can be written in the "communication window".
- Page 40 User Manual PT-PMS-62S Enable the keyboard Command type in function. Sending area. Open the communication by clicking “Play”. Monitoring area, indicates if the command sent works.
-
Page 41: Rs232 Communication Command
User Manual PT-PMS-62S 8.2 RS232 Communication Command Communication protocol: RS232 Communication Protocol Baud rate: 9600 Data bit: 8 Stop bit: 1 Parity bit: none Note: In the commands, “[”and “]” are symbols for easy reading and do not need to be ... -
Page 42: Source Switching
User Manual PT-PMS-62S Source Switching 8.2.2 Command Description Feedback Example Demo Mode: AV:01->01 AV:01->02 AV:02->01 AV:02->02 AV:03->01 Switch to demo testing mode, switch AV AV:03->02 Demo. 1>1, 1>2 and so on. AV:04->01 AV:04->02 AV:05->01 AV:05->02 AV:06->01 AV:06->02 Normal Mod Cancel the current operation and return Undo. -
Page 43: Preset Setting
User Manual PT-PMS-62S Command Description Feedback Exam Report the connection status of all 01 02 03 04 inputs. Connect Y Y N N %9971. Y means the corresponding input port is 05 06 connected to a source device, N means Connect N N not. - Page 44 User Manual PT-PMS-62S Command Description Feedback Example The output [x] audio is not mixed with UnMIXOUT:[x]. HDMI1 OUT UnMIX MIX audio. Set the HDMI output audio volume to SetHDMIVol:xx. Volume of HDMI: 30. xx. xx=0~60. Increase the HDMI output audio HDMIVolume+.
-
Page 45: Output Resolution Setting
User Manual PT-PMS-62S Command Description Feedback Example Volume of HDBT: 9. %9942. Report the audio volume. Volume of HDMI: 30. Volume of MIX: 6. HDMI1 Unembedded %9943. Report the external audio status. HDMI2 Embedded Output Resolution Setting 8.2.5 Command Description... -
Page 46: Edid Management
User Manual PT-PMS-62S EDID Management 8.2.6 Command Description Feedback Example The input [x] invoke built-in EDID [y]. x=1~3, 5. EDID EDID/[x]/[y]. EDID/4/1 1080P@60Hz 4K@30Hz 4:4:4 4K@60Hz 4:4:4 Upgrade the EDID data of the input port [x]. x=1~3, 5. When the command applied, system prompts to upload the EDID file (.bin). -
Page 47: Relay Control
User Manual PT-PMS-62S Relay Control 8.2.7 Command Description Feedback Example Relay ON[X]. Turn on relay [X], X=1~2. Relay 1 ON Relay OFF[X]. Turn off relay [X], X=1~2. Relay 1 OFF Relay Set the auto stop time of relay [X] to Y Relay 1 Turn On, delay 0.0... -
Page 48: Switcher Baud Rate Setting
User Manual PT-PMS-62S Command Description Feedback Example SetVGAPicMode: PICTURE SOFT MODE SetVGAPicMode: PICTURE Set the image mode to X. X=0~3. NORMAL MODE SetVGAPicMode:X. (dynamic/standard/mild/user) SetVGAPicMode: PICTURE VIVID MODE SetVGAPicMode: PICTURE USER MODE Switcher Baud Rate Setting 8.2.9 Command Description Feedback Example... -
Page 49: Cec Control
User Manual PT-PMS-62S CEC Control 8.2.10 If the input sources and displays support CEC, they can be controlled by sending CEC commands to replace IR remote. Step 1: According to the below command to enable CEC control. Command Description Feedback Example CECON. - Page 50 User Manual PT-PMS-62S Control the input source: Command Description Example and Feedback CECI0100. CEC I[port]00. Confirm operation (Enter). [CEC]: blue ray OK. CECI0101. CECI[port]01. [CEC]: blue ray up. CECI0102. CECI[port]02. DOWN. [CEC]: blue ray down. CECI0103. CECI[port]03. LEFT. [CEC]: blue ray left.
- Page 51 User Manual PT-PMS-62S Command Description Example and Feedback CECI014B. CECI[port]4B. Forward. [CEC]: blue ray skid forward. CECI[port]4C. Backward. CECI014C. [CEC]: blue ray skid backward. CECI016C. CECI[port]6C. Power off. [CEC]: Source Power off. CECI016D. CECI[port]6D. Power on. [CEC]: Source Power on.
-
Page 52: Third-Party Device Control
User Manual PT-PMS-62S Third-party Device Control 8.2.11 The switcher supports RS232 pass-through control, the third-party device can be controlled by RS232 command, and the command format as shown below: Command Function Command Example RS232 mode selection: Y=0, Local Control: The RS232 ... - Page 53 User Manual PT-PMS-62S Command Function Command Example xxx: ASCII characters. /+3/3:123456. Y: Represents the RS232 port. Y=1: The RS232 port of switcher. Y=2: The RS232 port of HDBaseT receiver. Y=3: The RS232 port of HDBaseT transmitter. X: Represents the baud rate of ...
- Page 54 User Manual PT-PMS-62S Command Function Command Example /#3/3:01 02 03 xxxxxx: HEX characters. X: Represents the RS232 port. RS232 Port The RS232 port on the matrix switcher. The RS232 port on the far-end HDBaseT receiver. B: Represents the baud rate of ...
-
Page 55: Trigger Feedback Command Setting
User Manual PT-PMS-62S Trigger Feedback Command Setting 8.2.12 Command Function Command Example xxxxxx: Feedback command (ASCII /+A/3: Play ON 123. characters). Y: Represents the RS232 port. Y=A: When power on system, receive the feedback command from the RS232 port of switcher. - Page 56 User Manual PT-PMS-62S Command Function Command Example Report the feedback command which is sent by the RS232 port of the %9952. Port 2: RX-ON when PWON far-end HDBaseT receiver while power on system. Report the feedback command which is sent by the RS232 port of the %9931.
-
Page 57: Osd Control
User Manual PT-PMS-62S 9. OSD Control The PT-PMS-62S provides a powerful OSD operation menu which contains 3 parts: optional settings, image settings, system settings etc. There are two ways to enter OSD menu: 1) Press and hold the MENU/2s button at least two seconds on the front panel. - Page 58 User Manual PT-PMS-62S Note: When setting the Picture Mode to User, Picture Adjust and Color temp Adjust are available. SOUND MENU OPTION MENU...
- Page 59 User Manual PT-PMS-62S SYSTEM MENU INFO MENU...
-
Page 60: Panel Drawing
RELAY1 RELAY2 IR EYE TCP/IP FIRMWARE OUTPUTS 1. HDMI 2. HDMI 3. HDMI AUDIO 4. VGA 5. DP 6. USB-C 1. HDMI 2. HDMI 2. HDBT IR IN IR OUT DC 24V PT-PMS-62S Matrix Switcher 115.0 mm PT-HDBT-200-RX HDBaseT Receiver... -
Page 61: Troubleshooting And Maintenance
User Manual PT-PMS-62S 11. Troubleshooting and Maintenance Problems Potential Causes Solutions Bad quality of the Try another high quality connecting cable cable. Output image with white noise. Fail or loose Make sure the connection is connection good Check with oscilloscope or... -
Page 62: After-Sales Service
User Manual PT-PMS-62S 12. After-Sales Service If problems occur while operating the product, please use the troubleshooting and maintenance information in this manual to deal with these problems. Any transport costs are borne by the user during the warranty period. - Page 63 User Manual PT-PMS-62S...
- Page 64 User Manual PT-PMS-62S Asking for Assistance Technical Support: Phone: +49 5971 800299 -0 Fax: +49 5971 800299 -99 Technical Support Hours: 8:30 AM to 5:00 PM Monday thru Thursday 8:30 AM to 4:00 PM Friday Write to: PureLink GmbH Von-Liebig-Straße 10 D - 48432 Rheine www.purelink.de...
Need help?
Do you have a question about the PT-PMS-62S and is the answer not in the manual?
Questions and answers