Advertisement
Quick Links
Advertisement

Related Manuals for Trailer Valet RVR12


Summary of Contents for Trailer Valet RVR12
- Page 1 RVR12 OPERATING MANUAL...
-
Page 2: Controller Operation
Controller Operation NOTE: The 3 Speed Toggle ranges from fast, moderate, and slow. When operating the valet at slow speeds it may be necessary to switch to the moderate or fast speed position on the toggle when turning at 90 degrees. Factors such as terrain and incline may affect the maneuverability of the valet. - Page 3 Operating the Valet 1. Before turning on the valet, make sure that the tracks and bottom of the valet are free from obstruction. 2. Turn the valet on using the ON/OFF button. There will be a short series of beeps and then the power indicator LED around the Power button will illuminate to show the valet is on.
-
Page 4: Adjusting The Track Tension
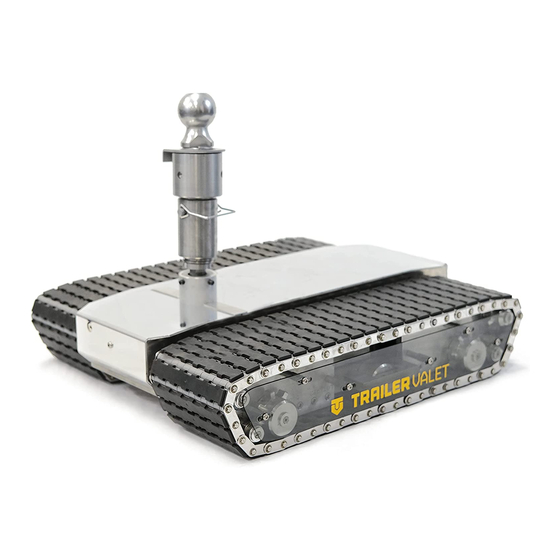
Adjusting The Track Tension Track tension may need to be adjusted after several hours of use. Follow the instructions below for each track. 1. Remove 6 track cover screws and remove the outside plastic track cover. 2. Loosen the three front rail end retainer screws. - Page 5 Attach with Coupler Set 1. If the Coupling Plate is not already installed with the Ball Base, detach the ball from the Base, slip the Coupling Plate under the ball, and reinsert into the Base. Secure tightly. 2. Place the Ball Base into the Base tower and secure with included pin. Then secure the Ball Base Tower into the slot on top of the RVR in place of the Mount Bracket Tower.
- Page 6 Adjusting The Track Tension 1. Before charging your valet, be sure the controller and valet are both turned OFF. 2. The charging indicator light on the charger should light up red once the charger is connected properly. The valet will be fully charged once the charge indicator light turns green. It is recommended to leave the valet charging when not in use.
-
Page 7: Charging The Transmitter
Charging the Transmitter WARNING: Only use the supplied charger to charge the transmitter when using the supplied batteries or the following: - 1200mAh Ni-MH or Ni-Cd ‘AA’ Rechargeable Batteries The use of the transmitter charger with alkaline batteries installed can damage the transmitter. - Page 8 Replacing the Transmitter Batteries 1. Remove 2 cover screws from the back of the transmitter case. 2. Replace old battery pack with a new battery pack. NOTE: A battery tray is provided with the valet. It can be used with standard AA rechargable batteries.
- Page 9 Spare TRACK Parts Rotoclips...
-
Page 10: Track Tools
Track tools The Track Tools are used to assist in the installation of new tracks. NOTE: This section is intended to show how the tools are used only. A detailed instruction guide is provided when purchasing new tracks. Refer to that instruction guide when installing new tracks. - Page 11 Track tools The Track Pin Tools are used to assist in the installation of new tracks when the tracks are too tight making it difficult to align the pin holes. Insert the Track Pin Tools on the inside and outside adjacent pins to the missing pin hole. Note: You will need to hold these in place by hand.
Need help?
Do you have a question about the RVR12 and is the answer not in the manual?
Questions and answers