
Subscribe to Our Youtube Channel
Related Manuals for SMART OPS PC


Summary of Contents for SMART OPS PC
- Page 1 SMART OPS PC modules with Windows® 10 Pro USER GUIDE PCM8-i5 PCM8-i7v Was this document helpful? smarttech.com/docfeedback/171747...
-
Page 2: Learn More
© 2021 SMART Technologies ULC. All rights reserved. No part of this publication may be reproduced, transmitted, transcribed, stored in a retrieval system or translated into any language in any form by any means without the prior written consent of SMART Technologies ULC. Information in this manual is subject to change without notice and does not represent a commitment on the part of SMART. - Page 3 CAUTION Do not install the OPS PC module or remove it from the accessory slot while the display is turned on. Ensure the power switch on the back of the display beside the AC power inlet is in the OFF (O) position.
- Page 4 User guide SMART OPS PC modules You can install the SMART software that is included with the display on the OPS PC module. For more information about installing software, see the software’s installation documentation. Viewing the OPS PC module input source 1.
-
Page 5: Connecting External Displays
Connecting external displays You can connect an external display to the HDMI 1.4 out connector on the OPS PC module (rather than the HDMI out connector on the display). This allows you to duplicate or extend the OPS PC module’s desktop to the external display. -
Page 6: Troubleshooting
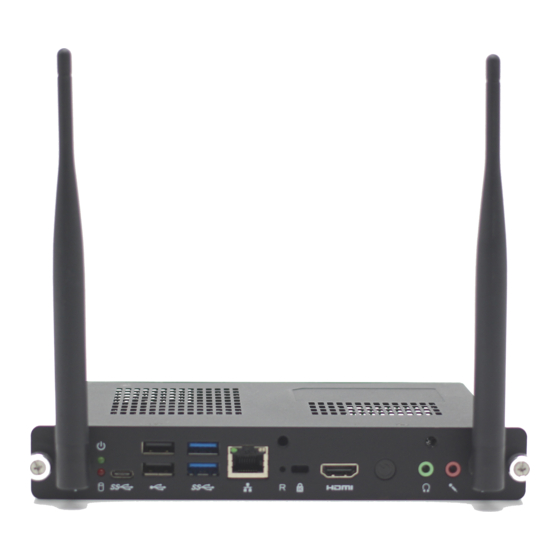
SMART OPS PC modules Troubleshooting This section explains how to resolve common issues with the SMART OPS PC module. If the symptoms you’re encountering aren’t covered below or the solutions to the symptoms don’t work, refer to the SMART knowledge base (community.smarttech.com) for additional troubleshooting information... - Page 7 User guide SMART OPS PC modules Connectors The following diagram and table present the connectors on the SMART OPS PC module: Connector Connects to Notes USB Type-C Supported USB drives, See Connecting USB drives, peripherals, and other peripherals, and other devices on devices page 5 and...
- Page 8 User guide SMART OPS PC modules Connector Connects to Notes Stereo 3.5 mm out External speakers or Analog audio cables and headphones connectors. Stereo 3.5 mm in Microphone Analog audio cables and connectors. smarttech.com/kb/171747...
Need help?
Do you have a question about the OPS PC and is the answer not in the manual?
Questions and answers