Advertisement
Advertisement
Table of Contents

Related Manuals for TACKLIFE MTS01A


Summary of Contents for TACKLIFE MTS01A
- Page 1 User Manual TABLE SAW Model:MTS01A...
-
Page 2: Warranty Registration
We a re glad to invite to register the war ranty information at www.tackli fetools.com.After regist ration,you may kindly enjoy the e xclusi ve se rvice Tel:+1 347-307-8957 Mon-Fri 9AM-5PM (PT) Aukey Technology Co., LTD. www.tacklifetools.com www.facebook.com/Tacklife.US support@tacklifetools.com Room 102, Building P09, South China City Electronic trading center, Longgang District Shenzhen... - Page 3 EN:KNOW YOUR TABLE SAW / ASSEMBLY & ADJUSTMENTS - 01-...
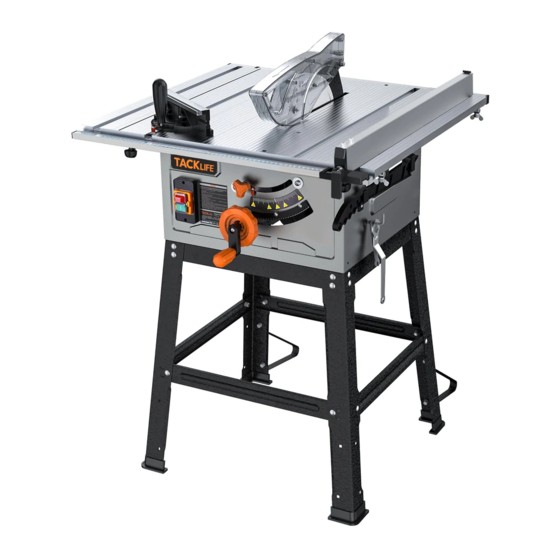
- Page 4 Description: Cross cutting fence Stand rubber foot Depth of cut handle Blade guard Blade guard seat Bevel angle adjustment wheel Bevel angle lock Dia216mm/10inch Saw blade Table insert plate On/off switch Side table lock Fence/Rip fence Side table extension Plastic Hook Cable winding hooks Push stick Hook for Wrenchs...
-
Page 5: Technical Details
Technical Details: Nominal freq uency and power: Nominal power: Tension et fré quence assignée: Puissance assignée: Spannung un d Frequenz: Leerlaufdrehzahl: Tensión y fre cuencia fijada: Potencia fijada: Tensione e fr equenza assegnata: Potenza assegnata: No-load spee d: Table size: Vitesse à... -
Page 6: Note To User
NOTE TO USER This instruction manual is meant to serve as a guide only. Specifications and references are subject to change without prior notice. GENERAL & SPECIFICSAFETY INSTRUCTIONS KNOW YOUR TOOL Read and understand the owners manual and labels affixed to the tool. Learn its application and limitations as well as its specific potential hazards. - Page 7 DISCONNECT TOOLS. Before servicing, when changing accessories or attachments. AVOID ACCIDENTAL STARTING. Make sure the switch is in the “OFF” position before plugging in. USE RECOMMENDED ACCESSORIES. Consult the manual for recommended accessories. Follow the instructions that accompany the acces- sories.The use of improper accessories may cause hazards.
-
Page 8: Electrical Information
MOVE THE RIP FENCE. 7. Move the rip fence out of the way when crosscutting. 8. SUPPORT LARGE PANELS. To minimize the risk of blade pinching and kickback, always support large workpieces. 9. REMOVE ALL ACCESSORIES FROM TABLE. Before transporting saw, remove all accessories (miter gauge, rip fence). Failure to do so can result in an accident causing possible serious personal injury. -
Page 9: Operation
OPERATION America and Canada: As received from the factory , your Table saw is ready to run for 110V-120V operation. Europe: As received from the factory , your Table saw is ready to run for 220V-230V operation. ON/OFF SWITCH The On/Off switch (A) Fig.3 turns the Table saw On or Off. To turn the Table saw ON, push the switch upwards to the On position.To turn the Table saw OFF, push the switch downwards to the Off position. - Page 10 prevent the saw kerf from closing. Start the motor and advance the work holding it down and against the fence. Never, stand in the line of the saw cut when ripping. Hold the work with both hands and push it along the fence and into the saw blade.
-
Page 11: Installation And Use Instructions
INSTALLATION AND USE INSTRUCTIONS FIG.A: Accessories of box Foot A-upper A-under B-upper B-under Screw - 09 -... - Page 12 FIG.B: Stand assembly A-upper B-upper B-upper A-upper A-under B-under Foot B-under A-under Foot A-upper A-under Foot - 10 -...
- Page 13 FIG.B: Stand assembly B-under B-under - 31 - B-under B-upper A-under - 11-...
- Page 14 FIG.B: Stand assembly FIG.C: Side table assembly STOP Lock - 12 -...
- Page 15 FIG.D: Accessory assembly and using Un-lock Lock WARNING ! / ATTENTION ! - 13 -...
- Page 16 FIG.E: Saw blade adjus�ng 90° 0 - 45 ° - 14 -...
- Page 17 FIG.F: Power Switch on/off FIG.G: Vacuum connec�on 3,45 cm - 15 -...
- Page 18 FIG.H: Saw blade replacing ø 254 mm - 24 T ø 254 mm - 60 T ø 254 mm - 80 T - 16 -...
- Page 19 7 8 9 12 13 17 18 19 81 8283 100 101 24 23 102 103 104 105 98 97 1-17 1-10 1-11 1-12 1-13 1-15 1-14 1-16 1-18 1-33 1-27 1-26 1-19 1-21 1-25 1-24 1-23 1-22 1-21 1-20 1-32 1-31 1-30...
Need help?
Do you have a question about the MTS01A and is the answer not in the manual?
Questions and answers
I was using this saw and it stopped running in the middle of a cut? Now it sits and does not operate. Very frustrating! What can I check to see why it is in operable? Is it this brown wire causing the problem?
The TACKLIFE MTS01A saw may stop running in the middle of a cut due to a stalled blade. This can happen if the workpiece stalls, causing the blade to stop turning. To prevent damage to the motor and ensure safety, the saw should be turned off before attempting to free the stalled blade.
This answer is automatically generated
@Mr. Anderson
This is the on and off switch and the coiled wires heated up and melted the brown wire?
If the on/off switch of the TACKLIFE MTS01A has melted wires, it should be replaced immediately to avoid electrical hazards such as shocks or fires. Using the saw with damaged wiring can be dangerous. Disconnect the saw from power before attempting any repairs.
This answer is automatically generated
Is there a reset button on this table saw?