Advertisement
Quick Links
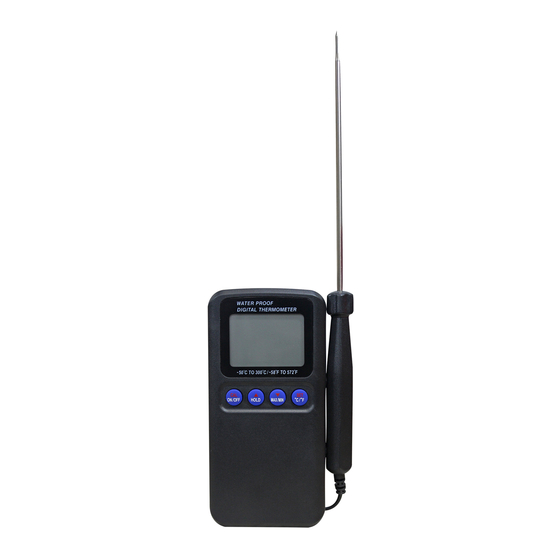
HANDHELD DIGITAL THERMOMETER INSTRUCTIONS
FEATURES
• Data hold function
• Wide measurement range
• Stainless steel probe
• Foldaway stand
• Temperature Calibration
• Celsius and Fahrenheit exchange
• Maximum/Minimum temperature memory • High/Low temperature alarm setting
• Key tone for operation confirmation
INSTALLATION
1. Unpack the thermometer
2. Open probe cable compartment cover
3. Fully extend the probe cable
4. Pull out the battery insulation strip
OPERATION
• As soon as the thermometer is switched on, it will perform a self test and show all display
segments for about 2 seconds and then display the normal temperature reading.
• Insert the probe into test substance about 25 mm/1" minumum; get the reading when it
becomes stable.
SELECT TEMPERATURE UNIT
Press and hold [°C/°F] for about 3 seconds then release to change temperature unit.
DATA HOLD
1. Press [HOLD] once will retain the display reading and "HOLD" icon will begin flashing.
2. Press the button again will return to normal display.
MAXIMUM/MINIMUM TEMPERATURE MEMORY
1. Press [MAX/MIN] once will display the maximum reading and the "MAX" icon will be flashing.
2. Press the button once more will show the minimum reading and the "MIN" icon will be flashing.
3. Press the button again to return to normal display.
4. Press [MAX/MIN] and hold for 3 seconds to clear memory.
TEMPERATURE ALARM SETTING
1. Press the [SET] button once and the HI value (default is Off) will be flashing.
2. Use the [UP] and [DOWN] keys to set the desired alarm high limit.
3. Press the [SET] button once more and the LO value (default is Off) will be flashing.
4. Use the [UP] and [DOWN] keys to set the desired alarm low limit.
5. Press the [SET] button again to finish setting.
Note: During the limit setting, holding down the [UP] or [DOWN]
Note: If the temperature value is out of the set limit then the alarm will sound.
Note: Pressing any button will stop the alarm sound but the HI or LO icon will keep flashing until the temperature
is within the set limit.
TEMPERATURE CALIBRATION
1. Press the [CAL] button and hold about 5 seconds until the display flashes "CAL" for 2 seconds, then enter into the
calibration mode.
2. Press the [] and [] to set the temperature error.
3. Press [CAL] button again to confirm the setting and exit the calibration mode.
• The ajustable temperature error range is -2.2 to 2.2˚C (-4 to 4˚F).
• You can set the temperature error in 0˚C or any temperature point.
• The temperature error value is "0" in case of first power on or battery replacement.
• For example, if the temperature eeeor is set at -2˚C, all the temperature points will reduce 2˚C automatically.
When the temperature of the object is 100˚C, the current temperature reading would become 98˚C after the
temperature error of -2˚C was set.
BATTERY REPLACEMENT
Use a suitable cross head driver to loosen the screw on the back of the case. Replace the battery and put back the
rear case and tighten the screws.
NOTES:
1. When the MAX/MIN reading is being displayed or the HOLD function is activated the thermometer cannot be
powered off until all the activated functions are released.
2. If the display becomes dim change the battery with the same type and leakage free battery.
3. After each measurement, clean the probe immediately in order to avoid cross contamination.
4. The test probe can not be placed inside the oven.
5. When the alarm setting is disabled, so is the power off.
SPECIFICATIONS:
Measuring Range: -50 to 300°C/-58 to 572°F
Display Accuracy:
• ±0.5˚C between -10 to 100˚C
• ±2.5˚C above 200˚C
• ±2.7˚F below 13.8˚F and between 212.2 to 392˚F
Display Resolution: 0.1°
Alarm Setting Resolution: 1° over full range
1 Hour Auto-Off: disbabled
Temperature Reading Update: 1 second
Battery: 1.5 volt, type AAA or equivalent x 2 piece
Probe Size: 3.5 (W) x 150 (H) mm
Product Size: 66 (W) x 135 (H) x 22 (D) (excluding probe)
Probe Cord Length: 1000 mm
Ambient Temperature: 0 to 50˚C (32 to 122˚F)
TERMÓMETRO DIGITAL MANUAL INSTRUCCIONES
CARACTERÍSTICAS
• Amplia escala de medidas
• ˚C y ˚F
• Calibración de la temperatura
• Ajuste de alarma de temperatura Alta/Baja (High /Low)
INSTALACION
1. Desempaque el termómetro
2. Abra la tapa del compartimiento del cable de la sonda
3. Extienda completamente el cable de la sonda
4. Hale la tira del aislante de la bateria
OPERACION
• Tan pronto como el termómetro sea encendido, comenzara una prueba automatica que mostrara varios
segmentos en el exhibidor por alrededor de 2 segundos, despues exhibira la lectura de la temperatura normal.
• Inserte la sonda en la substancia a probar, por al rededor de 25 mm / 1" minimo; obtenga la lectura cuando se
estabilize.
SELECCIONE LA UNIDAD DE TEMPERATURA
Presione y sostenga [˚C/˚F] por 3 segundos, luego afloje para cambiar la unidad de temperatura.
RETENCION – ALMASENAMIENTO DE DATOS
1. Presionando [HOLD] una vez, el exhibidor retendra la lectura y el icono "HOLD'' comenzara a destellar.
2. Presione el botòn de nuevo y el exhibidor regresara a su estado normal.
MEMORIA DE TEMPERATURA MAXIMA/MINIMA
1. Presione [MAX/MIN] una vez y exhibira la lectura maxima, y el icono MAX comenzara a destellar.
2. Presione el botòn una vez mas y mostrara lectura minima, y el icono "MIN" comenzara a destellar.
3. Presione el botòn nuevamente para regresar al exhibidor normal.
4. Presione [MAX/MIN] y sostenga por 3 segundos para borrar la memoria
AJUSTE LA ALARMA DE LA TEMPERATURA
1. Presione una vez el botón [SET] y el valor HI (pre-set esta OFF) se hará intermitente.
2. Use los botones de [UP] y [DOWN] para ajustar la alarma al límite alto.
3. Presione el botón [SET] una vez mas y el valor LO (pre-set esta OFF) se hará intermitente.
4. Use los botones [UP] y [DOWN] para ajustar la alarma al límite bajo.
5. Presione nuevamente el botón [SET] para terminar con los ajustes.
Nota: Durante los ajustes de los límites, mantenga presionado [UP] o [DOWN].
Nota: La alarma sonará si la temperatura está fuera del límite que se ajustó.
Nota: Para detener la alarma presione cualquier botón; pero los iconos HI o LO seguirán intermitentes hasta que la
temperatura llegue a los límites que se ajustaron.
CALIBRACIÓN DE LA TEMPERATURA
1. Presione el botón [CAL] y sostenga por 5 segundos hasta que en la pantalla aparezca por dos segundos "CAL", a
continuación entre al modo de calibración.
2. Presione [] y [] para establecer el error de temperatura.
3. Presione nuevamente el botón [CAL] para establecer el error de temperatura.
• El rango de error de temperatura ajustable es de -2.2 a 2.2°C (-4 a 4°F)
• Puede establecer el error de temperatura en 0°C o cualquier punto de temperatura.
• El valor del error de temperatura es "0" en caso de ser encendido por primera vez o se haya reemplazado de la
batería.
WATER PROOF
DIGITAL THERMOMETER
-50˚C to 300˚C / -58˚F to 572˚F
CAL
p
q
SET
ON/OFF
HOLD
MAX/MIN
˚C / ˚F
• ±1.5˚C below -10.1˚C and between 100.1 to 200˚C
• ±0.9˚F between 14˚ to 212˚F
• ±4.5˚F above 392˚F
• Funciòn de retenciòn de datos
• Sonda de acero inoxidable
• Memoria de temperaturas Maxima/Minima
• Tono para confirmaciòn de funcionamiento
• Por ejemplo. Si el valor del error de temperatura esta en -2°C, todos los puntos de temperatura se reducirán 2°C
automáticamente. Cuando la temperatura del objeto es 100°C, la lectura de la temperatura actual se convertiría
en 98°C después de que el error de temperatura fue de -2 °C.
REEMPLAZO DE LAS BATERIAS
Use un desarmador de estrella para soltar los tornillos de la tapa. Reemplace la batería y coloque de vuelta la tapa
apretando los 4 tornillos.
NOTAS:
1. Cuando las lecturas MAX/MIN se vean en la pantalla o la función HOLD esta activada, el termómetro no se puede
apagar hasta que todas las funciones hayan sido desactivadas.
2. Si la pantalla se ve débil, cambie la batería por una similar o libre de fugas.
3. Después de cada medida, limpie la sonda inmediatamente para evitar cualquier tipo de contaminación.
4. La sonda de prueba no puede colocarse dentro de un horno.
5. Cuando el ajuste de la alarma está desactivada, por lo que es la alimentación eléctrica.
ESPECIFICACIONES:
Escala de Mediciòn: -50 a 300°C/-58 a 572°F
Exactitud del Exhibidor:
• ±0.5°C entre -10 a 100°C
• ±1.5°C abajo de -10 y entre 100.1 a 200°C
• ±2.5°C arriba de 200°C
• ±0.9 abajo 13.8°F y entre 121.2 a 392°F
• ±4.5 arriba de 392°F
Resoluciòn del Exhibidor: 0.1°
Resoluciòn de Ajuste de Alarma: 1° sobre la escala (unica opcion 1)
Actualisaciòn Lectura de Temperatura: 1 segundo
Apagado automático: Deshabilitado
Bateria: 1.5 volt, tipo AAA o el equivalente x 2 pieza
Tamaño de la Sonda: 3.5 (W) x 150 (H) mm
Tamaño del Producto: 66 (W) x 135 (H) x 22 (D) (excluida la sonda)
Longitud del Cable de la Sonda: 1000 mm
Temperatura Ambiente: 0 to 50˚C (32 to 122˚F)
DIGITALES HANDTHERMOMETER GEBRAUCHSHINWEISEFEATURES
MERKMALE
• Grosses Messbereich
• Daten Speicher funktion
• Anzeige in Celsius – Fahrenheit
• Stechsonde aus Niro-Stahl
• Temperaturkalibrierung
• Höchst-Tiefsttemperatur Speicher Mit Alarmmeldung
• Signaltonbestätigung beim programmieren • Mit MAX/MIN Temperaturspeicherung
IN BETRIEBNAHME
1. Thermometer herausnehmen
2. die Kabelsondenraumabdeckung öffnen
3. Kabel vom Stechsonde herausziehen
4. Batterie Isolierungstreife entfernen
BEDIENUNG
• Sobald das Thermometer eingeschaltet worden ist, wird es eine Selbstprüfung durchlaufen und zeigt es während
2 sekunden alle Display Segmente und zeigt dann nachher der normale Temperaturwert.
• Die Stechsonde bis etwa 25mm Tiefe in dem Substanz zum prüfen hineinstechen-und der Wert - wenn stabilisiert
- auslesen.
EINTRAGEN VON TEMPERATUR-EINHEIT
Der (C°/F°) –Taste Während 3 Sekunden eingedrückt halten um die erwünschte Temperatur-Einheit zu wählen.
DATENSPEICHERUNG
1. Einmal die (HOLD)-Taste drücken, und die Anzeige im Display wird gehalten und die (HOLD)-Ikone fängt an zu
blinkern.
2. Sobald die (HOLD)-Taste wieder gedrückt wird kehrt die normale Display Funktion zurück.
MAXIMUM/MINIMUM TEMPERATURWERT SPEICHERN
1. Wann die (MAX/MIN)-Taste einmal gedrückt wird, zeigt das Display die Maximum Anzeige und die "MAX"-Ikone
fängt an zu blinkern.
2. Wenn jetzt die Taste wieder gedrückt wird erscheint die Minimum anzeige und die "MIN"-Ikone wird blinkern.
3. Wenn jetzt die Taste noch mal gedrückt wird kehrt die normale Displayfunktion zurück.
4. Drücken Sie [MAX / MIN] und halten Sie für 3 Sekunden, um Speicher zu löschen
TEMPERATURWARNUNGSEINSTELLUNG
1. Betätigen Sie den SET-Knopf einmal und der HI-Wert wird blitzen.
2. Verwenden Sie die UP und DOWN Tasten, um die gewünschte hohe Begrenzung einzustellen.
3. Betätigen Sie den SET-Knopf noch einmal und der LO Wert wird blitzen.
4. Verwenden Sie die UP und DOWN Tasten, um die gewünschte niedrige Begrenzung einzustellen.
5. Betätigen Sie den SET-Knopf wieder, um einzustellen zu beenden.
Anmerkung: Während der Begrenzungseinstellung halten Sie auf UP oder DOWN
Anmerkung: Wenn der Temperaturwert aus der Satzbegrenzung heraus ist, dann klingt die Warnung.
Anmerkung: das Betätigen jedes möglichen Knopfes stoppt den Warnungston, aber die HI-oder LO Ikone hält zu
blitzen, bis die Temperatur innerhalb der Satzbegrenzung ist.
TEMPERATURKALIBRIERUNG
1. Drücken Sie die [CAL] -Taste und halten Sie ca. 5 Sekunden, bis die Anzeige "CAL" blinkt für 2 Sekunden, und
geben Sie in das Kalibrierungsmodus.
2. Drücken Sie die [] und [], um den Temperaturfehler einzustellen.
3. Drücken Sie [CAL] -Taste erneut, um die Einstellung zu bestätigen und beenden Sie das Kalibrierungsmodus.
• Der einstellbar Temperaturfehlerbereich ist -2,2 bis 2.2c (-4 bis 4f).
• Sie können den Temperaturfehler in 0 ° C oder eine Temperatur Punkt festzulegen.
• Der Temperaturfehlerwert "0" bei ersten Einschalten oder Batteriewechsel.
• Wenn beispielsweise den Temperaturfehler auf -2C gesetzt wird, werden alle Temperaturpunkte 2°C automatisch
reduzieren. wenn die Temperatur des Objektes ist 100 ° C, die aktuelle Temperaturmessung würde 98˚C nach
dem Temperaturfehler -2˚C wurde eingestellt.
BATTERIE-WIEDEREINBAU
Benutzen Sie einen verwendbaren Querhauptfahrer, um die Schrauben an der Rückseite des Thermometers zu
lösen. Ersetzen Sie die Batterie und setzen Sie zurück den Hinterseite und ziehen Sie die Schrauben fest.
ANMERKUNGEN:
1. Wenn der MAX/MIN Messwert angezeigt wird oder der HOLD-Funktion ist aktiviert, kann der Thermometer nicht
abgestellt werden, bis alle aktivierten Funktionen freigegeben sind.
2. Wenn die Anzeige schwach wird, ändern Sie die Batterie nach der gleichen Art und eine Durchsickern-freien
Batterie.
3. Nach jedem Maß säubern Sie den Fühler sofort, um Querversch-mutzung zu vermeiden.
4. Der Fühler kann nicht innerhalb des Ofens gesetzt werden.
5. Wenn die Alarmeinstellung deaktiviert ist, so ist das Gerät ausgeschaltet.
SPEZIFIKATIONEN:
Messbereich: -50 bis 300°C/-58 bis 572°F
Display Genauigkeit:
• ±0.5˚C zwischen -10 bis 100˚C
• ±2.5˚C oben 200˚C
• ±2.7˚F unter 13.8˚F und zwischen 212.2 bis 392˚F
Display Auflösung: 0.1°
Alarmmeldung Auflösung: 1° über Gesammtbereich (NUR Option 1)
1 Stunde Auto-Off: deaktiviert
Temperaturanzeige Update: 1 Sekunde
Batterie: 1.5 Volt, Type AAA oder Äquivalent – 2 St.
Gerät Abmessung: 66 x 135 x 22 (BxHxD) Ohne Sonde
Stechsonde (BxH): 3.5 x 50 mm / Kabellänge: 1000mm
Ungebungstemperatur: 0 to 50˚C (32 to 122˚F)
THERMOMETRE NUMERIQUE INSTRUCTIONS
CARACTÉRISTIQUES
• Plage large
• Mémoire de données
• Etalonnage temperature
• Programmation d'alarme sonore pour températures maximales/ minimales
INSTALLATION
1. Sortir le thermomètre de son emballage
2. Ouvrir le couvercle du protège-fil
3. Allonger complètement le câble de la sonde
4. Enlever la protection de la batterie
OPÉRATION
• Lors de la mise en marche du thermomètre, il effectuera un autotest en affichant pendant 2 sec. tous les
caractères, après quoi il affichera la température ambiante.
• Insérer la sonde dans la substance à mesurer pour environ 2-3cm ; lire la température après stabilisation.
• ±1.5˚C unter -10.1˚C und zwischen 100.1 bis 200˚C
• ±0.9˚F zwischen 14˚ to 212˚F
• ±4.5˚F oben 392˚F
• Lecture en °C /°F
• Signal sonore lors de la mise en marche
• Mémoire des températures maximales/minimales
Advertisement

Related Manuals for MasterCool 52229


Summary of Contents for MasterCool 52229
- Page 1 HANDHELD DIGITAL THERMOMETER INSTRUCTIONS • Por ejemplo. Si el valor del error de temperatura esta en -2°C, todos los puntos de temperatura se reducirán 2°C FEATURES automáticamente. Cuando la temperatura del objeto es 100°C, la lectura de la temperatura actual se convertiría •...
- Page 2 5. Quando l’impostazione allarme è disabilitato, l’unita’ e’ in power off CARATTERISTICHE TECNICHE: Gamma di misurazione: da -50 a 300°C / -58 a 572°F Visualizzazione Precisione: • ± 0.5 Fra -10˚C a 100˚C • ± 1,5˚C sotto -10,1 Tra˚C e 100,1-200˚C 52229-INSTINT-R...