Advertisement
OVERVIEW
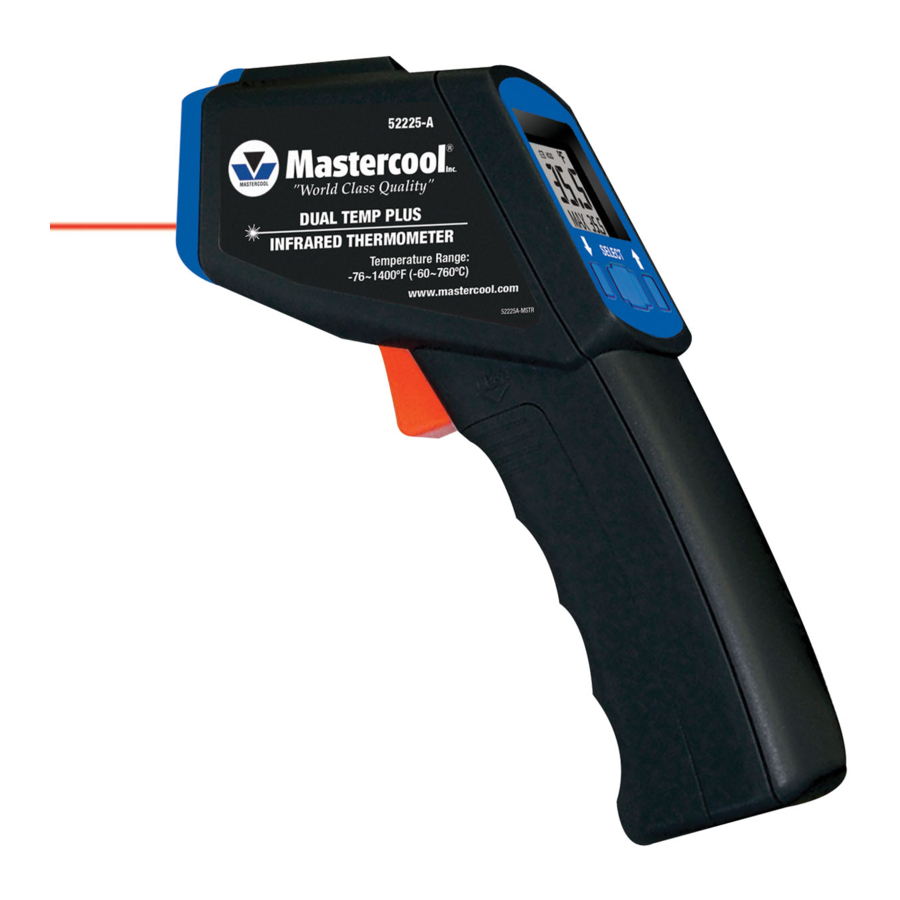
The Dual Temp Plus thermometer offers infrared and multiple probe capabilities. Fully review all instructions as this unit offers many mathematical and memory functions. Please keep away from children and DO NOT use for safety related applications.

- Sensor
- Laser
- Battery Compartment (2 AAA)
- Thermocouple Socket
- MEAS. Button
- Battery Cover
- LCD Display
- SELECT, UP and DOWN Buttons

Simply aim the thermometer at the measuring target and press the MEAS. button to display the surface temperature. Make sure the target area is within the field of view.
FUNCTIONS
Press the SELECT button to scroll through the following:
E,  E
E , MAX, MIN, DIF, AVG, HAL, LAL, PRB
EMISSIVITY
Select E to display emissivity.

Note: Default emissivity setting is.95 which will be applicable to most common material surface. Further emissivity uses can be checked on a published list.
Select E, followed by the UP and DOWN button to set the emissivity levels. Continue by pressing the SELECT button to confirm your setting in the memory. The emissivity can be changed from.10 (10E) to 1 (100E).
MAX, MIN, DIF or AVG Temperature Measurement
Press the SELECT button to view the desired function. Press and hold the MEAS. button and start scanning.
HAL, LAL
Alarms can be set on this unit as warnings or notice of certain temperatures. Simply press the SELECT button several times and scroll until you view (HAL), High Alarm Level and (LAL), Low Alarm Level on your screen. Once on either function, you can press the UP and DOWN buttons to lower or raise the desired alarm temperature. Once these numbers are set your unit will sound an alarm if these parameters are reached or passed.
PRB
To use your probe or surface temp. wire, simply scroll with the SELECT button until you can view the (PRB) or probe function on your screen. Plugging the Thermocouple into the Thermocouple Socket will automatically activate your probe or surface temp. wire. The unit will display the surface temperature in the lower right corner of the screen. The unit is also capable of measuring with the infrared while in the (PRB) mode, offering both surface and laser readings simultaneously.
Note: Surface and laser readings may differ due to the emissivity!
Note: To see the Minimum or Maximum data while in the (PRB) mode, press and hold the UP or DOWN button.
| ºF or ºC | Press the DOWN button to switch display between ºF and ºC (only in E, MAX, MIN, DIF, AVF modes.) |
| Backlight | Hold down the MEAS. button and press the UP button at the same time to activate the backlight. |
LASER
Hold down the MEAS. button and press the DOWN button at the same time to turn the laser ON or OFF.
Note: Non-contact infrared thermometers are not recommended for use in measuring the temperature of shiny or polished metals.
**The thermometer will automatically shut off if left to idle for more than 60 sec, unless in PRB mode. (In PRB mode, it will shut off if left idle for more than 9 minutes.)
ATTENTION!
- DO NOT look directly into the laser beam,
Permanent eye damage may result. - Use extreme caution when operating the laser!
- Never point the device towards anyone's eyes!
- Keep out of reach of children!
STORAGE & CLEANING
The sensor lens is the most delicate part of the thermometer. The lens should be kept clean at all times. Care should be taken when cleaning the lens using only a soft cloth or cotton swab with water or medical alcohol. Allow the lens to fully dry before using the thermometer. Do not submerge any part of the thermometer. Store thermometer at room temperature.
LCD ERROR MESSAGES
 | HI or LO is displayed when the temperature being measured is outside of the settings of (HAL) High Alarm Level and (LAL) Low Alarm Level. |
 | For all other error messages it is necessary to reset the thermometer. To reset, turn the instrument off, remove the battery and wait for a HI HI LOW LOW minimum of one minute. Reinsert the battery and turn on. If the error message remains please contact the Service Department for further assistance. |
BATTERY REPLACEMENT
(Remember to power off the unit before replacing the battery).
 |  |  |
| BATTERY OK | BATTERY LOW | BATTERY EXHAUSTED |
When the Low Battery icon displays, the batteries should be replaced.
(AAA batteries – 2 pcs.)
Dispose of used battery promptly and keep away from children.
SPECIFICATIONS
| 52225-A | |
| Non-Contact Temp. Range | -76º to 1400ºF (-60º to 760ºC) |
| Thermocouple Temp. Range | -83.2º to 1999ºF (-64º to 1400ºC) |
| Full Range Accuracy | ±2% of reading or 2˚C (4˚F) whichever is greater |
| Resolution | 0.1ºF (0.1ºC) |
| Reponse Time (90%) | 1 second |
| Distance: Spot | 30: 1 |
| Battery Life | Typically 180 hrs, Minimally 140 hours continuous use (Alkaline, without Laser and Back Light) |
| Dimensions | 7.5 x 1.5 x 4.5" (190.5 x 38 x 114mm) |
| Weight (Including batteries) | .42 oz (11.9 grams) |
Documents / ResourcesDownload manual
Here you can download full pdf version of manual, it may contain additional safety instructions, warranty information, FCC rules, etc.
Download MasterCool 52225-A - Dual Temp Infrared Thermometer Operating Manual
Advertisement


Need help?
Do you have a question about the 52225-A and is the answer not in the manual?
Questions and answers