Table of Contents
Advertisement
Quick Links
s
RAJA +
Fully Automatic Star
Delta Starter 3TE7421
For dependable service, it is of utmost
importance that instructions given below are
followed for selection, inspection, installation,
Commissioning, operation and maintenance.
RAJA + Fully Automatic Star Delta Starter
Selection of Starter
• Refer Table 1 for recommended selection of 3TE7 FASD
starters.
• FASD Starters are available in 3 frame sizes – FASD1: upto
30HP, FASD2: 40HP & 50HP and FASD3: 75HP submersible
pump ratings.
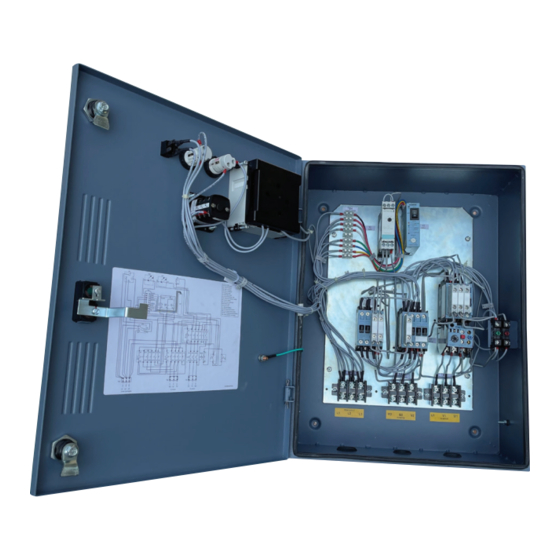
14
11
12
4
13
7
Fig. 1: FASD Starter
Fig. 2: FASD Starter inside view
Installation, Operation & Maintenance
Instructions
Please read and understand these instructions before
installing, operating or maintaining the equipment. Keep for
future reference.
Danger
Hazardous voltage can cause death or serious injury. Disconnect
power before working on equipment.
Warning
Automatic Motor Restart
LMRA has "Auto" mode selection. Use this function with
caution, Motor will restart automatically when healthy
power is restored back.
Reliable functioning of the equipment is only ensured with
certified components. Commissioning and maintenance by
qualified personnel only.
NOTICE
This product has been designed for environment A. Use of this product
in environment B may cause unwanted electromagnetic disturbances in
which case the user may require to take adequate mitigation measures.
Complies to standard : IS/IEC 60947-4-1
1. 'ON' push button (green)
2. 'OFF/RESET' push button (red)
3
3. Door knob
8
4. Metal Enclosure
9
5. Door
6. Mechanical Latch (OFF push button) to be used for preventing
10
undesired ON operation of Starter
7. Name plate
1
8. LED (amber) to indicate healthiness of incoming power supply
2
6
9. Green LED to indicate Motor ON status
10. Rocker switch (Control ON / OFF)
5
11. Dual VA meter (For indication)
12. Phase Selector switch
13. Earthing screw
14. Starter Mounting bracket
1
Advertisement
Table of Contents

Related Manuals for Siemens RAJA+ 3TE7421


Summary of Contents for Siemens RAJA+ 3TE7421
- Page 1 Installation, Operation & Maintenance Instructions RAJA + Please read and understand these instructions before installing, operating or maintaining the equipment. Keep for future reference. Fully Automatic Star Danger Hazardous voltage can cause death or serious injury. Disconnect Delta Starter 3TE7421 power before working on equipment. Warning For dependable service, it is of utmost Automatic Motor Restart importance that instructions given below are LMRA has “Auto” mode selection. Use this function with caution, Motor will restart automatically when healthy followed for selection, inspection, installation, power is restored back.
- Page 2 0.58 times the rated current on the motor • Close the door by rotating the door locks clockwise. nameplate. Commissioning : • If the relay trips even when set at rated motor current the For exact setting of timer and overload relay, follow the suitability of the starter/relay for the particular application instruction given below: should be checked with the nearest Siemens office. Before switching ON recheck all external connections. Operation: • Star-Delta Timer setting for FASD: • Ensure the door is locked. - First Switch ON the Rocker switch (Control On/Off). - Start the motor by pressing the ‘ON’ button shown in • Rotate the Mechanical Latch away from OFF push button. Fig. 1.
- Page 3 Maintenance: 4. Follow instructions given in Fig. 4 (For contactor mounted relay) / Fig. 5, 6 (For individual mounted • Switch off the starter and Put Latch on the OFF push relay) for removal of relay. button, (marked ‘O’). Disconnect the main supply by switching the main switch & Rocker Switch Off before 5. Select a proper relay exactly as per the original. doing any maintenance. 6. Connect the relay terminals (L1, L2, L3) to (T1, T2, • Keep the interior dust free. T3) of Q1 line contactor (For contactor mounted relay) / adaptor (For individual mounted relay). • Re-tighten the terminal screws from time to time as per specified torque in table 2. 7. Connect the relay terminals to Terminal block TB2. • No maintenance is needed for overload relay. Please do Care should be taken to fix the relay terminals & not open the relay.
- Page 4 L1, L2, L3: 3φ supply Q1: Line Contactor Q2: Star Contactor Q3: Delta Contactor K1: Bimetal relay K2: Star Delta Timer K3: Line Monitoring relay VSS: Voltmeter selector switch RS: Rocker switch AV: Ammeter Voltmeter AM: Amber LED GN: Green LED S1: ON push button S0: OFF/Reset push button TB1: Incoming terminal block...
- Page 5 L1, L2, L3: 3φ supply Q1: Line Contactor Q2: Star Contactor Q3: Delta Contactor K1: Bimetal relay K2: Star Delta Timer K3: Line Monitoring relay VSS: Voltmeter selector switch RS: Rocker switch AV: Ammeter Voltmeter AM: Amber LED GN: Green LED S1: ON push button S0: OFF/Reset push button TB4: LMR Terminal connector...
- Page 7 Table 2: Terminal torque values Torque Description Order No. Type Size (Nm) Contactor 3TS3210-0AZ6-08K Terminal block 30A – Terminal block 60A – Thermal Overload Relay 3UW5102-1J Terminal block 100A – Thermal Overload Relay 3UW5102-1K Dual VA Meter 200A – Current Thermal Overload Relay 3UW5202-2A terminals Thermal Overload Relay 3UW5202-2B Dual VA Meter 30A – Current terminals Thermal Overload Relay 3US5600-2C8K Dual VA Meter 60A – Current Thermal Overload Relay 3US5600-2D8K terminals Thermal Overload Relay 3US5600-2R8K Dual VA Meter 100A – Current terminals Thermal Overload Relay...
- Page 8 Representative view for FASD3 øL FASD1 179.5 FASD2 185.7 49.2 178.5 FASD3 205.7 99.5 229.2 156.2 Fig. 10: Dimensional Drawing Disposal Siemens products are environment friendly, which PLASTICS: Segregate as per material type for recycling predominantly consist of recyclable materials. through authorized dealer. Because of the long lifetime of For disposals we recommend disassembling and separation Siemens Products the disposal guidelines may be replaced into following materials: by other national regulations when taking the product out of service. The local customer care service is available at any METALS: Segregate into Ferrous types for recycling through time to answer disposal-related questions. authorized dealer. Customer Care Toll free no. 1800 220 987 Email: ics.india@siemens.com Order No. A5E50494782000A/AA SACHIN ENTERPRISE Siemens Limited Product development is a continuous process. Consequently the data indicated in this Leaflet is subject to change without prior notice. For latest issue contact our sales offices.
Need help?
Do you have a question about the RAJA+ 3TE7421 and is the answer not in the manual?
Questions and answers