Table of Contents
Advertisement
Quick Links
Advertisement
Chapters
Table of Contents

Subscribe to Our Youtube Channel
Related Manuals for Takstar TS-8807PP


Summary of Contents for Takstar TS-8807PP
-
Page 2: Table Of Contents
中文目录……………………………………………………………………1-12 Content……………………………………………………………………13-29 前言………………………………………………………………………………2 产品特性…………………………………………………………………………2 适用范围…………………………………………………………………………2 包装清单…………………………………………………………………………3 技术参数…………………………………………………………………………3 功能示意…………………………………………………………………………4 接收器……………………………………………………………………4 发射器……………………………………………………………………5 使用说明………………………………………………………………………7 发射器安装………………………………………………………………7 接收器安装………………………………………………………………8 系统锁定及解锁…………………………………………………………9 频率调节…………………………………………………………………9 注意事项………………………………………………………………………10 故障处理………………………………………………………………………10 安全警示………………………………………………………………………11 关于图标含义解释……………………………………………………………11 环保说明………………………………………………………………………12... -
Page 3: 产品特性
■ 前言 尊敬的用户: 感谢您选购得胜TS-8807PP无线麦克风,为了您能够更好的了解使用本 产品,建议您在使用前仔细阅读本说明书。 若存在有疑问或者您有宝贵的建议,可通过拨打得胜官方 服务热线400 6828 333或微信扫描二维码关注得胜官方公众号 与我们联系。 ■ 产品特性 采用TUNER分集式技术,有效改善接收死角,提高接收稳定度; ● 特设频道ID码识别功能,有效防止外界或频道之间串扰出现噪音; ● 双通道UHF频段设计,比传统的VHF频段干扰更小,传输更可靠; ● 接收机具备一键自动扫频功能,能自动快速选取无干扰频道使用; ● 红外对频方式,只需轻松一按,即可完成发射器与接收器频道同步,使用 ● 方便; 设有SQ调整功能,用户可根据使用环境调整灵敏度,提高抗干扰能力或 ● 接收距离; 具备独立的平衡(XLR)及非平衡(6.3mm)的混合输出,方便设备连 ● 接; 发射器设有低电指示状态,方便用户有效识别; ● 设有低切/低衰功能,有效减少环境噪音或舞台震动带来的影响。 ● ■ 适用范围 会议、培训、教学等场所... -
Page 4: 包装清单
■ 包装清单 接收机…………………………………………………………………………1个 5号电池…………………………………………………………………………4节 发射器…………………………………………………………………………2个 头戴麦克风……………………………………………………………………2个 领夹麦克风……………………………………………………………………2个 接收天线………………………………………………………………………2支 音频线…………………………………………………………………………1条 适配器…………………………………………………………………………1个 角码……………………………………………………………………………1对 ■ 技术参数 系统指标 接收机 频率范围:470~960MHz 供电:DC 12V/0.5A (分段设计) 频率输出方式:独立平衡(XLR插座) 调制方式:宽带FM 与混合(6.3mm插座) 静音控制:导频ID码 无线接口:TNC/50Ω阻抗 可调范围:50MHz 灵敏度:≤-90 dBm(接线测试) 信道数量:200 音频输出最大电平:2.0V/RMS(at 信道间隔:250KHz 1KHz THD=1%) 频率稳定度:±0.015% 尺寸(LxWxH):430x190x51mm 动态范围:≥100dB A+ 重量: 2480g 调制频偏:±48KHz 发射机 频率响应:50Hz~18KHz 输出功率:≤10mW 综合信噪比:≥105dB A+... -
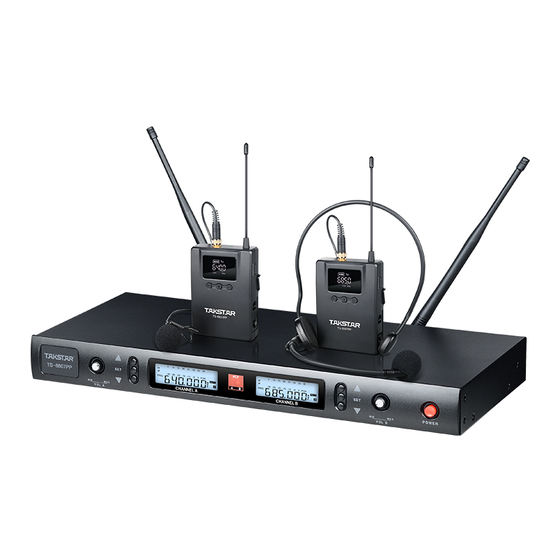
Page 5: 功能示意
■ 功能示意 接收器 ⑤ ② TS-8807PP ③ ④ ① 前面板 ① 音量调节旋钮:调节输出音量的大小; ② 液晶显示:显示对频工作状态、频率、接收信号电平等信息; ③ 红外对频窗口:配合SET键,将频率参数传至发射机; ④ 电源键:开启关闭机内的电源供应;点按开启电源开关时,液晶显示屏 亮; ⑤ 功能按键:用于频率调整、对频、扫频等操作; 液晶显示屏 ① 8级射频电平显示:显示接收信号强度; ② 8级音频电平显示:显示声音信号强度; ③ 频率菜单显示:FREQ亮时,显示当前工作频率; ④ 静音显示:MUTE亮时,表示机器处于静音状态; ⑤ 6位字符显示:显示当前信息; ⑥ 通道选择显示:显示当前使用通道;... -
Page 6: 发射器
② ⑤ ④ ① ③ 背面板 ① 电源插座:连接DC 12V电源至输入插座;插座的中心电极连接正电压; ② 天线连接座:连接外置天线,增加使用距离; ③ 灵敏度调节:调节的范围为0-40dBm,该数值越小,则灵敏度越低,距 离越近,但抗干扰能力更强。反之,该数值越大,灵敏度越高,距离越 远; ④ 音频平衡输出:采用“XLR”型插座,两通道信号分别输出; ⑤ 音频非平衡输出:采用“P”型插座,两通道混合信号分别输出; 发射器 ① ⑦ ⑤ ⑨ ② ④ ③ ⑥ ⑩ ⑧ ⑪⑪... - Page 7 ① 显示屏:显示工作频率、电池电量等信息; ②“SET”键:长按SET键开启增益调节模式,停止操作2秒后,自动关闭调 节模式; 建议头戴麦克风增益档位为4,领夹麦克风增益档位为8; ③“+”增加键:在增益调节模式下,短按对应增加MIC增益; ④“-”减小键:在增益调节模式下,短按对应减小MIC增益; ⑤ 电源开关键:长按两秒开关机,循环点按开启或关闭静音功能; ⑥ 电池仓:用于安装5号电池; ⑦ 低切开关:拨到“ON”位置,可衰减150Hz以下的低频环境噪声(如交 通声、空调声、震动声等),拨到“OFF”恢复正常拾音; ⑧ 静音指示灯:关闭静音时,常亮绿灯,开启静音时,常亮红灯; ⑨ 背扣:用于将发射器扣于腰带或裤腰上使用; ⑩ 麦克风插座:用于连接3.5mm接口的麦克风; ⑪ 外置天线:1/4波长天线,增强信号发射距离; ③ ① ② ④ 发射器显示屏 ① 增益调节显示:增益范围0~8, 默认值是4; ② 工作频率:显示当前发射器工作频率; ③ 电池电量:以电量格数多少来表示当前发射器电池电量,电量严重不足 时,电池符号闪烁; ④ 通道:显示当前使用通道;在对频状态下,连接A发射器显示CHA,连接 B发射器显示CHB;...
-
Page 8: 使用说明
■ 使用说明 1. 开机前,先将接收机音量调小,然后按接收机电源按钮开接收机,电源 导通后,液晶显示器背景灯亮,所有字符全部显示,随后主显示栏显示 接收机频道、频率、自动对频状态; 2. 观察接收器液晶显示屏的RF和AF电平表,若有强的干扰,应调换频道避 开干扰点; 3. 长按2秒发射器电源开关键,发射器开机,接收机对应频道的RF电平表信 号强度点亮; 4. 将发射机红外接口对准接收机红外发射窗口,与对应接收机通道 (CHA或CHB)对频成功时,发射机显示当前频率小数点后一位; 5. 根据实际情况,适当的调节接收器的麦克风输出音量大小; 6. 长按3秒发射器电源开关键,接收器关机;长按2秒发射器电源开关键, 发射器关机。 发射器安装 1. 安装电池:同时按压电池仓伸缩键取出电池仓;将2节5号电池按电 池仓 标明的正负极性安装,注意电池极性不要装反;将电池仓推送入发射器 电池卡座内,直到电池仓伸缩键“哒”的一声扣紧到位;如下图A 2. 将头戴麦克风或夹领麦克风插头插入发射器的“MIC”插座,并锁紧固 定;如下图B 图A... -
Page 9: 接收器安装
领夹麦克风 头戴麦克风 图B 接收器安装 1.安装天线:将外置天线对准接收器天线连接座,顺时针旋转直至旋紧; 如下图C; 2.将天线印有工作频率一面朝上,折叠天线,使之与接收器呈90°角;如下 图D; 顺时针旋转 图C 图D... -
Page 10: 系统锁定及解锁
系统锁定及解锁 锁定:在图①初始界面下长按“SET”键3秒显示图②界面,所有功能键将被 锁定(电源开关键除外); 解锁:长按“SET”键3秒,显示图③界面可解锁; 频率调节 1. 手动频率调节 在图①初始界面下,短按“▲”键与“▼”键可调节当前使用的频率, 当已调整到需要使用的频率时,停止短按,频率跳动停止,频率调整成 功。打开发射机电源,将发射机上的红外接收窗口“IR”与接收机上的 红外发射窗口。“ACT”成直线相对(对频距离可选择在10cm-50cm之 间),此时点按“SET”键,屏幕窗口显示图对频界面后显示对频搜索 信息,对频成功后将自动跳转至频率信道显示界面。如果对频不成功可 重新点按“SET”键继续对频,直至对频成功。 2. 自动扫描操作 在图①界面的状态下,长按3秒对应通道的“▲”键,接收机的对应通道 进行自动扫描状态,频率会跳动,当扫描到干净频点时,接收机会自动 发出红外对频状态,如图②。这时打开发射机,将“IR”窗口对准 “ACT”即可。 (注意:在多套使用时,前面对上频率的需打开发射机,在对下一套接收 机进行自动扫描) 图① 图② 图③ 图④... -
Page 11: 注意事项
■ 注意事项 1. 接收机采用全向天线时,天线离墙体(特别是金属体)应有0.5m距离; 2. 接收范围和很多因素相关,变化很大,在传输方向无大型金属件阻挡, 可以获得更好的传输效果; 3. 如果接收条件不够理想,可以采用延长线,外接高增益天线,甚至天线 放大器,可以达到非常明显的增距效果; 4. 当接收机面板正对使用方向时,或接收机内置在金属箱体内时,将天线 接于前面板会有更好的接收效果; 5. 产品使用中出现红灯闪烁时,表示电池电量不足,需更换电池; 6. 若发射器长期不适用时,请从底座内取出电池,以免电池漏液而损坏麦 克风; 7. 正确的调整发射器咪头与嘴的距离,太近会引起调制过大而产生信号失 真,太远的灵敏度使调制度不够,将会降低信噪比。建议嘴巴距咪头约 5~15cm。 ■ 故障处理 故障现象 故障原因 发射器、接收机无指示 发射器电池耗尽,接收机电源未接好 接收机无射频信号 收发不同频或超出接收范围 有射频信号,但无音频信号 发射器麦克风未接入或接收机静噪太深 发射调试频偏太小,接收输出电频低, 音频信号背景噪音太大 也许有干扰信号 发射器的咪头与嘴巴距离太近,接收机 音频信号失真 输出电频过高 接收机静噪太深,接收机天线设置不当, 使用距离较短,信号不稳定 周围有强电磁干扰... -
Page 12: 安全警示
■ 安全警示 为避免电击、高温、着火、辐射、爆炸、机械危险以及使用不当等可能 造成的人身伤害或财产损失,使用本产品前,请仔细阅读并遵守以下事项: 1.使用产品时请确认所连接设备与本产品功率是否匹配以及合理调整设备 音量大小,不要在超过产品功率及大音量下长时间使用,以免造成产品 异常和听力损伤; 2.使用中若发现有异常(如冒烟、异味等),请立即关闭电源开关并拨掉 电源插头,然后将产品送经销商检修; 3.若产品需要使用可拆装电池时,严禁使用外壳绝缘材料破损的电池;请 不要为非充电电池充电; 4.废弃电池需放入指定的分类垃圾桶,不可作为儿童玩具或直接丢弃,以 免造成安全隐患或影响环境; 5.超过一周不使用本产品时,请取出麦克风内电池,以免电池漏液导致产 品损坏; 6.本产品及附件都应放置在室内干燥通风处,勿长期存放在潮湿、灰尘多 的环境,使用中避免靠近火源,雨淋、进水、过度碰撞、抛掷、振动本 机及覆盖通风孔,避免损坏其功能; 7.若产品需要固定于墙壁或天花板上时,请确保固定到位,防止因固定强 度不足导致产品发生跌落危险; 8.使用该产品时需遵守相关安全规定,法律法规明确禁止使用场合请勿使 用产品,以免导致意外事故; 9.请不要自行拆机改装或维修,以防止出现人身伤害,如有问题或服务需 求请联系当地经销商跟进处理。... -
Page 13: 关于图标含义解释
■ 关于图标含义解释 该图标表示产品所标配的适配器符合“中国强制性产品认证”3C认 证要求。 此符号表示,根据WEEE指令(2012/19/EU)和国家法律,由于这种类 型的废弃物会有潜在的有害物质,可能对环境和人类健康产生负面 影响,所以本产品不应与您的家庭垃圾一起处置,应将本产品应交 由授权的电气和电子设备(WEEE)回收站回收。同时,您在正确处理本产品的 同时将有助于自然资源的利用。如需了解更多有关您可以在何处放置废物回 收设备的信息,请有效联系您当地的城市办事处、废物管理局或家庭废物处 理服务部门。 ■ 环保说明... - Page 14 Product………………………………………………………………………14 Features………………………………………………………………………14 Application……………………………………………………………………14 Product content………………………………………………………………15 Specification…………………………………………………………………15 Function instruction…………………………………………………………17 Receiver…………………………………………………………………17 Transmitter……………………………………………………………19 Operation instruction………………………………………………………21 Transmitter installation… … … … … … … … … … … … … … … … …21 Receiver installation…………………………………………………22 System lock and unlock… … … … … … … … … … … … … … … … …23 Frequency adjustment………………………………………………24 Caution………………………………………………………………………25 Trouble shooting……………………………………………………………26...
-
Page 15: Product
■ Product Dear Customer, Thank you for purchasing TS-8807PP wireless conference microphone. Please read the user manual carefully before operation and keep it for reference in the future. If you have any question or suggestion, please contact our local dealer. -
Page 16: Product Content
■ Product content Receiver…………………………………………………………………………1 pc AA battery……………………………………………………………………4 pcs Transmitter……………………………………………………………………2 pcs Headset mic…………………………………………………………………2 pcs Lavalier mic……………………………………………………………………2 pcs Antenna………………………………………………………………………2 pcs Audio cable……………………………………………………………………1 pc Adapter…………………………………………………………………………1 pc Corner…………………………………………………………………………1 pc ■ Specification System Specification Frequency Range:470~960MHz (frequency band design) Modulation:FM Mute Control:frequency guide ID code Adjustable Range:50MHz Frequency Band Qty:200 Frequency Band Interval:250KHz... - Page 17 Sensitivity:≤-90 dBm (wiring test) Audio Out Max Level:2.0V/RMS(at 1KHz THD=1%) Dimension(LxWxH):430x190x51mm Weight: 2480g Transmitter Output Power:≤10mW Power Supply:two AA batteries Operation Time:≥8h Dimension(LxWxH):100x64x24.5mm Weight:80g Note: the above data are obtained from the test of Takstar laboratory, and Takstar has the right of...
-
Page 18: Function Instruction
■ Function instruction Receiver ⑤ ② TS-8807PP ③ ④ ① Front panel ① Volume knob: adjusting volume level. ② LCD: displaying matching frequency status, frequency, receiving signal level. ③ Infrared matching window: used with SET button to send frequency parameter to the transmitter. - Page 19 ③ Frequency menu display: when FREQ lights up, it displays the current operation frequency. ④ Mute display: when MUTE lights up, this means it is in mute status. ⑤ 6 character display: displaying the current information. ⑥ Channel selection display: displaying the current operation channel. ②...
-
Page 20: Transmitter
Transmitter ① ⑦ ⑤ ⑨ ② ④ ③ ⑥ ⑩ ⑧ ⑪⑪ ① LCD: displaying operation frequency, battery power, etc. ②“SET”button: Keep pressing the “SET”button to turn on the gain adjustment mode. After stopping the operation 2 seconds, the Gain Adjustment Mode will be automatically turned off. - Page 21 ⑨ Belt clip: used to pack the transmitter on the waist belt. ⑩ Mic connector: used to link with mic of 3.5mm connector. ⑪ External antenna: 1/4 wave length antenna to increase the signal transmission range. ③ ① ② ④ Transmitter display ①...
-
Page 22: Operation Instruction
■ Operation instruction 1. Before turning on, set the receiver volume to minimum, and then turn on the receiver. LCD lights up and displays all characters and receiver Channel/frequency/matching status. 2. Watch the RF/AF level meter. If there is strong interference, change the channel to avoid interference. -
Page 23: Receiver Installation
Figure A Lavalier mic Headset mic Figure B Receiver installation 1.Antenna installation: connect the external antenna with the antenna connector of receiver, and turn it clockwise fully. Refer to figure C below: 2.Put the side marked with frequency of antenna upward. Fold the antenna to form a 90°... -
Page 24: System Lock And Unlock
Turn counterclockwise Figure C Figure D System lock and unlock Lock: in the initial interface of figure ①, keep pressing “SET”button for 3 seconds, it displays the interface in figure ②. All the function buttons are locked (except power switch). Unlock: keep pressing “SET”... -
Page 25: Frequency Adjustment
Frequency adjustment 1. Adjusting manually In the initial interface of figure ①, press “▲”or“▼”button to adjust the current operation frequency. When it is adjusted to the wanted frequency, stop pressing. The frequency stops changing. This means the frequency is adjusted successfully. Turn on the transmitter. Point the infrared window IR of transmitter to the infrared window ACT of the receiver in a line (10cm-50cm range). -
Page 26: Caution
■ Caution 1. If the omni-directional antenna is used for the receiver, keep the antenna 0.5m away from the wall (especially metal object). 2. The receiving range is relative to many factors. If there is no big metal part in the transmission direction, the transmission effect is better. 3. -
Page 27: Trouble Shooting
■ Trouble shooting Problem Reason Transmitter battery is used up. Receiver Transmitter/receiver have power supply is not connected well. no indication Different receiving and transmitting Receiver has RF signal frequency or out of the receiving range There is RF signal, but no Transmitter mic is not linked or too much audio signal cell phone SQ... -
Page 28: Safety Instruction
■ Safety instruction To avoid electric shock, over temperature, catching fire, explosion, mechanical risk and hurt or property loss caused by improper use, please read the following items carefully before operation: 1. Before operation, make sure that the system power matches with the equipment. -
Page 29: The Meaning Of Icon
■ The meaning of Icon This icon indicates that the adapter of the product meets the 3C certification requirements of "China Compulsory Product Certification". This symbol indicates that according to WEEE Directive (2012 / 19 / EU) and national laws, this type of waste will have potential harmful substances, which may have a negative impact on the Environment and human health, so this product should not be disposed together with your household waste, and should be handed over to the... - Page 32 GB/T 17276-1998 9T807PPS1A...
Need help?
Do you have a question about the TS-8807PP and is the answer not in the manual?
Questions and answers