Table of Contents
Advertisement
Available languages
Available languages
Quick Links
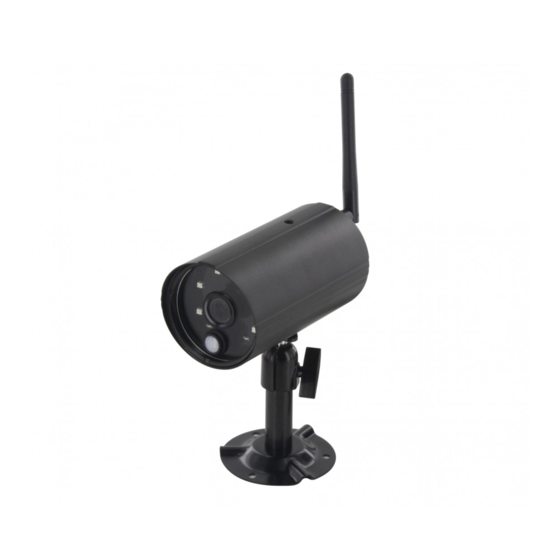
Wireless Camera
QUICK START GUIDE / GUIDE DE DÉMARRAGE RAPIDE / BEKNOPTE
HANDLEIDING / GUÍA DE INSTALACIÓN RÁPIDA / GUIA DE INICIAÇÃO
RÁPIDA / KURZANLEITUNG / GUIDA RAPIDA ALL'USO /
РУКОВОДСТВО ПОЛЬЗОВАТЕЛЯ /
HIZLI BAŞLANGIÇ KILAVUZU / GHID DE INSTALARE
34543
КРАТКОЕ
SKRÓCONA INSTRUKCJA OBSŁUGI /
KIT CONTENT
PRODUCT OVERVIEW
Note: Before using the memory card/ HDD for
recording video, you MUST format the memory card/
HDD on the console.
INSTALLING YOUR DEVICES
A. Setting up your monitor
1. Insert the memory card and/or connect HDD device to USB port.
2. Twist on the antenna to the LEFT side of the console.
3. Connect the Ethernet cable from the BACK of the console to your router
4. Connect the 12V power adaptor and power on the system
5. Twist on the stand to the back of the console
Note: Keep distance between device minimum 1 meter
EN
Connect system directly after the router. Do not connect
system to router through a hub or switcher. Enable DHCP
and UPnP on your router. TCP port #6000 and #80 should
be opened
Advertisement
Table of Contents

Related Manuals for Chacon 34543


Summary of Contents for Chacon 34543
- Page 1 KIT CONTENT Wireless Camera 34543 PRODUCT OVERVIEW QUICK START GUIDE / GUIDE DE DÉMARRAGE RAPIDE / BEKNOPTE HANDLEIDING / GUÍA DE INSTALACIÓN RÁPIDA / GUIA DE INICIAÇÃO Note: Before using the memory card/ HDD for RÁPIDA / KURZANLEITUNG / GUIDA RAPIDA ALL'USO / КРАТКОЕ...
-
Page 2: Quick Select Menu
Pair the camera to the receiver If you have additional cameras disconnected with receiver, follow steps below to pair: 1. Tap the camera setup icon to access the camera pairing screen. 2. Select the Camera channel (Camera 1/2/3/4). 3. Tap the "Camera Pairing" icon. 4. - Page 3 8. For privacy matter, please change the security code on the app. For Andriod Live View with Dynamic Display 1. Go to the device list 2. Press and hold the device name, the menu will appear on the panel. Then tap “modify”. 3.
-
Page 4: App Introduction
4. Tap ”Save” when you done APP INTRODUCTION b. interval Go to the push notification setting to setup interval time of the push. There are four options Note: Your smart phone will receive the push immediately after rst triggered. After that the camera will send the push according to you can select how long you’ll receive the push interval time you setup. -
Page 5: Specifications
Les ports TCP #6000 et #80 doivent être ouverts Hereby, Chacon, declares that the radio equipment type « 34543 » is in compliance with the Directive 2014/53/UE. The full text of the EU decalration of conformity is available at the following Internet address: http://chacon.be/conformity... -
Page 6: Menu Principal
Appairez la caméra au récepteur Si vous avez d'autres caméras déconnectés avec récepteur, suivez les étapes ci-dessous pour l'appairage : 1. Appuyez sur l’icône de configuration de la caméra pour accéder à l’écran d’appairage de la caméra. 2. Sélectionnez le canal de la caméra (caméra 1/2/3/4). 3. - Page 7 Visualisation en direct avec affichage dynamique Remarque : Si vous n’avez pas installé l’application pour scanner des codes QR dans votre smartphone, nous recommandons de télécharger et d’installer l’application « Barcode Scanner ». 7. Saisissez le même mot de passe que le récepteur. Donnez un nom à votre appareil et ensuite appuyez sur « save » (Enregistrer) pour sortir.
- Page 8 PRÉSENTATION DE L’APPLICATION b. intervalle Allez dans les paramètres de la notification push pour configurer l’intervalle de la notification push. Quatre options sont disponibles vous pouvez choisir la durée de réception des notifications push Remarque : votre smartphone recevra immédiatement la notification push après la première activation. Ensuite, la caméra enverra une notification push selon l’intervalle paramétré.
-
Page 9: Inhoud Van De Set
Schakel DHCP en UPnP op uw router in. De TCP-poorten nr. 6000 en 80 moeten open zijn Le soussigné, Chacon, déclare que l’équipement radioélectrique « 34543 »est conforme à la Directive 2014/53/UE. Le texte complet de la déclaration UE de conformité est disponible à l’adresse internet suivante : http://chacon.be/conformity... - Page 10 Koppel de camera aan de ontvanger Als u nog meer camera's hebt die niet aan de ontvanger zijn gekoppeld, volg dan onderstaande stappen om deze te koppelen: 1. Tik op het pictogram voor camera-instelling om het scherm voor het koppelen van de camera te openen. 2.
- Page 11 7. Voer hetzelfde wachtwoord in als voor de ontvanger. Geef uw apparaat een naam en tik vervolgens op "Save" (opslaan) om af te sluiten. Liveweergave via dynamische schermen 8. Uit privacyoverwegingen raden wij u aan de beveiligingscode op de app te wijzigen. Voor Android 1.
- Page 12 AAN DE SLAG MET DE APP b. interval Ga naar de instelling voor de pushmelding om het tijdsinterval voor de pushmelding in te stellen. U hebt hier vier opties om te selecteren hoe lang u de pushmelding wilt ontvangen you can select how long you’ll receive the push Opmerking: uw smartphone ontvangt de pushmelding direct bij de eerste activering.
-
Page 13: Contenido Del Kit
Habilite DHCP y UPnP en el router. Deberán estar abiertos los puertos 6000 y 80 del TCP. Hierbij verklaar ik, Chacon, dat het type radioapparatuur ‘34543’ conform is met Richtlijn 2014/53/EU. De volledige tekst van de EU-conformiteitsverklaring kan worden geraadpleegd op het volgende internetadres: http://chacon.be/conformity... - Page 14 Emparejar la cámara con el receptor Si tiene cámaras adicionales desconectadas del receptor, siga los pasos a continuación para el emparejamiento: 1. Pulse el icono de configuración de la cámara para acceder a la pantalla de emparejamiento de la cámara. 2.
- Page 15 7 Introduzca la misma contraseña que la del receptor. Asigne un nombre a su dispositivo y luego pulse "Save" (Guardar) para salir. Visión en directo con pantalla dinámica 8. Por motivos de privacidad, cambie el código de seguridad en la aplicación. Para Android 1.
-
Page 16: Ajustes De Fábrica
PRESENTACIÓN DE LA APLICACIÓN b. Intervalo Vaya a los ajustes de notificaciones push para configurar el intervalo de tiempo de las mismas. Hay cuatro opciones entre las que puede seleccionar durante cuánto tiempo recibirá las notificaciones pushyou can select how long you’ll receive the push Nota: su smartphone recibirá... -
Page 17: Conteúdo Do Kit
Ative o DHCP e UPnP no router. A porta TCP #6000 e #80 deve estar aberta. Hereby, Por la presente, Chacon, declara que el tipo de equipo radioeléctrico ‘34543 es conforme con le Directiva 2014/53/UE. El texto completo de la declaración UE de conformidad está disponible en la dirección internet http://chacon.be/conformity... -
Page 18: Funcionamento Do Sistema
Emparelhe a câmara com o recetor Se tiver câmaras adicionais desligadas com recetor, siga os passos abaixo para emparelhar: 1. Toque no ícone de configuração da câmara para aceder ao ecrã de emparelhamento da câmara. 2. Selecione o canal da câmara (Câmara 1/2/3/4). 3. - Page 19 Visualização ao vivo com ecrã dinâmico 7. Introduza a mesma palavra-passe que para o recetor. Atribua um nome ao seu dispositivo e toque em "save" (guardar) para sair. 8. Por uma questão de privacidade, altere o código de segurança na aplicação. Para Android 1.
- Page 20 4. Toque em "Save" (Guardar) quando terminar. INTRODUÇÃO À APLICAÇÃO b. intervalo Aceda à configuração de notificações para definir o tempo de intervalo da notificação. Existem quatro opções pode selecionar quanto tempo receberá a notificação Nota: receberá no seu smartphone a notificação imediatamente após o primeiro acionamento. Depois disso, a câmara envia a you can select how long you’ll receive the push notificação de acordo com o tempo de intervalo configurado.
-
Page 21: Installation Der Geräte
Mehrfachstecker am Router an. Aktivieren Sie am Router DHCP und UPnP. Die TCP-Ports 6000 und 80 sollten O abaixo assinado, Chacon, declara que o presente tipo de equipamento de rádio ‘34543’ está em conformidade geöffnet sein. com a Diretiva 2014/53/UE. -
Page 22: Bedienung Des Systems
Kamera mit dem Empfänger koppeln Wenn Sie weitere Kameras haben, die vom Empfänger getrennt sind, koppeln Sie diese folgendermaßen: 1. Tippen Sie auf das Symbol zum Einrichten der Kamera, um den Bildschirm zum Koppeln der Kamera aufzurufen. 2. Wählen Sie den Kamerakanal aus (Kamera 1/2/3/4). 3. - Page 23 Live-Ansicht der dynamischen Anzeige 7. Geben Sie dasselbe Kennwort wie für den Empfänger ein. Geben Sie Ihrem Gerät einen Namen und tippen Sie dann auf „Save“ (Speichern), um den Bildschirm zu verlassen. 8. Ändern Sie aus Datenschutzgründen den Sicherheitscode für die App. Für Android 1.
- Page 24 EINFÜHRUNG ZUR APP b. intervall Gehen Sie zu der Einstellung für Push-Benachrichtigungen, um die Intervallzeit festzulegen. Es stehen 4 Optionen zur Auswahl des Zeitraums zur Verfügung, in dem Sie Push-Benachrichtigungen erhalten. you can select how long you’ll receive the push Hinweis: Ihr Smartphone erhält die erste Push-Benachrichtigung umgehend nach der Aktivierung.
-
Page 25: Contenuto Del Kit
(2) dieses Gerät muss den Empfang von Interferenzen zulassen, einschließlich von Interferenzen, die unerwünschte Auswirkungen auf den Betrieb haben. Chacon erklärt hiermit, dass der Funkgerätetyp „34543“ mit der Richtlinie 2014/53/EG konform ist. INSTALLAZIONE DEI DISPOSITIVI Der vollständige Test der EU-Konformitätserklärung steht unter der folgenden Internetadresse zur Verfügung: http://chacon.be/conformity... -
Page 26: Funzionamento Del Sistema
Associare la videocamera al ricevitore Se si hanno ulteriori videocamere non connesse al ricevitore, procedere come segue per eseguire l’associazione: 1. Toccare l’icona relativa alla configurazione della videocamera per accedere allo schermo di associazione della videocamera. 2. Selezionare il canale della Videocamera (Videocamera 1/2/3/4). 3. - Page 27 7. Inserire la stessa password utilizzata per il ricevitore. Scegliere il nome del dispositivo, quindi toccare “save” (salva) per uscire. Visualizzazione live - Modalità dinamica questione riservatezza, assicurarsi modificare codice sicurezza sull’app. Per Android 1. Andare all’elenco dei dispositivi 2. Tenere premuto il nome del dispositivo; apparirà il menu sul pannello. Quindi toccare “modify” (modifica). 3.
- Page 28 INTRODUZIONE ALL’APP b.Intervallo Andare alle impostazioni delle notifiche push per impostare l’intervallo di tempo per le notifiche push. È possibile selezionare quattro opzioni per l’intervallo di ricezione delle notifiche push you can select how long you’ll receive the push Nota: Lo smartphone riceverà le notifiche push subito dopo l’attivazione. Successivamente, la videocamera invierà le notifiche push in base all’intervallo di tempo impostato.
-
Page 29: Описание Продукта
помощью Hub. interferenza ricevuta, incluse le interferenze che possono causare un funzionamento indesiderato. Con la presente, Chacon, dichiara che l’apparecchiatura radio tipo ‘34543’ è conforme alla direttiva 2014/53/UE. УСТАНОВКА УСТРОЙСТВА Il testo completo della dichiarazione di conformità UE è disponibile al seguente sito: http://chacon.be/conformity... -
Page 30: Работа Системы
Настройки привязки камеры к системе Если у Вас имеется дополнительная камера, неподключенная к системе HDNVR, выполните следующие действия: Нажмите значок настройки камеры, чтобы открыть экран сопряжения камеры. Выберите канал камеры ( Камера 1 / 2 / 3 / 4). Нажмите на иконку « Сопряжение камеры (Camera Pairing). Через... - Page 31 Прямая трансляция в режиме Dynamic Display Внимание: Если на вашем устройстве не установлено приложение для считывания QR кода, мы рекомендуем вам установить приложение “Barcode Scanner” 7 Введите пароль такой же какой вы установили на консоли. Дайте вашему удаленному доступу имя и нажмите «сохранить», чтобы...
-
Page 32: Возврат К Заводским Настройкам
4. Нажмите «Сохранить (Save)» по завершении. ОПИСАНИЕ МОБИЛЬНОГО ПРИЛОЖЕНИЯ b. Интервал Перейдите в меню Настройки уведомлений, чтобы установить интервал времени уведомлений. Существует четыре варианта, среди которых вы сможете выбрать вы можете выбрать подходящий вам. Внимание: Ваш смартфон получит уведомление сразу после первого запуска. После этого камера отправит push – you can select how long you’ll receive the push уведомление... -
Page 33: Zawartość Zestawu
помехи, включая помехи, которые могут вызвать нежелательную работу Otwarte powinny być porty TCP nr 6000 i nr 80 Таким образом, Chacon заявляет, что радио устройство «34543» соответствует Директиве 2014/53 / ЕС. Полный тест декларации соответствия ЕС доступен по следующему адресу: http://chacon.be/conformity... -
Page 34: Menu Główne
Parowanie kamery z odbiornikiem Jeśli inne kamery nie są podłączone do odbiornika, wykonaj następujące czynności, aby sparować urządzenia: 1. Naciśnij ikonę konfiguracji kamery, aby uzyskać dostęp do ekranu parowania kamery. 2. Wybierz kanał kamery (kamera 1/2/3/4). 3. Naciśnij ikonę parowania kamery. 4. - Page 35 7. Wprowadź hasło takie jak do odbiornika. Nadaj urządzeniu nazwę, a następnie naciśnij przycisk „Save” (zapisz), aby zamknąć Podgląd na żywo w trybie dynamicznym menu. 8. W celu zapewnienia ochrony prywatności zmień kod bezpieczeństwa w aplikacji. System Android 1. Przejdź do listy urządzeń. 2.
-
Page 36: Ustawienia Fabryczne
4. Po zakończeniu naciśnij przycisk „Save” (zapisz) PRZEDSTAWIENIE APLIKACJI b. Odstęp czasowy Przejdź do ustawień powiadomień push, aby ustawić odstęp czasowy dla powiadomień push. Dostępne są cztery opcje okresu odbierania powiadomień push. Uwaga: Twój smartfon otrzyma powiadomienie push natychmiast po pierwszym aktywowaniu. Następnie kamera będzie wysyłać you can select how long you’ll receive the push powiadomienia push zgodnie z ustawionym przedziałem czasowym. -
Page 37: Ürüne Genel Bakiş
TCP #6000 ve #80 portu açılmalıdır. powodować niepożądane działanie. Firma Chacon niniejszym oświadcza, że urządzenie radiowe 34543 jest zgodne z Dyrektywą 2014/53/UE. Pełna treść deklaracji zgodności UE dostępna jest pod adresem CİHAZLARIN KURULMASI http://chacon.be/conformity... - Page 38 Kamerayı alıcıyla eşleştirin Alıcı ile bağlantısı kesilmiş ek kameralarınız varsa eşleştirmek için aşağıdaki adımları izleyin: 1. Kamera eşleştirme ekranına erişmek için kamera kurulum simgesine dokunun. 2. Kamera kanalını seçin (Kamera 1/2/3/4). 3. “Kamera Eşleştirme" simgesine dokunun. 4. 35 saniye içinde kameranın arka tarafındaki eşleştirme düğmesine 5 saniye basılı tutun. Kameranın başarıyla eşleştirildiğini gösteren Yeşil Bağlantı...
- Page 39 Dinamik Ekran ile Canlı İzleme 7. Şifreyi alıcıyla aynı şekilde girin. Cihazınızı adlandırın, ardından çıkmak için “save” (kaydet) üzerine dokunun. 8. Gizlilik açısından, lütfen uygulamadaki güvenlik kodunu değiştirin. Android için 1. Cihaz listesine git 2. Cihaz adını basılı tutun, menü panelde görüntülenecektir. Sonra “modify”(değiştir) üzerine dokunun. 3.
- Page 40 4. İşiniz bittiğinde ”Save” (Kaydet) üzerine dokunun. UYGULAMA TANITIMI b. Aralık Bildirim aralığını ayarlamak için push notification (bildirim alımı) ayarına gidin. Hangi süre boyunca bildirim alacağınızı belirlemeye yönelik dört seçenek bulunmaktadır Not: Akıllı telefonunuz ilki tetiklendikten hemen sonra bildirim alacaktır. Bundan sonra kamera, ayarladığınız zaman aralığına göre you can select how long you’ll receive the push bildirim gönderir.
- Page 41 Hub sau Switch. Activați de la router funcțiile DHCP și UPnP. Porturile TCP 6000 și 80 trebuie să fie deschise Chacon, “34543” telsiz ekipmanının 2014/53/EU Direktifine uygun olduğunu beyan etmektedir. AB uygunluk beyanının tam testi aşağıdaki İnternet adresinde bulunabilir: http://chacon.be/conformity INSTALAREA APARATELOR A.
-
Page 42: Meniul Principal
Asocierea camerei la receptor Dacă aveți mai multe camere pe care doriți să le conectați la receptor, urmați procedura de mai jos: 1. Apăsați pe pictograma de configurare a camerei pentru a accesa meniul de asociere a mai multor camere. 2. - Page 43 7. Introduceți aceeași parolă ca pentru receptor. Dați un nume camerei, apoi apăsați „Save” (Salvați). Imagine în direct cu afișare dinamică 8. Pentru siguranță, schimbați codul de securitate din aplicație. Pentru Android 1. Accesați lista dispozitivelor. 2. Țineți apăsat pe numele camerei. Va apărea un meniu. Apăsați pe „Modify” (Modificare). 3.
- Page 44 4. Când ați terminat, apăsați pe „Save” (Salvați). INTRODUCERE PRIVIND APLICAȚIA b. interval Accesați meniul de configurare a notificărilor în timp real pentru a selecta intervalul de timp pentru acestea. Sunt disponibile patru opțiuni pentru selectarea intervalului de timp pentru notificări Observație: Telefonul dvs.
- Page 45 și (2) acest aparat trebuie să accepte orice interferențe recepționate, inclusiv interferențe care pot provoca funcționarea incorectă a acestui Chacon declară că echipamentul radio tip „34543” respectă directiva 2014/53/EU. Declarația de conformitate integrală cu normele UE este disponibilă la următoarea adresă de internet : http://chacon.be/conformity...
Need help?
Do you have a question about the 34543 and is the answer not in the manual?
Questions and answers