Table of Contents
Advertisement
Quick Links
Operating manual
solar water pump „Marino"
Customer support:
If you have problems or questions regarding this product, simply contact us!
Monday to Friday 8 am to 12 noon and 1 pm to 4 pm.
By phone: 09605-92206-0
By e-mail for ordering spare parts: ersatzteil@esotec.de
By e-mail for questions about the product: technik@esotec.de
Product: Manufacturer Item No.: 101759
These instructions relate ONLY to this product and contain important infor-
mation for using the product for the first time. Please keep these instructions
for later reference and should always accompany the product in the event of
transference to a new user.
1. Introduction
Dear Costumer,
Thank you for purchasing the solar light. With this solar light you purchased a product
manufactured according to the current state of technology.
This product fulfils all requirements of the valid European and national
regulations. The conformity was proved. The relevant declarations and
documentation are deposited with the manufacturer.
To maintain this state and guarantee a safe operation, you as the user will
have to follow this operating manual!
2. Safety Instructions
- In case of damages caused by not
!
following this operating manual, the
warranty rights will expire! We exclude
liability for any consequential damages!
- We exclude liability for property or
personal damages caused by inappropriate
handling or not following the safety instructions.
- In these cases any guarantee rights will expire.
Due to safety and admission reasons (CE) it is not allowed to arbitrarily reconstruct
and/or change the solar light.
Therefore, please keep to the operating manual.
The accident prevention rules of the association of the industrial trade cooperative
association for electric plants and working material are to be considered in industrial
environments.
3. Intended use
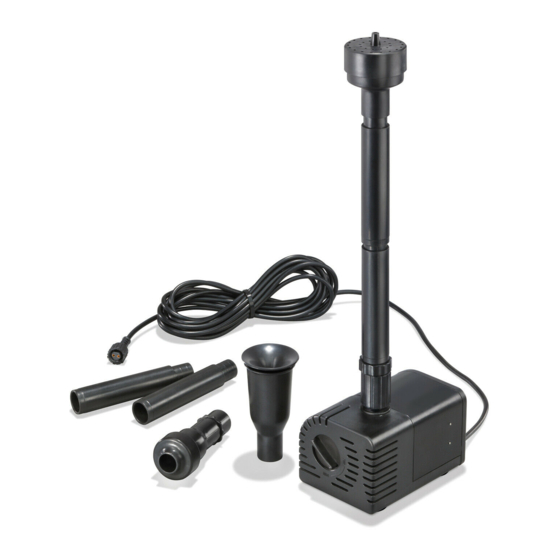
This submersible pump is designed for pumping water in garden ponds, fountains,
water dishes, etc. It can pump water through a hose connection or can be operated
through attached lifting tubes with water sprinklers.
A solar module or a power pack with a voltage of 12 to 24 volts can be used as the
energy source. When used with a solar module, the pump works only if enough solar
radiation strikes the solar module.
A battery box (accessory) is delivered along with this pump.
The delivery rate of the pump can be adjusted using the regulator on the front side of
the pump. The water pump has no On/Off switch. As soon as the pump is connected
to its power supply, it starts pumping water.
4. Installation and commissioning
1. Roll out the connecting cable of
the pump completely.
2. Ensure that the cap is firmly in
place on the socket.
3. Place the pump in water (plea-
se note Point 5 here).
4. Connect the lifting tubes till
they project out of the water
surface. For this, first attach the
reducer to the pump.
5. You can now choose from 3
different water nozzles.
6. Alternatively, the pump can
also be used for pumping water
through a hose. For this, you
just have to attach a hose to
the pump's pipe.
7. Now supply power to the water
pump through a solar module.
Use the enclosed plug with
cable (brown = positive pole,
blue = negative pole) for this. If
you have purchased this pump
as a complete solar power sys-
tem, then the appropriate plug is already attached to the solar module.
Note: The plug has reverse-polarity protection, no force should be used while inser-
ting. The glass of the solar module is fragile.
Caution! Risk of injury! A broken module cannot be repaired again and must be
disposed off in an environmental-friendly way.
8. If the pumping capacity is too high, you can reduce the amount of water. Simply
water nozzle
lifting
tubes
waterbell
threat
air fountain
Flowrate
regulator
turn the regulator on the front side of the pump in clockwise direction. Please do
GB
not use force while adjusting. The adjustment range is 45°.
5. Dry run protection
The pump is equipped as standard with a dry run pro-
tection. Two sensor points are provided on the side of
the housing for this. The pump works if these points are
under water. If a point projects out of the water, the pump
does not work.
6. Care and maintenance
For optimum performance of the pump, it must be washed occasionally with warm
water depending on the water contamination. To wash the pump, open the housing
as follows:
Note: Please do not use force while dismantling or assembling the pump. The parts
are very fragile and can break easily.
1. Disconnect the pump's plug.
2. Pull the front cover of the pump forward like a slide gently (Figure 1).
3. Turn the front cover of the pump by about 45° clockwise (Figure 1) and carefully
pull the cover forward (Figure 2). Watch out for the plastic shaft and the seal while
doing this.
4. Carefully drag the impeller out of the pump (if necessary, use pliers). (Figure 3).
5. Now clean all the parts carefully with warm water.
6. Then plug the shaft with the impeller carefully into the hole of the pump. Ensure
that the shaft is fitted firmly.
7. Now place the cover carefully over the pump. Ensure that the seal is fitted proper-
ly.
8. Turn the front cover again by 45 degrees counter-clockwise into the starting posi-
tion.
9. Slide the lower part of the pump completely into the pump housing.
The pump is ready to use again.
1
turn 45°
3
7. Malfunction
Pump is not pumping water
- Is the pump completely submerged in water? Dry run protection (Point 5)
- Is the polarity of the supply voltage reversed? Cable colour brown = + pole,
blue = negative pole
- Is the pump dirty? Cleaning the pump, see Point 6.
8. Technical data
- Operating voltage:
- Degree of protection:
- Class of protection:
- Power consumption:
- Pump lift:
- Delivery rate:
- Operating temp. range:
Note: The pump is only suitable for pumping water.
Note: Protect the pump from frost!
During cold winter months, the pump must be taken out of the water and placed/
stored in a warm area. The solar module can spend the winter outdoors.
9. Safety information:
DANGEROUS for children! Children could easily swallow the small parts that come
with this pump and its packaging material. Please keep at a safe distance. These
parts could otherwise lead to choking or suffocation!
WARNING against danger of stumbling! Lay out the connection cable such that it
does not create the threat of tripping or stumbling!
CAREFUL: material damage! If you set up the solar module without a module hold-
er, you must make sure that it is sturdy enough to retain its position. If the module falls
down or a foreign object hits against it, the solar module can be damaged.
2
12 - 24 V DC
IP 68
III
Approx. 6 W at 12 VDC - approx. 35 W at 24 VDC
Max. 1 m at 12 VDC - max. 3,5 m at 24 VDC
Max. 1000 l/h at 12 VDC - max. 2000 l/h at 24 VDC
+4 to +40°C
Sensorpoints
Advertisement
Table of Contents

Subscribe to Our Youtube Channel
Related Manuals for esotec Marino


Summary of Contents for esotec Marino
- Page 1 The pump works if these points are By e-mail for ordering spare parts: ersatzteil@esotec.de under water. If a point projects out of the water, the pump By e-mail for questions about the product: technik@esotec.de does not work. Product: Manufacturer Item No.: 101759 Sensorpoints 6.
- Page 2 Item No.: 911066 8. Complete nozzle set: Item No.: 911067 Manufacturer/Importer esotec GmbH - Gewerbegebiet Weberschlag 9 - D-92729 Weiherhammer Tel.-Nr: 09605-92206-0 - Fax.-Nr: 09605-92206-10 - Internet: www.esotec.de Disposal: Dear customer, please cooperate in avoiding waste. When you intend to dispose of the product in future, please consider that it contains valuable raw materials suited for recycling.
Need help?
Do you have a question about the Marino and is the answer not in the manual?
Questions and answers