Advertisement
Quick Links
Quick Start Guide
1- Loosen screws (2) on Reel Arm and raise the arm high enough to accommodate reel; rotate 90°.
Tighten screws to secure Arm. 2- Screw the Support Posts (2) into the side of the press.
3- Place the Parts Guide over the Support Posts (2) slide to fasten, tighten knobs to secure.
PRESS SET-UP
1
6- Use handle to Raise Safety Guard door until engaged (click sound). Make sure handle is in the
down position. 7- Place the applicator on base of the press, raise ram (A), slide to the right until rams
interlock and applicator hits stop (B).
APPLICATOR INSTALLATION
6
11-Place reel on Arm w/label facing outwards, tighten back Reel Stop until parts are aligned with the end
of the Parts Guide. 12- Place Reel Holders onto Arm, apply pressure (compress spring) while tightening.
13- Check label for proper die set, initial setting and shut height. Turn dial to adjust to initial setting.
11
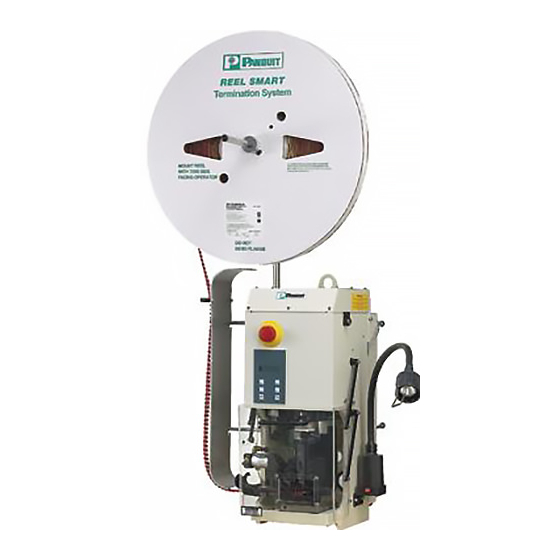
Fully
Assembled
CP-871 with
CA9
Applicator
Part Number >> CP-871 Press / CA9 Applicator >> Setup, Loading and Operation
2
8
-
Raise the handle on the side of the press to secure applicator.
A
B
7
12
Equipment Needed:
CP-871
CA9 Applicator
Power Cord and air line
Terminals
Operation Manual
Tool Solutions Division - Romeoville, IL (USA)
3
8
13
Tools Needed:
Metric Allen wrenches (Set)
Dial Calipers
Side cutters
Page: 1 of 2
4- Attach Power Cord, Foot Pedal and Tool Feed (back of press)
5- Insert Air Hose into Air Regulator on Press then connect to air
sources.
4
9- Attach air line to inner fitting on press and adapter to applicator.
10- Loosen thumb screw and remove Reel Holders and spring.
9
14- Remove protective coating from dies. Insert Crimp Die into the ram
then the Cutter Die. 15-Slide the cutter die upwards then tighten securely
with allen wrench (use small end of wrench to tighten)
14
5
10
15
Safety Equipment
Glasses
QS-CA9 Rev: 00 / April, 2012
Advertisement

Subscribe to Our Youtube Channel
Related Manuals for Panduit Ezair CA9


Summary of Contents for Panduit Ezair CA9
- Page 1 Tool Solutions Division - Romeoville, IL (USA) Quick Start Guide Part Number >> CP-871 Press / CA9 Applicator >> Setup, Loading and Operation 4- Attach Power Cord, Foot Pedal and Tool Feed (back of press) 1- Loosen screws (2) on Reel Arm and raise the arm high enough to accommodate reel; rotate 90°. Tighten screws to secure Arm.
- Page 2 Tool Solutions Division - Romeoville, IL (USA) Quick Start Guide Part Number >> CP-871 Press / CA9 Applicator >> Setup, Loading and Operation 16- Lift Feed Finger (A) and insert Lower Die (B). 19- Close Safety Guard. Power ON press by turning the Emergency Stop 17- Lower the Feed Finger into slot of lower die and tighten securely w/allen wrench.
Need help?
Do you have a question about the Ezair CA9 and is the answer not in the manual?
Questions and answers