Table of Contents
Advertisement
Quick Links
Advertisement
Table of Contents

Related Manuals for Ocean Rodeo Control


Summary of Contents for Ocean Rodeo Control
-
Page 2: Table Of Contents
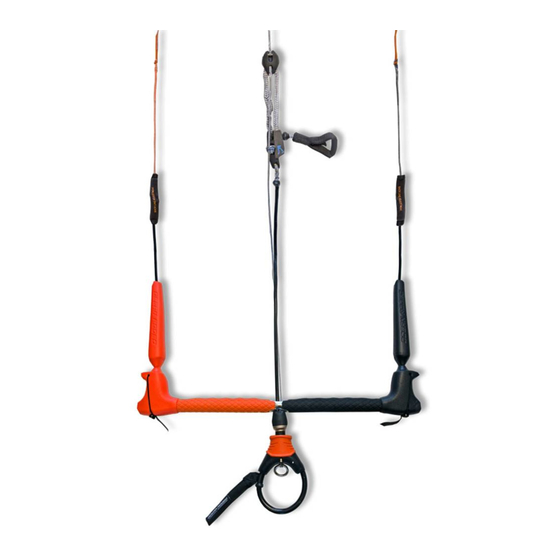
Kite leash attachment Read this manual thoroughly before using your The user is therefore advised to obtain such new kite control bar. This is not a kiteboarding instruction as well as familiarizing him or Kite leash safety release instruction manual, nor does it eliminate the... - Page 3 Back flying lines Kite leash Back line leader Kite leash release cuff Front flying lines Safety line Front line flag out safety Trim line Above bar trim cleat Above bar trim handle Bungee line storage Back line length adjuster Bar floats Below bar swivel Push away release Trim loop...
-
Page 4: Caution
Caution TUNING THE LINES Safety Warning: kite powered sports can be very dangerous and physically demanding. The user of this product should understand that participating in kite powered sports may involve serious injury or death and agree to observe the following safety precautions: Your kite’s performance relies on properly Now pull on the bar to check your rear outside tuned lines! Make a habit of checking your... -
Page 5: Back Line Length Adjustment
back line length adjustment All Lines Equal Length! With your trim strap fully extended (stopper Your back flying lines can be adjusted longer or When your line lengths are equal, slide the knot touching the cleat) your back lines and shorter by sliding the neoprene covers up and neoprene covers down covering the loose front lines must be equal in length. -
Page 6: Using A Lock In Tube
(located on the chicken loop hub) away from you with force. on your lines while riding. loop. So long as your kite leash is attached to the center line leash attachment, the control bar will ride up the center safety line and depower the kite. -
Page 7: Trim Loop Reset After Activation
Trim loop reset after activation To reset your trim loop, push the metal retain- Push metal retaining ring up towards release cuff Holding pin in place, slide release cuff up (4) ing pin down (1) Slide retaining pin under release cuff and let Slide the metal box ring over the retaining pin cuff snap back into place (5) and push into place (2) -
Page 8: Trim Line Adjustment
Trim line adjustment Trim line set to maximum power (1) Pull down and out on the trim line to release Allow trim line to travel back to a longer length from cleat (3) to add power (4) Pull down on trim line to depower your kite (2) -
Page 9: Connecting Leash / Harness Attachment
connecting Leash / harness attachment KITE LEASH ATTACHMENT NOTE! It is incredibly important you attach your If your harness does not have a leash attach- Wrap tether around the spreader bar and leash to the kite with the leash release cuff closest ment point use the provided leash tether. -
Page 10: Kite Leash Safety Release
Kite leash Safety release NOTE: Always test your safety systems! Slide the release cuff up (3) Slip the retaining pin under the cuff and let it To eject your leash, simply push the cuff away snap back in place (4) from you (1)(2) PUSH... -
Page 11: Below Bar Swivel
Below bar swivel Single front line re-ride twisted front lines can effect the operation of your front line When activated, this control bar’s safety re-ride. In order to correct twisted front lines simply grasp the release system depowers your kite by releas-... -
Page 12: Line Storage Bungees
Use bar end line bungees to secure your kite To avoid tangles we suggest you wind your All kite control bars are covered by a lines for tanglr free storage. lines in a figure 8 pattern around your bar one year warranty offered to the original ends.
Need help?
Do you have a question about the Control and is the answer not in the manual?
Questions and answers