Table of Contents
Advertisement
Quick Links
Advertisement
Table of Contents

Related Manuals for Ocean Rodeo Stick-Shift


Summary of Contents for Ocean Rodeo Stick-Shift
- Page 1 KITE CONTROL BAR - FEATURING SIDEWINDER BACK LINE TRIM.
-
Page 2: Table Of Contents
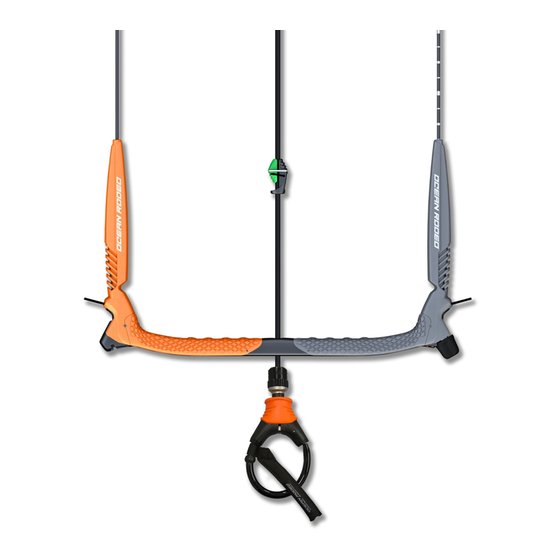
TAKE A LESSON! TABLE OF CONTENTS THIS MANUAL IS NOT A KITE LESSON! BEFORE YOU LAUNCH YOUR KITE, TAKE BAR OVERVIEW SINGLE FRONT LINE RE-RIDE LESSONS FROM A PROPERLY CERTIFIED SCHOOL! USING THE R3 SIDEWINDER LINE STORAGE BUNGIES For information on lessons in your area go to TUNING THE LINES STORING AND CARING oceanrodeo.com/kiteboarding/L2K... - Page 3 KITE LEASH RELEASE CUFF R3 FORCE TENSIONER SYSTEM KITE LEASH FORCE TENSIONER SPRING CAP LOCK IN TUBE R3 LINE SPLITTER LEASH ATTACHMENT RING 35cm PIGTAILS TRIM LOOP 30cm PIGTAILS PUSH AWAY RELEASE CUFF 20cm PIGTAILS BELOW BAR SWIVEL GROOVE BAR LOCKING TUBE R3 G-STOP: BAR STOPPER BAR FLOATS...
-
Page 4: Using The R3 Sidewinder
USING THE R3 SIDEWINDER When the bar is at max power, the bar ends will appear as shown in image 1. NOTE: While riding, the R3 Sidewinder Adjusting trim while riding: If the tuning should be located on your right side. knob feels too difficult to turn, sheet the bar When the bar is at minimum power, the bar out to decrease backline tension. -
Page 5: Tuning The Lines
TUNING THE LINES � except for the short line from the anchor point Completely depower the bar by unwinding the and pull on the bar until the line has stretched to Sidewinder to the minimum power setting. Your kite’s performance relies on properly tuned the same length as the others. -
Page 6: Pigtail Guide
PIGTAIL GUIDE Warning: Before riding with your new Ocean Rodeo Stick-Shift kite control bar, please ensure you are using appropriate pigtails and that your kite is rigged properly. Included with your new Stick-Shift bar you have received: 4 x 20cm pigtails (A) - Page 7 USING THE LOCK IN TUBE TRIM LOOP RELEASE CUFF ACTIVATION The lock in tube helps keep your trim loop hooked in if you have slack or minimal tension on To separate yourself from the trim loop in an emergency situation, push the orange release cuff your lines while riding.
-
Page 8: Trim Loop Reset
TRIM LOOP RESET NOTE: To increase the life of your Trim Loop and lines, ensure the Front Line Re-ride Sleeve and inte- To reset your trim loop, push the metal retaining pin down. (1) rior channel of Trim Loop is free of sand and debris. Do this by pulling out the leash connection Slide the metal box ring over the retaining pin and push into place. -
Page 9: Kite Leash Attachment
KITE LEASH ATTACHMENT Fold the retaining pin and loop back, tucking them under the release cuff. (3) NOTE! It is extremely important you attach your leash to the kite with the leash release cuff Allow release cuff to slide back into place, securely locking the leash to the harness. (4) closest to your harness! Pull the release cuff up and slide the “Rider End”... -
Page 10: Kite Leash Safety Release
KITE LEASH SAFETY RELEASE USING THE R3 G-STOP (BAR STOPPER) NOTE: Always test your safety systems! To adjust the stopper position on the locking tube, align the top edges of both stopper compo- nents (1). To eject your leash, simply push the cuff away from you. To lock the stopper in place, tap it with your control bar. -
Page 11: The R3 Force Tensioner System
Warning: THE R3 FORCE TENSIONER SYSTEM Do not move stopper below safe-line The tensioning system allows the user to depower their kite when there is no tension on the marked on locking tube. back lines. NOTE: Locking the Bar Stopper below this To keep the tensioning system free from sand and debris, rinse it regularly. -
Page 12: Below Bar Swivel
BELOW BAR SWIVEL Twisted front lines can affect the operation of your front line re-ride. To correct twisted front lines: Grasp the swivel head and turn it in the opposite direction of the line twists. WARNING: Multiple twists in your front lines can create dangerous amounts of fric- tion and prevent proper depowering when the front line re-ride system is activated. -
Page 13: Single Front Line Re-Ride
SINGLE FRONT LINE RE-RIDE LINE STORAGE BUNGEES When activated, the control bar’s safety Use bar end line bungees to secure your system depowers your kite by releasing kite lines for tangle free storage. tension on 3 of the 4 flying lines. This allows the kite to depower and remain safely teth- ered to you by your leash. -
Page 14: Storing And Caring
Warranty is limited to the repair or � Never launch with obstacles or people safety systems. replacement at Ocean Rodeo’s sole discre- � Be first aid certified and carry first aid and closer than two full line lengths downwind. - Page 15 oceanrodeo.com info@oceanrodeo.com NA Toll Free 888-544-4969 EU Toll Free +44-800-756-5505...
Need help?
Do you have a question about the Stick-Shift and is the answer not in the manual?
Questions and answers