Advertisement
Table of Contents
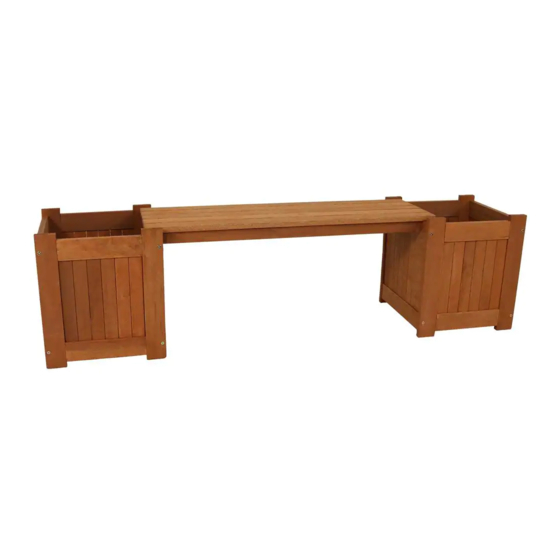
OUTDOOR FLOWER BOX BENCH
Read all assembly and care instructions carefully before using this product. Save this manual for future reference.
330
pounds
150 kg
CHOKING HAZARD — This item contains small parts that can
be swallowed. Keep children away during assembly.
HELPFUL HINT
This item was treated with teak oil at the factory. Apply a suitable wood oil at least once a year, or
when the wood looks particularly dry. Left untreated, the wood will weather to a silvery gray color.
LY011
Purchase Date:
Thank you for choosing Sunnydaze Decor. We stand behind our brand and the quality of the items we sell.
Replacement parts or products will be sent at our discretion within the 1-year warranty period. Proof of purchase, with
the date of purchase as well as photos of the merchandise defect, must be provided. Photos are used to determine
the cause of defects and for future quality control. Register your warranty at
If you have any questions, comments or concerns, feel free to contact us by phone at 888-881-4668, by email:
customerservice@nethealthshops.com, or via our contact us page at
Assemble components on a soft, clean surface to avoid damaging the finish.
Inspect packaging to ensure all
parts are accounted for before
disposing of packing materials.
/
/
Order/Customer Reference Number:
LAM-615
No.
A
B
C
D
E
F
G
02/2020
https://tiny.cc/SunnydazeWarranty
https://tiny.cc/SunnydazeContact
Parts
Bench Seat
End Panel
Inner Panel
JCBC M6 x 50mm 16
Barrel Nut
Hex Key
Barrel Nut Driver
Qty.
1
4
4
16
1
1
Page 1 / 2
Advertisement
Table of Contents

Related Manuals for Sunnydaze Decor LAM-615


Summary of Contents for Sunnydaze Decor LAM-615
- Page 1 Order/Customer Reference Number: Thank you for choosing Sunnydaze Decor. We stand behind our brand and the quality of the items we sell. Replacement parts or products will be sent at our discretion within the 1-year warranty period. Proof of purchase, with the date of purchase as well as photos of the merchandise defect, must be provided.
- Page 2 ASSEMBLY Do not fully tighten any bolt until all bolts have been placed. 1. With the slotted end facing out, place 2x Barrel Nut (E) into Inner Panel (B). Use Barrel Nut Driver (G) to turn the barrel nut so the threaded hole aligns with the pre-drilled hole.
Need help?
Do you have a question about the LAM-615 and is the answer not in the manual?
Questions and answers