Dogtra E-FENCE 3500 Owner's Manual
Underground e-fence system
Hide thumbs
Also See for E-FENCE 3500:
- Owner's manual (82 pages) ,
- User manual (30 pages) ,
- Owner's manual (79 pages)

Subscribe to Our Youtube Channel
Related Manuals for Dogtra E-FENCE 3500


Summary of Contents for Dogtra E-FENCE 3500
- Page 1 E-FENCE 3500 UNDERGROUND E-FENCE SYSTEM Owner's Manual Please read this manual thoroughly before operating the Dogtra E-FENCE 3500.
-
Page 2: Table Of Contents
CONTENTS OVERVIEW ......................MAIN FEATURES OF THE E-FENCE 3500 ............. SAFETY FEATURES ....................PACKAGE CONTENTS ..................DESCRIPTION OF TRANSMITTER PARTS ............DESCRIPTION OF RECEIVER PARTS ............... RECEIVER FITTING ....................CHARGING THE RECEIVER ................CHANGING THE CONTACT POINT LENGTH ..........TESTING THE SYSTEM PRIOR TO INSTALLATION ........ -
Page 3: Overview
OVERVIEW The Dogtra E-FENCE 3500 system gives you the ability to allow your dog the freedom he wants within your specified boundaries. Dogtra’s containment system contains your dog without the use of conventional fencing that can be chewed through, jumped over or dug under. -
Page 4: Main Features Of The E-Fence 3500
· 2-hour rapid charge lithium polymer batteries SAFETY FEATURES · Dogtra’s E-FENCE 3500 system use state-of-the-art microcomputer technology. The receiver has an automatic control that limits the stimulation to eight seconds. · Dogtra’s filtering system prevents accidental activation from outside sources other than your transmitter. -
Page 5: Package Contents
PACKAGE CONTENTS Wall-Mount Receiver 20ga Underground Transmitter Fence Wire (500 feet) Boundary Training Owner's Training Flags (50 each bundle) Manual Book Transmitter Ground Wire Receiver Power Adaptor (green) Charger (5-volt 1A) (24-volt 500mA) Test Lamp Plastic Anchors Transmitter (2 ea.) Mounting Screws (2 ea.) Wire Splices... -
Page 6: Description Of Transmitter Parts
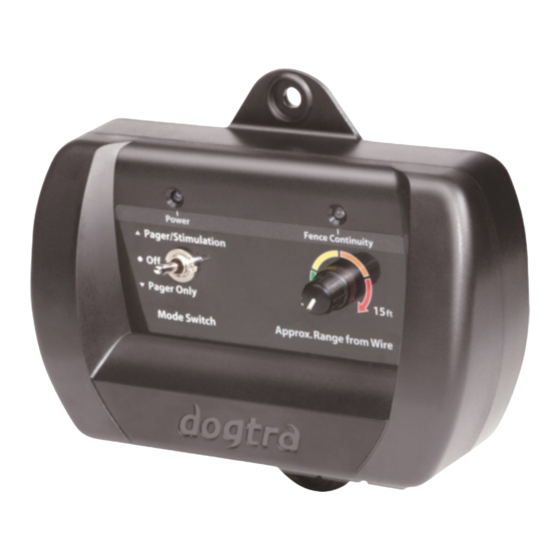
DESCRIPTION OF TRANSMITTER PARTS On/Off Boundary Wire Indicator Light Continuity Light Field Width Adjustment Knob On/Off & Function Selection Switch Connector for Ground Wire Power Jack Boundary Wire Connector Tabs E-FENCE 3500 Transmitter... - Page 7 On/Off & Function Selection Switch The On/Off & Function Selection Switch has three functions. When the toggle switch is in the up position, the unit will give the dog a Pager vibration followed by stimulation. When the toggle switch is in the down position, only a Pager vibration occurs (no stimulation).
- Page 8 Boundary Wire Continuity Light When the wires are connected properly, the boundary wire continuity light will be on. In the event that the E-FENCE 3500 wire becomes damaged or disconnected, the light will automatically turn off and the warning beep will sound.
- Page 9 Power Jack Plug the 120-volt adaptor into a 120-volt wall outlet and insert the adaptor plug into the power jack of the transmitter. Wall-Mount Transmitter Use the (2) included screws to mount the transmitter to a wall securely near an outlet.
-
Page 10: Description Of Receiver Parts
DESCRIPTION OF RECEIVER PARTS Collar Strap Contact Points Battery Charging Receptacle & Rubber Plug LED Indicator Light Stimulation Selection Dial E-FENCE 3500 Receiver... - Page 11 E-FENCE 3500 system is not being utilized. Receiver LED Indicator Light When first activating the E-FENCE 3500, the LED light on the receiver will illuminate for approximately 1 second to indicate that the power is on. Once the unit is turned on, a blink will occur every 2 seconds to indicate that the receiver is functioning properly.
-
Page 12: Receiver Fitting
If the receiver is too loose, the contact will not be consistent and cause the corrections to be inconsistent. Dogtra uses surgical stainless steel contact points and anti- microbial plastic to protect the dog’s skin. - Page 13 Battery Charging Receptacle & Rubber Plug On the inside of the receiver next to the collar strap is a battery charging receptacle and rubber plug. The unit will be fully waterproof with or without the rubber plug. If the dog was in salt water, make sure to rinse the receiver and charging port with clean water and air dry.
-
Page 14: Charging The Receiver
Dogtra e-collars. This will prevent any damage that can be incurred from attempting to use a different charger. NOTE 2: The unit has a partial charge when it leaves the Dogtra facility. Upon receipt of the system, be sure to give it a full 2-hour initial charge before the first use away from any flammable substances. -
Page 15: Changing The Contact Point Length
CHANGING THE CONTACT POINT LENGTH The Dogtra E-FENCE 3500 comes equipped with standard 5/8” contact points that can be extended to 3/4” contact points, for use with dogs with longer coats. To increase the contact point length from 5/8” to 3/4”, follow the steps below. -
Page 16: Testing The System Prior To Installation
TESTING THE SYSTEM PRIOR TO INSTALLATION 1. To ensure that your E-FENCE 3500 system is working properly, connect the power adaptor into the transmitter power jack and then plug the power adaptor into a household outlet. Switch the stimulation knob to Pager +Stimulation or Pager Only. -
Page 17: Installation
INSTALLATION Fence Wire The e-fence boundary wire must make a continuous loop around your property for the system to operate. The signal is delivered from the terminal of the transmitter, through the fence wire, back to the other terminal on the transmitter. When this is accomplished, the wire continuity light will emit a constant red indicator. - Page 18 Common Boundary Designs *The diagrams below are indicated for a rectangular layout. House House Front Boundary Only Fence Front Yard Only House House Front or Back Access Basic Loop with Garden twisted wire neutral House House zone passage Front Boundary with Existing Fence Double Loop with Passage...
- Page 19 * Please note the diagrams are not drawn to scale. The E-FENCE 3500 system includes 500 feet of boundary wire and 50 training flags. Additional flags and wiring can be purchased through the Dogtra Company.
-
Page 20: Additional Parts
Tools To install your E-FENCE 3500, you will need a flat-edge spade, Phillips screwdriver, and a wire cutter/stripper. If your layout calls for the wires to be connected across concrete, you will also need a caulking gun, exterior silicon... - Page 21 IMPORTANT Before starting any digging, contact your local phone, gas and power companies to locate any other buried services. The E-FENCE 3500 boundary wire does not have to be buried to operate. For protective measures we highly recommend the wire be buried about 3-4 inches underground. Begin by digging a 4-inch deep cut where the wire first enters the ground near the transmitter and continue around the path of the loop wire.
- Page 22 IMPORTANT Bury the fence wire after you have tested the system and are sure it is working properly. Do not nick or scrape the fence wire during installation as it may result in an intermittent signal or no signal. Make gradual turns at the corners with a radius of at least 3 feet.
-
Page 23: Wire Splicing
The waterproof splices included in the E-FENCE 3500 system are designed to provide a sealed connection between the wires. The insulation on the boundary wire should not be stripped before placing wire into the holes. - Page 24 Connecting the Fence Wire to the Transmitter Splice the two ends of the twisted wire to each of the two ends of the fence wire. Drill a hole through the exterior wall or window/door sill or run the fence wire through an existing utility line hole.
-
Page 25: Optional Accessories
OPTIONAL ACCESSORIES The following items may be purchased separately. To purchase accessories, please visit Dogtra's online store at www.dogtra.com or call customer service at (888) 811-9111. Transmitter Power Receiver Charger Adaptor (24Volt 500mA) (5Volt 1A) · European Adaptor for 220-volt outlets... - Page 26 Connecting a Lightning Surge Protector Transmitter Adaptor Transmitter Loop Transmitter Fence wires Transmitter Wires Plug the lightning protector into a grounded (3-wire) 120V AC outlet within five feet of where you want to locate the transmitter. Cut the e-fence wires near the protector and strip all four ends back ¼...
-
Page 27: Troubleshooting Guide
TROUBLESHOOTING GUIDE 1. My dog is not reacting to the receiver. – Make sure the receiver and transmitter are turned on. – Make sure the collar strap is tight enough so both contact points are touching the dog’s skin. – The contact points may be too short for the dog. To place an order for longer contact points that are more appropriate for your dog, please call (888) 811- 9111. - Page 28 2. Get the Underground Cable Wire Locator transmitter: - Connect the red alligator clip to the end of one of the E-FENCE 3500 boundary wires. - Connect the black alligator clip to the end of the ground wire that is not in the ground.
-
Page 29: General Maintenance Tips
GENERAL MAINTENANCE TIPS Your system requires very little maintenance. The receiver for the E-FENCE 3500 system is fully waterproof. To remove dirt, simply wipe with soap and water. The wall transmitter is not waterproof and must be protected from the elements in a shed, garage or carport. -
Page 30: Warranty And Repair Information
No dealer of Dogtra products, nor any employee or agent of Dogtra, is authorized to make any additions, changes, or extensions to the Warranty. Dogtra, at its sole discretion and at any time, reserves the right to modify the Warranty. - Page 31 (see below for contact information). Upon approval of your warranty work, Dogtra will repair or replace (at Dogtra’s election) your product without charge for labor or parts. You are responsible for shipping, including cost, of your product to Dogtra for warranty service. Dogtra will handle shipping, including cost, of the repaired or replaced product back to customers in the USA.
Need help?
Do you have a question about the E-FENCE 3500 and is the answer not in the manual?
Questions and answers