Advertisement
Quick Links
Advertisement

Related Manuals for DAYTEK M32


Summary of Contents for DAYTEK M32
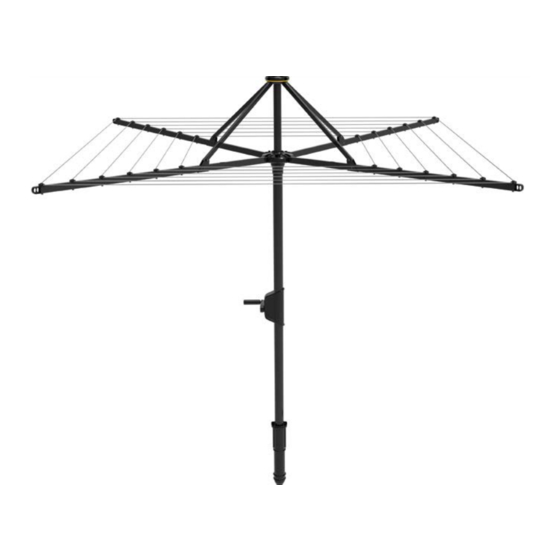
- Page 1 IMPORTANT – READ THESE INSTRUCTIONS Product Code BEFORE USING YOUR CLOTHESLINE Date of purchase Name & location Suitable for models of supplier M32 / M38 / M42 / M48 / M52 / M58 R0619-V1 daytek.com.au 100% Australian Owned Since 1954...
-
Page 2: Before You Begin
BEFORE YOU BEGIN Note: We recommend two persons to install this product Please check that the carton contains all the Tools and materials required for installation: • required parts before assembly. Medium aggregate screenings (crushed rock) • Your carton should contain the following: 20kg bags of pre-mix concrete x 2 •... - Page 3 PREPARING THE SITE FOR YOUR ROTARY CLOTHESLINE Preparing the ground socket 1. Make sure the selected installation position has a MINIMUM minimum of 3 meters clearance on all sides from the METRES central location. 2. Excavate a hole 250mm in diameter x 600mm deep. DIAM 3.
- Page 4 Securing the main tube assembly 10. Ensure the concrete is underneath the top 8. Tie a length of rope from each stake to the main lip of the ground socket. tube assembly to secure it vertically. Check that the tube is sitting vertically using a spirit level. 11.
- Page 5 ASSEMBLING YOUR ROTARY CLOTHESLINE 1. Once the concrete is dry, remove the cord and stabilising stakes. 2. Gently slide the hoist tube assembly into the main tube assembly until the units engage together. The tube assemblies are engaged when both the upper and lower wind brake face meet.
- Page 6 OPERATING YOUR ROTARY CLOTHESLINE 1. Slide the yellow ring upwards, this allows the arms to be folded out to horizontal position where the dual latches will lock the arms in place. YELLOW (See Fig. 1 – 3) RING YELLOW RING 2.
- Page 7 Note: There is a safety clutch within the gear 3. To raise the hoist for ‘free spinning’ wind box. When the clothesline is in maximum lowest drying, simply rotate the handle in a or highest position the handle will rotate freely clockwise direction to disengage the wind (clicking sound), which prevents damage to the break.
- Page 8 FOLDING AWAY YOUR ROTARY CLOTHESLINE 1. Wind down the clothesline to the wind break position. 2. Use one hand to push the release buttons on the Slide whilst pulling down on the Central Hub with your other hand. Once the catch disengages you can move the Slide downwards until all four arms are folded vertically.
-
Page 9: Helpful Hints
ADJUSTING THE HEIGHT OF YOUR ROTARY CLOTHESLINE The ideal height of the clothesline should be approximately 50mm from the users head to the underside of the horizontal arms. To adjust the clothesline to higher position simply remove the support ring from the ground socket, lift the clothesline and rotate to either slot 1, 2 or 3. - Page 10 HOW TO RESTRING/REPLACE THE LINE ON YOUR DAYTEK ROTARY CLOTHESLINE ARM 3 ARM 4 ARM 2 ARM 1 – LINE END A. Tensioner Block Bottom – C. Bolt – head of bolt under recessed into the arm of the the arm of the clothesline.
- Page 11 ARM 2, 3 & 4 STRING LINE TERMINAL BLOCK TOP AFFIXED HOW TO TENSION THE LINE ON YOUR DAYTEK ROTARY CLOTHESLINE 1. At the required tensioning point, place your index 3. Pull the line through the Tensioner Block to finger on top of the Tensioner Block Top and over required tension and re-tighten the bolt.
-
Page 12: Care And Maintenance
A full range of important to regularly wipe down the surface of your spares are available through Daytek. Wipe away dust clothesline with a damp cloth. and dirt regularly to prevent build up and ensure smooth operation.
Need help?
Do you have a question about the M32 and is the answer not in the manual?
Questions and answers