Table of Contents
Advertisement
Available languages
Available languages
Quick Links
MODEL: IOS-DOV-DT
Installation AND CONFIGURATION INSTRUCTIONS
Ratings:
Voltage: 120/277 VAC, 50/60 Hz
Incandescent : 800 W, 120 VAC, 50/60 Hz
Electronic Ballast: 5 A, 120/277 VAC, 50/60 Hz
Motor: 1/4 HP, 120 VAC, 50/60 Hz
Adjustable Ambient Light Level: 10 fc to Daylight
Selectable Time Delay: 15 sec to 30 min (DIP switch)
Walk Through Mode: 3 min if no activity after 30 sec
Test Mode: 15 sec upon initial power-up
PIR Sensitivity Adjustment: 50% or 100% (DIP switch)
Ultrasonic Sensitivity Adjustment: 30% to 100%
Coverage - PIR: up to 1200 ft
(110
2
Ultrasonic: up to 400 ft
Temperature Range: 32° F to 122 °F (0° C to 50° C)
DESCRIPTION:
The IOS-DOV-DT series Dual Technology Occupancy Sensors In-Wall sensor switch controls
a load based on occupancy, vacancy and ambient light levels. It combines passive infrared
(PIR) and ultrasonic technologies to help avoid false triggering while increasing presence
detection. Selectable modes allow the sensor to turn load ON and hold it ON as long as either
or both technologies detect occupancy. If no movement is detected for a user-specified time
of 15 seconds to 30 minutes, the load is turned OFF. The sensor provides a 180° coverage
pattern, up to 1200 ft
2
(110
)
m2
LOCATION/MOUNTING
Since this device responds to temperature changes, care should be taken when mounting
the device. DO NOT mount directly above a heat source, in a location where hot or cold drafts
will blow directly on the sensor, or where unintended motion will be within the sensor's
field-of-view.
INSTALLATION
1.
Make sure power is turned off at main disconnect.
2.
Remove existing single pole switch or dimmer installation, if applicable.
3.
Remove 3/4" (1.9 cm) of insulation from each circuit conductor. Make sure the ends of
wires are straight.
4.
Connect lead wires as shown in WIRING DIAGRAM (see Figure 2): Black lead to Line
(Hot), Red lead to Load wire, White lead to Neutral wire, Green lead to Ground.
5.
Gently position wires in wall box, attach sensor switch to the box.
6.
Mount device "TOP" up.
7.
Restore power at circuit breaker or fuse, wait one minute.
8.
Remove the small cover plate by lifting from bottom edge (see Figure 3).
9.
Locate the adjustment knobs on the control panel to perform tests and adjustments
(see Figure 4).
10. Replace the small cover plate after testing and adjusting.
11. Attach the wall plate.
SENSOR ADJUSTMENT
Remove the cover from the sensor.
NOTE: There is a 40 sec warm-up period when power is first applied to unit.
The sensors are factory preset to allow for quick installation in most applications. Follow
this procedure to verify the sensor coverage and customize the settings.
BAND SWITCH
Sensor has the ability to be set as an occupancy or vacancy sensor. The main difference is that when set to
vacancy mode the load will only turn ON with the push button.
Mode
Position
Description
OFF
Left
Circuit is permanently open
OCC
Center
Occupancy Mode: Automatic ON, Automatic OFF
after set time delay.
VAC
Right
Vacancy Mode: Manual ON only, Automatic OFF
after set time delay
)
m2
2
(37
m2
)
for PIR and 400 ft
for Ultrasonic sensor.
2
(37
)
m2
React to the push button
None
Manually toggles the load
ON/OFF.
Manually toggles the load
ON/OFF.
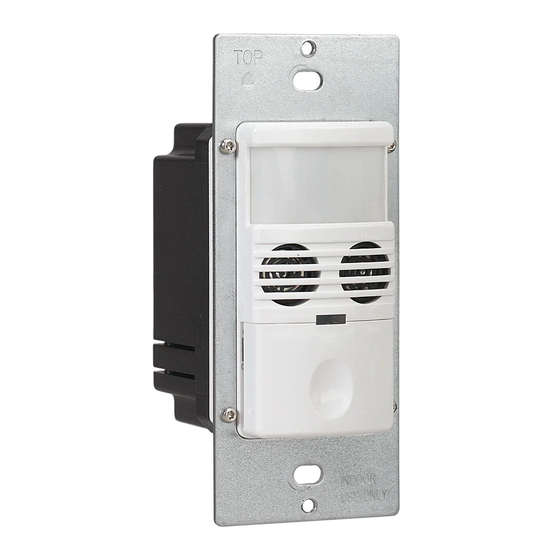
Dual Technology
PIR/Ultrasonic
In-Wall Occupancy / Vacancy
Sensor Switch
Risk of Fire or Electric Shock
WARNING
• Disconnect power at the circuit breaker(s) or fuses before installing or servicing.
• Installation and/or wiring must be in accordance with national and local electrical code
requirements.
• Use COPPER conductors ONLY.
• Indoor dry location use only.
• Do not exceed electrical ratings.
Figure 1
Figure 2
Figure 3
Figure 4
PIR Coverage: 1200 ft
(110
)
2
m2
Ultrasonic Coverage: 400 ft
2
(37
m2
)
Advertisement
Table of Contents

Subscribe to Our Youtube Channel
Related Manuals for Intermatic IOS-DOV-DT


Summary of Contents for Intermatic IOS-DOV-DT
- Page 1 Figure 1 DESCRIPTION: The IOS-DOV-DT series Dual Technology Occupancy Sensors In-Wall sensor switch controls a load based on occupancy, vacancy and ambient light levels. It combines passive infrared (PIR) and ultrasonic technologies to help avoid false triggering while increasing presence detection.
- Page 2 LIMITED WARRANTY Warranty service is available by either (a) returning the product to the dealer from whom the unit was purchased or (b) completing a warranty claim online at www.intermatic.com. This warranty is made by: Intermatic Incorporated, 1950 Innovation Way, Suite 300, Libertyville, IL 60048. For additional product or warranty information go to: http://www.Intermatic.com or call 815-675-7000.
- Page 3 Plage de température : 0 °C à 50 °C (32 °F à 122 °F) Figure 1 DESCRIPTION : Vue de dessus Le détecteur d’occupation encastré à technologie double série IOS-DOV-DT commande une charge (20 pi) en fonction de l’occupation, de l’inoccupation et des niveaux d’éclairage ambiant. Il combine des (10 pi) technologies à...
- Page 4 Ce service de garantie est disponible (a) en retournant le produit au vendeur auprès duquel l’unité a été achetée ou (b) en remplissant un formulaire en ligne de réclamation de garantie sur www.intermatic.com. Cette garantie est faite par : Intermatic...
- Page 5 DESCRIPCIÓN: Vista superior El interruptor del sensor de ocupación en pared con tecnología doble serie IOS-DOV-DT controla una carga basada en la ocupación, desocupación y los niveles de luz ambiente. Combina tecnologías infrarroja pasiva (PIR) y ultrasónica para ayudar a evitar disparos falsos y aumentar la detección de presencia.
- Page 6 Este servicio de garantía está disponible mediante (a) la devolución del producto al proveedor al que se le compró la unidad; o (b) el llenado de una reclamación de garantía en línea en www.intermatic.com. Esta garantía la otorga: Intermatic Incorporated,...
Need help?
Do you have a question about the IOS-DOV-DT and is the answer not in the manual?
Questions and answers