
Related Manuals for Faria Beede MG3000

Summary of Contents for Faria Beede MG3000
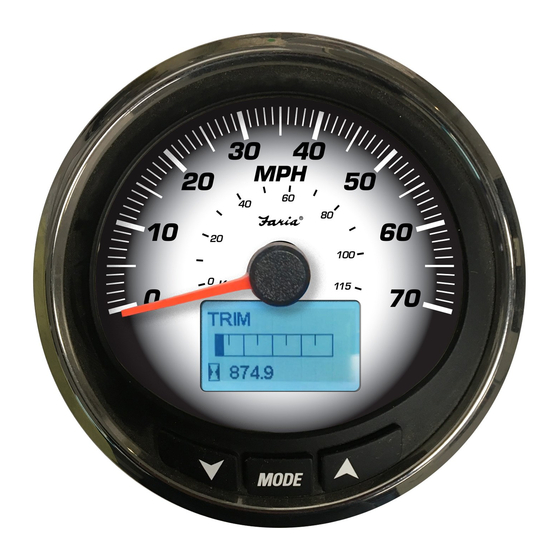
- Page 1 IS0399 Rev. A ecn 10591 6/2017 MG3000 - Speedometer DEPTH 25.0 Installation / User Manual www.FariaBeede.com...
-
Page 2: Table Of Contents
NO DATA..........................10 Release Information IMPORTANT: This guide was written for the 4 inch MG3000 speedometer with the latest Software version: referenced below. Gauges with other software versions may have features not documented in this guide. To view the gauge software version, refer to Software Version page 7. -
Page 3: Installation
The MG3000 instruments use a “plug and play” networking technology and is connected directly to the MG3000 tachometer. The MG3000 speedometer is controlled by a three-button keypad. The buttons and a brief description of their uses: • UP and DOWN: Used to scroll through available pages in Normal Mode or options within the system menus. -
Page 4: Wiring Diagram
Wiring Diagram Speedometer Tachometer Pitot connection for Speed. (Optional) 12- pin connector 12- pin connector Pin 1 7.7 vDC (Faria Bus +) Pin 1 7.7 vDC (Faria Bus +) Pin 2 Faria Bus A Pin 2 Faria Bus A Pin 3 Faria Bus B Pin 3 Faria Bus B... -
Page 5: Power On
To customize the data displayed in the LCD go to Display Settings on page 10. Otherwise, if this is the first time you have powered on your MG3000 speedometer, you will be prompted to System Setup. Complete the required system setup. -
Page 6: Edit Menu Options
DISPLAY: is used to edit the data pages that are shown in Normal Mode. Note: Although the manual may identify a particular function as being part of the MG3000 architecture individual functions may not be available for your installation. Check with your engine and boat manufacturer for function availability. -
Page 7: Warning Audio (On Or Off)
AUDIO options menu. Press and hold the MODE button to save the setting. The LCD screen displays SETTING SAVED! and the MG3000 issues an audible beep. Setting Saved Audio Setting Use SET SAVED to turn the buzzer ON or OFF after a setting is saved in the speedometer. -
Page 8: Performing A Master Reset
• the release date for the software Data Sources Use DATA SOURCES to set where the MG3000 system gets the information it needs to display the information in the LCD. There are two data points that can be set by the Data Sources menu, Tanks and Depth. -
Page 9: Tanks
Analog or Bus Data. Analog uses the analog depth transducer attached to DEPTH the back of the MG3000 speedometer for depth and Bus Data uses the information on the TANKS CAN bus network for depth information. To make changes to the depth data source enter the DATA SOURCES menu (page 7) then: Use the UP and/or DOWN buttons to select DEPTH. -
Page 10: Deep Water
0.0 FT PRESS Deep Water Warning Use the Deep Water warning edit menu to set the deep water depth alarms for the MG3000 system. To make changes to the deep water depth alarm enter the DEPTH WARN menu (page 8) then:... -
Page 11: Display Settings
NO DATA ˚F PRESS Another possible cause for NO DATA is that the information is not available for your MG3000 configuration. This could be because of the way the MG3000 system was purchased and configured by the boat builder. If you see NO DATA in a data page you may remove those data pages by using the Number of Data Pages menu and limit to only those screens that have actual data. - Page 12 Faria Beede Instruments, Inc. P.O. Box 983 - 385 Norwich-New London Turnpike Uncasville, CT 06382, USA 860.848.9271...
Need help?
Do you have a question about the MG3000 and is the answer not in the manual?
Questions and answers