Table of Contents
Advertisement
MODEL PL1326
13-INCH PLANER
WITH SPIRAL CUTTERHEAD
Instruction Manual
NEED HELP? CONTACT US!
Have product questions? Need technical support? Please feel free to contact us:
1-800-232-1195 (M-F 8AM-5PM CST)
TECHSUPPORT@WENPRODUCTS.COM
IMPORTANT: Your new tool has been engineered and manufactured to WEN's highest standards for dependability,
ease of operation, and operator safety. When properly cared for, this product will supply you years of rugged,
trouble-free performance. Pay close attention to the rules for safe operation, warnings, and cautions. If you use
your tool properly and for its intended purpose, you will enjoy years of safe, reliable service.
WENPRODUCTS.COM
For replacement parts and the most up-to-date instruction manuals, visit
Advertisement
Table of Contents

Related Manuals for Wen PL1326


Summary of Contents for Wen PL1326
- Page 1 1-800-232-1195 (M-F 8AM-5PM CST) TECHSUPPORT@WENPRODUCTS.COM IMPORTANT: Your new tool has been engineered and manufactured to WEN’s highest standards for dependability, ease of operation, and operator safety. When properly cared for, this product will supply you years of rugged, trouble-free performance. Pay close attention to the rules for safe operation, warnings, and cautions. If you use your tool properly and for its intended purpose, you will enjoy years of safe, reliable service.
-
Page 2: Table Of Contents
CONTENTS WELCOME Introduction ..................... 3 Specifications ....................3 SAFETY General Safety Rules ..................4 Planer Safety Warnings ..................6 Electrical Information ..................7 BEFORE OPERATING Unpacking & Packing List .................8 Know Your Planer .................... 9 Assembly & Adjustments ................10 OPERATION &... -
Page 3: Welcome
INTRODUCTION Thanks for purchasing the WEN Benchtop Planer. We know you are excited to put your tool to work, but first, please take a moment to read through the manual. Safe operation of this tool requires that you read and understand this operator’s manual and all the labels affixed to the tool. -
Page 4: Safety
GENERAL SAFETY RULES WARNING! Read all safety warnings and all instructions. Failure to follow the warnings and instructions may result in electric shock, fire and/or serious injury. Safety is a combination of common sense, staying alert and knowing how your item works. The term “power tool” in the warnings refers to your mains-operated (corded) power tool or battery-operated (cordless) power tool. - Page 5 GENERAL SAFETY RULES WARNING! Read all safety warnings and all instructions. Failure to follow the warnings and instructions may result in electric shock, fire and/or serious injury. Safety is a combination of common sense, staying alert and knowing how your item works. The term “power tool” in the warnings refers to your mains-operated (corded) power tool or battery-operated (cordless) power tool.
-
Page 6: Planer Safety Warnings
PLANER SAFETY WARNINGS WARNING! Do not let comfort or familiarity with the product replace strict adherence to product safety rules. Failure to follow the safety instructions may result in serious personal injury. PLANER SAFETY 10. Do not plane material shorter than 15”, narrower than 3/4”, wider than 13”, or thinner than 1/2”. -
Page 7: Electrical Information
ELECTRICAL INFORMATION GROUNDING INSTRUCTIONS In the event of a malfunction or breakdown, grounding provides the path of least resistance for an electric current and reduces the risk of electric shock. This tool is equipped with an electric cord that has an equipment grounding conductor and a grounding plug. -
Page 8: Before Operating
UNPACKING & PACKING LIST UNPACKING With the help of a friend or trustworthy foe, such as one of your in-laws, carefully remove the planer from the packaging and place it on a sturdy, flat surface. Make sure to take out all contents and accessories. Do not discard the packaging until everything is removed. -
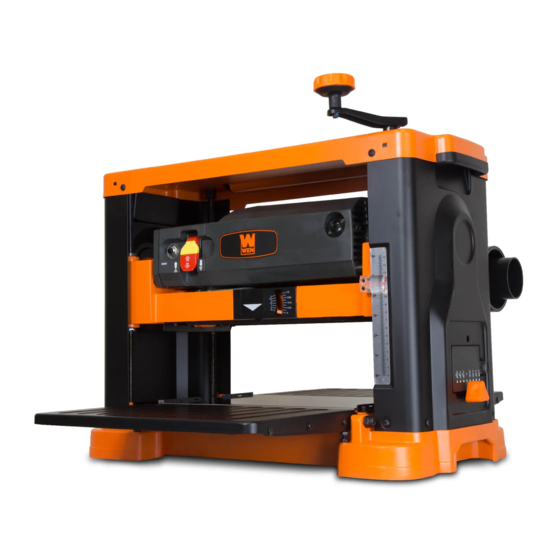
Page 9: Know Your Planer
KNOW YOUR PLANER TOOL PURPOSE Resurface boards, flatten workpieces, and much more with your WEN Thickness Planer. Refer to the diagram below to become familiarized with the parts and controls of your thickness planer. PLANER Return Roller Return Roller Elevation Handle... -
Page 10: Assembly & Adjustments
ASSEMBLY & ADJUSTMENTS ATTACHING THE DEPTH ADJUSTMENT HANDLE Fig. 2 1. Secure the depth adjustment handle (Fig. 2 - 1) to the top of the planer using the included socket head cap screw (Fig. 2 - 2). 2. Flip the depth adjustment handle over so the socket head cap screw is covered. -
Page 11: Operation & Maintenance
(Fig. 5). There are eight mount- ing holes – one set of two holes at each corner. Mounting Holes NOTE: We recommend the WEN 6588T or MSA658 Planer Stand for both stability and easy transportation around the workshop. OPERATION Fig. - Page 12 OPERATION AVOID DAMAGE TO BLADES Fig. 7 Thickness planers are a precision woodworking machine and should be used on quality lumber only. Do not plane dirty boards; dirt and small stones are abrasive and will wear out the cutting inserts. WARNING! REMOVE NAILS AND STAPLES.
- Page 13 OPERATION DEPTH OF CUT • The depth of cut depends on the width, species, hardness, moisture content, grain direction, and grain structure of the wood. • The maximum depth of cut is 1/8” for workpieces less than 6” wide, and 1/16” for workpieces wider than 6”. The wider the workpiece, the shallower the depth of cut should be.
- Page 14 OPERATION PREPARING WORK Thickness planers work best when at least one side of the lumber is flat. Use a surface planer or a jointer to create a flat surface. Twisted or severely warped boards can jam the planer and should not be used. Rip lumber in half to reduce the magnitude of warpage.
- Page 15 OPERATION THE DO’S AND DONT’S OF GRAIN DIRECTION Fig. 9 Always plane with the grain of the wood (in the same direction as the grain). There are six sides to every board: two face grains, two side/edge grains, and two end grains. Never plane with the end grain facing upwards.
-
Page 16: Maintenance
MAINTENANCE ADJUSTING/REPLACING CUTTING INSERTS WARNING! Always turn the planer OFF and disconnect it from the power source before starting any main- tenance work. The cutterhead is equipped with 26 indexable cutting inserts. Each insert can be rotated 90 degrees to expose a fresh edge;... - Page 17 Replace brushes if the carbon is worn down to 3/16” long or shorter. Tighten brush caps after replacement. Both brushes should be replaced simultaneously. Replacement brushes can be purchased from wenproducts.com (part no. PL1326-189). LUBRICATION The motor and cutterhead bearings are sealed and need no lu- brication.
-
Page 18: Troubleshooting Guide
TROUBLESHOOTING GUIDE WARNING! Stop using the tool immediately if any of the following problems occur. Repairs and replace- ments should only be performed by an authorized technician. For any questions, please contact our customer service at 1-(800) 232-1195, M-F 8-5 CST or email us at techsupport@wenproducts.com. PROBLEM CAUSE SOLUTION... - Page 19 TROUBLESHOOTING GUIDE WARNING! Stop using the tool immediately if any of the following problems occur. Repairs and replace- ments should only be performed by an authorized technician. For any questions, please contact our customer service at 1-(800) 232-1195, M-F 8-5 CST or email us at techsupport@wenproducts.com. PROBLEM CAUSE SOLUTION...
-
Page 20: Exploded View & Parts List
EXPLODED VIEW & PARTS LIST NOTE: Not all parts may be available for purchase. - Page 21 EXPLODED VIEW & PARTS LIST Part No. Description Qty. Part No. Description Qty. PL1326- Bearing Retainer Top Cover Assembly 001ASM Washer Socket Head Cap PL1326- 39_S Dust Chute Assembly Screw 039ASM Elevation Nut Dust Chute Lower Door Rollercase Dust Chute Half-Seal...
- Page 22 PL1326-189 Carbon Brush Table PL1326-190 Carbon Brush Cover PL1326-119 Extension Table Label, Logo Washer Label, Nameplate Scale PL1326-198 Cutterhead Side Guard Spacer Label, Safety Spring Label, Insert Replace- Steel Ball ment M135 Pivot Rod Label, Insert Warning Adjusting Screw PL1326-...
-
Page 23: Warranty Statement
WARRANTY STATEMENT WEN Products is committed to building tools that are dependable for years. Our warranties are consistent with this commitment and our dedication to quality. LIMITED WARRANTY OF WEN PRODUCTS FOR HOME USE GREAT LAKES TECHNOLOGIES, LLC (“Seller”) warrants to the original purchaser only, that all WEN consumer power tools will be free from defects in material or workmanship during personal use for a period of two (2) years used for professional or commercial use. - Page 24 THANKS FOR REMEMBERING V. 2020.09.22...
Need help?
Do you have a question about the PL1326 and is the answer not in the manual?
Questions and answers
Can carbide cutters be used in place of hss cutters and can either two sided or 4 sided carbide cutters be used?
Yes, carbide cutters can be used instead of HSS cutters for the WEN PL1326 if it has a compatible spiral cutter head. The document states that the 14.3x14.3x2mm-50° double-edge carbide inserts are compatible with spiral cutter heads used in WEN machines. Only two-sided carbide cutters are mentioned as compatible; four-sided cutters are not specified.
This answer is automatically generated