Advertisement
Available languages
Available languages
Quick Links
Safe Operation Practices • Assembly & Set-Up • Controls & Operation • Service • Troubleshooting
O
Record Product Information
Before setting up and operating your new equipment, please locate the model plate
on the equipment and record the information in the provided area to the right. You
can locate the model plate by looking at the side flange of the engine mounting
plate. This information will be necessary, should you seek technical support via our
web site, Customer Support Department, or with a local authorized service dealer.
Table of Contents
Safe Operation
Practices ......................................................... 2
Assembly & Set-Up .................................................................. 4
Controls & Operation .............................................................. 6
Service ...................................................................................8
Read and follow all safety rules and instructions in this manual before attempting to operate this machine. Failure to comply with these instructions
may result in personal injury.
Engine Exhaust, some of its constituents and certain vehicle components contain or emit chemicals known to the State of California to cause cancer
and birth defects or other reproductive harm.
NOTE:
This Operator's Manual covers several models. Features may vary by model. Not all features in this manual are applicable to all models and the model depicted may differ from yours.
peratOr
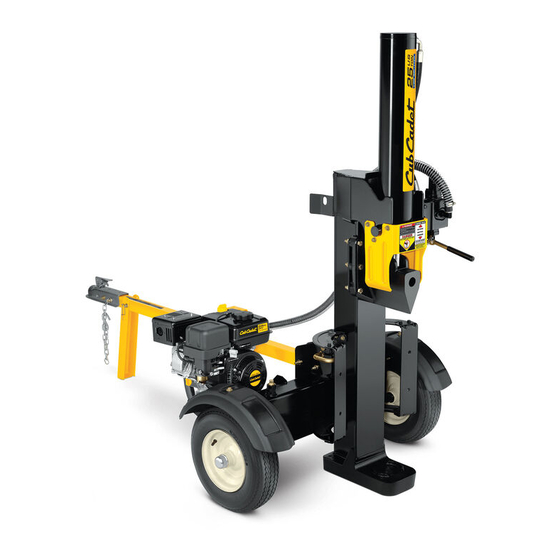
Mid Beam Logsplitter
California Proposition 65
'
M
s
anual
M
N
odel
uMber
S
N
erial
uMber
Troubleshooting ................................................................... 10
Français ............................................................................... 13
Replacement Parts
.............................See Separate Supplement
Warranty ...........................................See Separate Supplement
WARNING
WARNING
Form No. 769-22174
(June 27, 2019)
Advertisement

Related Manuals for Cub Cadet LS 25 CC H


Summary of Contents for Cub Cadet LS 25 CC H
- Page 1 Safe Operation Practices • Assembly & Set-Up • Controls & Operation • Service • Troubleshooting ’ peratOr anual Mid Beam Logsplitter Record Product Information odel uMber Before setting up and operating your new equipment, please locate the model plate on the equipment and record the information in the provided area to the right. You can locate the model plate by looking at the side flange of the engine mounting plate.
- Page 2 SAFE OPERATION PRACTICES WARNING This symbol points out important safety instructions which, if not followed, could endanger the personal safety and/or property of yourself and others. Read and follow all instructions in this manual before attempting to operate this machine. Failure to comply with these instructions may result in personal injury. When you see this symbol - HEED ITS WARNING! DANGER This machine was built to be operated according to the safe operation practices in this manual.
- Page 3 SAFE OPERATION PRACTICES When splitting extra large or uneven logs, the log must be stabilized with wooden shims Check all safety guards and shields to be sure they are in the proper position. Never operate with or split wood placed between the log and end plate or ground. safety guards, shields or other protective features removed.
- Page 4 ASSEMBLY & SET-UP Thank You Inspect the bottom of the crate for any protruding Spring Clip staples or wood splinters Thank you for purchasing this product. It was carefully engineered to provide excellent performance and remove. when properly operated and maintained. Remove any loose parts Please read this entire manual prior to operating the equipment.
- Page 5 ASSEMBLY & SET-UP Disconnect the log tray from the NOTE: Your log splitter may be shipped with motor oil in the engine. You MUST check the oil level beam on the control valve side by before operating. Be careful not to overfill. Gasoline can be added to the engine when the log splitter is removing the two hex washer in either the horizontal or vertical position.
- Page 6 CONTROLS & OPERATION Starting the Engine Cylinder Log Dislodger Control Handle Refer to the Engine Operator’s Manual for detailed starting instructions. Horizontal Wedge WARNING Beam Lock Read, understand and follow all the instructions and warnings on the machine and Tongue included in the Operator’s Manuals before operating.
- Page 7 CONTROLS & OPERATION Using the Control Handle Transporting the Log Splitter The control handle has three positions. See Figure 16. WARNING • FORWARD — Move the control handle NEUTRAL REVERSE to the FORWARD position to move wedge (To stop wedge) FORWARD (To return wedge) Do not tow faster than 45 mph and check the local, state and federal requirements...
- Page 8 SERVICE Reinstall the WARNING filter inlet screen and Do NOT make any adjustments without first stopping the engine, suction hose. disconnecting the spark plug wire and grounding it against the engine. Tighten the Always wear safety glasses during operation or while performing any hose clamp.
- Page 9 SERVICE Beam & Splitting Wedge Rotate the engine by slowly pulling the starter handle until the engine coupling half set screw is at the bottom. Loosen the set screw using an allen wrench and slide the coupling half off the engine shaft. Lubricate the top, sides and bottom of the beam and where it comes into contact with the splitting wedge with engine oil before each use.
- Page 10 TROUBLESHOOTING Problem Cause Remedy Cylinder rod will not move 1. Broken drive shaft. 1. See authorized service dealer. 2. Shipping plugs left in hydraulic hoses. 2. Disconnect hydraulic hoses, remove shipping plugs, reconnect hoses. 3. Set screws in coupling not adjusted properly. 3.
- Page 11 NOTES PAGE...
- Page 12 NOTES PAGE...
-
Page 13: Table Of Contents
Consignes de sécurité • Assemblage et montage • Commandes et utilisation • Entretien • Dépannage ’ anuel de l utilisateur Fendeuse à bûches à poutre moyenne Identification du produit uMéro de Modèle Avant de préparer et d’utiliser votre appareil neuf, veuillez localiser la plaque signalétique et reporter les renseignements dans la section à... -
Page 14: Consignes De Sécurité
CONSIGNES DE SÉCURITÉ AVERTISSEMENT Les consignes importantes sont précédées de ce symbole. Si vous ne respectez pas ces consignes, vous pourriez vous blesser grièvement ou causer des dommages. Veuillez lire toutes les consignes de ce manuel avant d’utiliser votre appareil afin d’écarter tout risque d’accident et de blessure. RESPECTEZ L’AVERTISSEMENT QUI ACCOMPAGNE CE SYMBOLE ! DANGER Cet appareil a été... - Page 15 CONSIGNES DE SÉCURITÉ Gardez la zone de travail propre. Enlevez immédiatement le bois fendu autour de la fendeuse pour Ne déplacez jamais l’appareil sur une pente ou sur un terrain accidenté sans un véhicule de remorquage éviter de trébucher. ou l’aide nécessaire. Ne modifiez pas le réglage du régulateur de vitesse et évitez de faire tourner le moteur à...
-
Page 16: Assemblage Et Montage
ASSEMBLAGE ET MONTAGE Merci. Vérifiez s'il y a des éclats de bois ou des objets pointus au Agrafe à ressort fond de la boîte et enlevez-les, Nous vous remercions d'avoir acheté ce produit. Il a été soigneusement conçu pour vous offrir une le cas échéant. - Page 17 ASSEMBLAGE ET MONTAGE Enlevez le plateau de la poutre du côté NOTE : L'appareil peut être expédié avec de l'huile dans le moteur. Il est toutefois recommandé de de la soupape de contrôle. Pour ce vérifier le niveau d’huile avant d'utiliser l'appareil. Prenez garde de ne pas trop remplir le réservoir. faire, retirez les deux boulons qui fixent Le réservoir de carburant peut être rempli quand la fendeuse est placée à...
-
Page 18: Commandes Et Utilisation
COMMANDES ET UTILISATION 4. Lubrifiez la partie de la poutre (où le coin de fendage passera) avec de l'huile à moteur. Poignée de Dispositif de dégagement Vérin commande N'utilisez pas de graisse. Lubrifiez l'avant et l'arrière de la poutre. 5. Branchez le fil de la bougie d'allumage à la bougie d'allumage. Démarrage du moteur Levier de Coin de... - Page 19 COMMANDES ET UTILISATION Utilisation de la poignée de commande Transport de la fendeuse à bûches La poignée de commande peut être placée dans NEUTRE (Pour arrêter le coin de fendage) AVERTISSEMENT trois positions. Voir Figure 16. • MARCHE AVANT — Placez la poignée Ne remorquez pas la fendeuse à...
-
Page 20: Entretien
ENTRETIEN Laissez l'huile AVERTISSEMENT couler dans le récipient. N'effectuez jamais de réglages sans avoir arrêté le moteur, débranché le fil de bougie, mis le fil de bougie à la masse contre le moteur. Portez toujours NOTE : des lunettes de protection lorsque vous utilisez la fendeuse et lorsque vous capacité... - Page 21 ENTRETIEN Colliers de serrage Retirez la pompe. Desserrez la vis de retenue sur le raccord du moteur et enlevez-le. Vérifiez les colliers de serrage sur le boyau de retour avant chaque utilisation et Faites tourner le moteur en tirant lentement sur le lanceur à rappel jusqu’à vérifiez les colliers de serrage sur le boyau une fois par saison.
-
Page 22: Dépannage
DÉPANNAGE Problème Cause Solution Le piston du vérin ne bouge pas. 1. L’arbre d’entraînement est brisé. 1. Consultez un centre de service agréé. 2. Des bouchons d'expédition se trouvent dans les boyaux 2. Débranchez les boyaux hydrauliques, retirez les bouchons hydrauliques. - Page 23 REMARQUE...
- Page 24 REMARQUE...
Need help?
Do you have a question about the LS 25 CC H and is the answer not in the manual?
Questions and answers