
Related Manuals for Parker Compumotor RP240


Summary of Contents for Parker Compumotor RP240
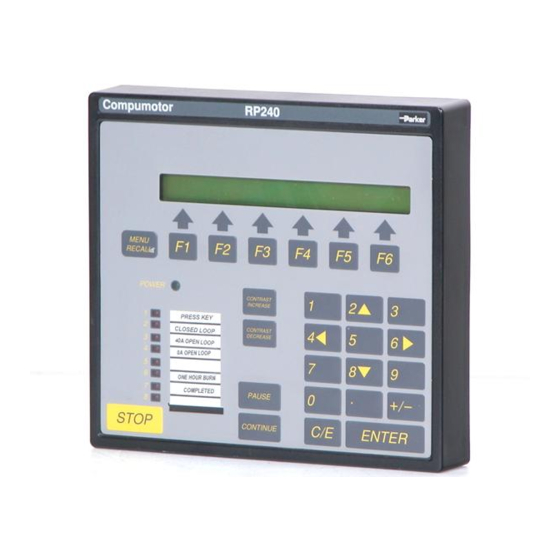
- Page 1 (217) 352-9330 | Click HERE Find the Parker / Compumotor RP240 at our website:...
-
Page 2: Table Of Contents
T A B L E C O N T E N T S How To Use This User Guide ........................i Assumptions..........................i User Guide Contents ........................i Installation Process Overview ........................ ii Installation Procedures ........................ii Related Publications..........................ii INTRODUCTION .......................... - Page 3 DIRECT RP240 CONTROL ....................... 43 ¯ RP240 Overview ..........................43 Command Summary ..........................43 RP240 Response—Extended X Mode ....................45 Key Press Response of RP240—6000 Mode ..................45 HARDWARE REFERENCE......................... 47 ˘ Environmental ............................. 47 Electrical Specifications ........................47 RP240 Connector........................... 47 Power ............................
-
Page 4: How To Use This User Guide
How To Use This User Guide This user guide is designed to help you install, develop, and maintain your system. Each chapter begins with a list of specific objectives that should be met after you have read the chapter. This section is intended to help you find and use the information in this user guide. -
Page 5: Installation Process Overview
Related Publications The following publications may be helpful resources. Current Parker Compumotor Motion Control Catalog User guide for the Compumotor Indexer or Servo Controller that you will use with the RP240 Schram, Peter (editor). The National Electric Code Handbook (Third Edition). -
Page 6: Introduction
Introduction Chapter Objective The information in this chapter will enable you to: Understand the product's basic functions & features Product Description The RP240 is designed to operate as an operator interface for Compumotor's Extended X (the SX Indexer/Drive, ZX Indexer/Drive, and Model 500 Indexer) and 6000 Series products (6200 Indexer and 6250 Servo Controller). - Page 7 Artisan Scientific - Quality Instrumentation ... Guaranteed | (888) 88-SOURCE | www.artisan-scientific.com...
-
Page 8: Getting Started
Inspect your RP240 shipment upon receipt for damage to its shipping container. Report any damage to the shipping company as soon as possible. Parker Compumotor cannot be held responsible for damage incurred in shipment. The items listed in the table below should be present and in good condition. -
Page 9: Wiring Connections
Wiring Connections The following figure illustrates the RS-232C and power; connector. This connector is located on the back of the RP240. Helpful Hint: RP240 Back Panel Back Panel +5 V RS-232C Connector RP240 User Guide Artisan Scientific - Quality Instrumentation ... Guaranteed | (888) 88-SOURCE | www.artisan-scientific.com... -
Page 10: Installation
Installation Chapter Objectives The information in this chapter will enable you to: Mount the RP240 properly Wire the RP240 correctly Verify that the complete system is installed properly Environmental Considerations The RP240 is designed to be mounted to a door, on a panel front, desk, or Helpful Hint: carried by hand. -
Page 11: System Mounting
System Mounting RP240 Door Mount To mount the RP240 operator panel to the door of an enclosure, or on a panel, follow the steps below. Drill four holes as shown in the following figure Remove the bayonet mounts (screws and standoffs) and rubber feet from the back of the operator panel (save the screws for mounting). -
Page 12: Rp240 Dimensions
RP240 Dimensions The following figure shows the dimensional drawing for the RP240. Mounting holes and their dimensions are given. Mounting holes 8-32 UNC (4 Plcs) 8.70 1.50 0.90 6.90 RP240 Compumotor 0.76 Interface Connector 0.60 Location RP240-NEMA4 Door Mount To mount the RP240-NEMA4 operator panel through the door of an enclosure, or in a panel, follow the steps below. -
Page 13: Rp240 Connections
Cutout in Cabinet Door Gasket RP240 Nema 4 Housing Wiring Guidelines Proper grounding of electrical equipment is essential to ensure the safety of Helpful Hint: personnel. You can reduce the effects of electrical noise due to All earth ground connections must be electromagnetic interference (EMI) by proper grounding. -
Page 14: Rp240 To Sx Wiring Diagram
To wire the RP240 to a 6000 Series product (6200 or 6250), connect the +5VDC connection on the RP240 to the +5VDC source on the 6000 Series connector labeled RP240. Connect the RP240 ground connection to the ground on the 6000 Series connector labeled RP240. -
Page 15: Rp240 To Model 500 Wiring Diagram
RP240 to Model 500 Wiring Diagram Model 500 Indexer Pin 14—Ground ENCODER Pin 23—+5VDC A +5VDC power source RP240 Rear Connector is available at pin 23 of either 25-pin D connector. ABS/INC ENCODER +5 V MOTOR DRIVER EARTH RP240 Connector Pin Out The following table provides the pin out for the RP240 connector. -
Page 16: Using The Rp240 With An Extended X Language Product
Using the RP240 With An Extended X Language Product Before continuing with this section, you should be familiar with the Helpful Hint: Extended X Language product you will be using. An understanding of If you are using the programming sequences is important. Download the following program to RP240 with a 6000 Sequence #100 in the Extended X Language product. -
Page 17: Extended X Command Summary And Application Design
Extended X Command Summary and Application Design Chapter Objectives The information in this chapter will enable you to: Program the SX, ZX, or Model 500 to control the RP240 Customize the system to meet your requirements PROGRAMMING NOTE This chapter provides Extended X programming information that is required to communicate with the RP240. -
Page 18: Description Of Extended X Language Command Format
Description of Extended X Language Command Format The following is a definition of the format fields for the Extended X Language products. Clear Display Version DCLR SX Rev C2 ZX Rev D 500 Rev C Type Programming Attributes <DCLRn Syntax [X] Buffered line number [ ] Device specific... -
Page 19: Extended X Language Command Listing
Extended X Language Command Listing Clear Display Version DCLR SX Rev C2 ZX Rev D 500 Rev C T y p e Programming Attributes S y n t a x <DCLRn [X] Buffered Units line number [ ] Device specific Range 0, 1, 2 [ ] Saved independently... - Page 20 Turn RP240 LEDs On/Off Version DLED SX Rev C2 ZX Rev D 500 Rev C T y p e Programming Attributes S y n t a x <a>DLEDn [X] Buffered Units None [ ] Device specific Range 0, 1, X [ ] Saved independently D e f a u l t [ ] Saved in sequences...
- Page 21 Enable/Disable Stop Version DSTP SX Rev C2 ZX Rev D 500 Rev C T y p e Programming Attributes S y n t a x <DSTPb [X] Buffered Units None [ ] Device specific Range 0, 1 [ ] Saved independently D e f a u l t [ ] Saved in sequences Response...
- Page 22 Display Variable Data on RP240 LCD Version SX Rev C2 ZX Rev D 500 Rev C T y p e Programming Attributes S y n t a x <DVOn,n,n,b [X] Buffered Units None [ ] Device specific Range See Below [ ] Saved independently D e f a u l t None...
- Page 23 Enable and Read Numeric Keypad Version VAR=NUM SX Rev C2 ZX Rev D 500 Rev C T y p e Programming Attributes S y n t a x <a>VAR=NUM [X] Buffered Units None [ ] Device specific Range 1 to 50 [ ] Saved independently D e f a u l t None...
-
Page 24: Discussion Of Extended X Language Commands
Discussion of Extended X Language Commands This section discusses the commands described previously in the command reference. Prompting an Operator or Displaying Information In many motion control applications, the most important requirement is the operator interface. Presenting information to an operator in a desired format is often difficult at best. -
Page 25: Extended X Language Command Programming Example
Extended X Language Command Programming Example A user wants his operator to see the message ENTER THE CYCLE COUNT. He wants this message placed on line two, starting after two spaces in from the left. He also wants the user to be able to enter the cycle count three spaces after the message. -
Page 26: Processing Information
Step 7 Press a 1, followed by a 5, followed by an ENTER E N T E R O U N Cursor Location After the ENTER key is pressed, the RP240 will transmit the value 15 to the Model 500, SX, or ZX. This value will be stored in variable 1. Use the VARn=FUN command to enter information based on function key input. -
Page 27: Enabling Stop And Pause Keys
Variables can be used in conditional statements like IF, WHILE, and REPEAT, or as data values in D, V, A, AD, L, or T commands. In step 7 above, the value 15 was entered stored in variable 1 to be used as the cycle count. The following is a command example: Command Description... -
Page 28: Sample Program
Sample Program This section provides an example of an RP240 application program. Refer to the specific indexer's Software Reference Guide for a more detailed description of the commands. The power-up sequence (Sequence #100) is used to initialize the SX, 500, or Power-Up ZX to a state compatible with the RP240. - Page 29 Sequence #3 asks for a selection via the function keys. Control is passed to a Sequence #3 sequence based upon the function key pressed. Erase sequence #3 Begin definition of sequence #3 Clear all lines of the RP240 display DCLRØ Position cursor at row 1, column 1 DPC1ØØ...
- Page 30 Sequence #5 provides input status information and then toggles the eight Sequence #5 LEDs of the RP240 on and off. Erase sequence #5 Begin definition of sequence #5 Clear all lines of the RP240 display DCLRØ Position the cursor at row 1, column 0 DPC1ØØ...
- Page 31 Sequence #7 performs the moves taught in sequence #6. The distance for Sequence #7 each move is based upon the distance that was stored in a variable in sequence #6. Erase sequence #7 Begin definition of sequence #7 Set acceleration to 100 rev/sec/sec A1ØØ...
- Page 32 DTXTYES Position the cursor at row 2, column 36 DPC236 DTXTNO Wait for a function key to be pressed VAR22=FUN End If Exit REPEAT UNTIL loop when variable 22 equals one UNTIL(VAR22=1) Repeat all the commands until the UNTIL condition is true REPEAT Clear all lines of the RP240 display DCLRØ...
-
Page 33: Editing Sequences
Sequences #13, #14, and #15 store the current position into variables 6, 7, Sequences and 8, respectively. #13,#14,#15 Erase sequence #13 XE13 Begin definition of sequence #13 XD13 Variable 6 equals the current position VAR6=POS End definition of sequence #13 Erase sequence #14 XE14 Begin definition of sequence #14... -
Page 34: Daisy Chaining
Daisy Chaining This section describes daisy chaining multiple Extended X language products with an RP240. More than one SX, Model 500, or ZX can be daisy chained to a single RP240. Daisy chaining up to 16 units is not a trivial programming assignment. When multiple units are daisy chained together, one unit must act as the master, controlling all the slaves down the line. - Page 35 The power-up sequence (Sequence #100) is used to initialize the SX, 500, or Power-Up ZX to a state compatible with the RP240. Sequence Command Description Erase sequence #100 1XE1ØØ Begin definition of sequence #100 1XD1ØØ Disable limits (Use LDØ if limits are hard wired) 1LD3 Disable command echo 1SSA1...
- Page 36 Sequence #3 jogs axis 2. Sequence #3 1DCLRØ 1DPC1Ø2 1DTXTJOG___STOP___JOG 1DPC2Ø2 1DTXTCCW__________CW 1DPC235 1DTXTEXIT 1MPP 1VAR1=FUN 1IF(VAR1=1) 1"2E 1"2H- 1"2G 1"2F 1NIF 1IF(VAR1=2) 1"2E 1"2S 1"2F 1NIF 1IF(VAR1=3) 1"2E 1"2H+ 1"2G 1"2F 1NIF 1IF(VAR1=6) 1"2E 1"2S 1"2F 1XG1 1NG 1NIF RP240 User Guide Artisan Scientific - Quality Instrumentation ...
-
Page 37: 6000 Series Command Summary And Application Design
6000 Series Command Summary and Application Design Chapter Objectives The information in this chapter will enable you to: Program the 6200 or 6250 to control the RP240 Customize the system to meet your requirements PROGRAMMING NOTE This chapter provides the 6000 Series programming information that is required to communicate with the RP240. -
Page 38: Description 6000 Series Command Format
Description 6000 Series Command Format The following is a definition of the format fields for the 6000 Series commands. DCLEAR R ev Clear Display Pr o d u ct 6200 6250 T yp e Display (RP240) Interface Syn t ax <!>DCLEARin/a U n it s R an g e... -
Page 39: Rp240 X Language Command Listing
RP240 X Language Command Listing Pr o d u ct R ev DCLEAR Clear Display 6200 T yp e 6250 Display (RP240) Interface Syn t ax <!>DCLEARi U n it s R an g e i = Ø (clear all lines), 1 (clear line 1), or 2 (clear line 2) D ef au lt R esp o n se See A lso... - Page 40 Pr o d u ct R ev DPASS Change RP240 Password 6200 T yp e 6250 Display (RP240) Interface Syn t ax <!>DPASS<i> U n it s i = integer of up to 4 characters R an g e 1 - 9999 D ef au lt 6200 or 6250 (depending on if you have a 6200 or 6250) R esp o n se...
- Page 41 Pr o d u ct R ev [ DREADF ] Read RP240 Function Key 6200 T yp e 6250 Display (RP240) Interface Syn t ax See below U n it s R an g e D ef au lt R esp o n se See A lso DREAD, DVAR, DWRITE, VAR The Read RP240 Function Key (DREADF) command allows you to store numeric data entered in from a RP240...
-
Page 42: Prompting An Operator Or Displaying Information
Prompting an Operator or Displaying Information In many motion control applications, the most important requirement is the operator interface. Presenting information to an operator in a desired format is often difficult at best. The RP240 has two visual indicators to help present information to the operator. -
Page 43: 6000 Series Command Programming Example
6000 Series Command Programming Example A user wants his operator to see the message ENTER THE CYCLE COUNT. He wants this message placed on line two, starting after two spaces in from the left. He also wants the user to be able to enter the cycle count three spaces after the message. - Page 44 Step 7 Press a 1, followed by a 5, followed by an ENTER E N T E R O U N Cursor Location After the ENTER key is pressed, the value 15 will be stored in variable 1. Use the VARn=DREADF command to enter information based on function key input.
-
Page 45: Processing Information
Processing Information Variables can be used in conditional statements like IF, WHILE, and REPEAT, or as data values in commands. For a complete list of allowed command value substitutions, refer to Appendix B in the 6000 Series Software Reference Guide. In step 7, the value 15 was entered stored in variable 1 to be used as the cycle count. - Page 46 Artisan Scientific - Quality Instrumentation ... Guaranteed | (888) 88-SOURCE | www.artisan-scientific.com...
-
Page 47: Direct Rp240 Control
Direct RP240 Control Chapter Objectives The information in this chapter will enable you to: Control the RP240 without the use of an Extended X or 6000 Series product PROGRAMMING NOTE The information provided in this chapter is intended for users of the RP240 that do not have an Extended X or 6000 Series product. - Page 48 Command Description Valid in 6000 Mode Enable 6000 mode *B<cr> Report # of RP240 display lines *C<cr> STOP key enable *D<cr> STOP key disable *E<cr> PAUSE and CONTINUE key enable *F<cr> PAUSE and CONTINUE key disable *G<cr> Beeper on *H<cr> Beeper off *I<cr>...
-
Page 49: Rp240 Response-Extended X Mode
RP240 Response—Extended X Mode The commands below enable the RP240 for specific functions in Extended X mode (default) only. Once these functions are enabled, the RP240 will respond with the information provided below. STOP key enable *D<cr> PAUSE and CONTINUE key enable *F<cr>... -
Page 50: Hardware Reference
Hardware Reference Chapter Objectives The information in this chapter will enable you to: Use this chapter as a quick-reference tool for most system specifications (environmental, I/O, pin outs, etc.) Environmental Operating Temperature: 36°F to 122°F (5°C to 50°C) Storage Temperature: -22°F to 185°F (-30°C to 85°C) Humidity: 0% to 95% non-condensing Electrical Specifications RP240 Connector... - Page 51 Artisan Scientific - Quality Instrumentation ... Guaranteed | (888) 88-SOURCE | www.artisan-scientific.com...
-
Page 52: Troubleshooting
Troubleshooting Chapter Objectives The information in this chapter will enable you to: Isolate and resolve system hardware problems Isolate and resolve system software problems PROM Table In order to use the RP240, the Extended X product must have a PROM with a revision greater than or equal to the ones shown in the table below. -
Page 53: Reducing Electrical Noise
RP240 status, and anything else that was happening when the problem occurred). Refer to the problem solutions contained in this chapter. If your system's problem persists, contact Parker Compumotor's Applications Department at (800) 358-9070. Reducing Electrical Noise For detailed information on reducing electrical noise in your system, refer to the current Compumotor Catalog. -
Page 54: Common Problems & Solutions
Common Problems & Solutions The following table presents some guidelines to help you isolate problems with your motion control system. Look for the symptom that most closely resembles what you are experiencing. Look through the list of possible causes so that you better understand what may be preventing proper operation. - Page 55 If you wish to edit sequences in your SX, ZX, or Model 500 controller, you must re-establish RS-232C communication before downloading the new sequences to the controller. Compumotor recommends using the following procedure. Remove power from your controller and the RP240. Remove connections between the controller and the RP240.
- Page 56 6000 RP240-NEMA4 7 MODE NEMA R ABLE LENGTHS ATINGS NEMA 12 5 OMMANDS 6000 S NEMA 4 5 ERIES DCLEAR 35 DJOG 35 9, 47 POWER SUPPLY DLED 35 ROGRAMMING DPASS 36 6000 S ERIES DPCUR 36 UNCTION KEYS DREAD 36 JOG MODE DREADF 37 DISPLAY...
Need help?
Do you have a question about the Compumotor RP240 and is the answer not in the manual?
Questions and answers