Cisco Nexus 3000 Series Hardware Installation Manual
Hide thumbs
Also See for Nexus 3000 Series:
- Installation manual ,
- Command reference manual (356 pages) ,
- Configuration manual (338 pages)
Table of Contents
Advertisement
Advertisement
Table of Contents

Related Manuals for Cisco Nexus 3000 Series


Summary of Contents for Cisco Nexus 3000 Series
- Page 1 Cisco Nexus 3000 Series Hardware Installation Guide First Published: 2014-04-30 Last Modified: 2018-11-01 Americas Headquarters Cisco Systems, Inc. 170 West Tasman Drive San Jose, CA 95134-1706 http://www.cisco.com Tel: 408 526-4000 800 553-NETS (6387) Fax: 408 527-0883...
- Page 2 Any products and features described herein as in development or available at a future date remain in varying stages of development and will be offered on a when-and if-available basis. Any such product or feature roadmaps are subject to change at the sole discretion of Cisco and Cisco will have no liability for delay in the delivery or failure to deliver any products or feature roadmap items that may be set forth in this document.
-
Page 3: Table Of Contents
Overview of the Cisco Nexus 31108 Switch Overview of the Cisco Nexus 31128PQ Switch C H A P T E R 2 Preparing the Site Temperature Requirement Humidity Requirement Altitude Requirements Dust and Contaminants Cisco Nexus 3000 Series Hardware Installation Guide... - Page 4 Replacing a 2 (RU) Fan Module Replacing an AC Power Supply Replacing a DC Power Supply A P P E N D I X A Rack Specifications General Requirements and Guidelines for Cabinets and Racks Cisco Nexus 3000 Series Hardware Installation Guide...
- Page 5 HVDC Power Cable Specifications A P P E N D I X C LEDs Chassis LEDs Fan LEDs Power Supply LEDs A P P E N D I X D Spare Parts Table Spares Support Table Cisco Nexus 3000 Series Hardware Installation Guide...
- Page 6 Contents Cisco Nexus 3000 Series Hardware Installation Guide...
-
Page 7: Preface
Release Notes Release Notes for the Cisco Nexus 3000 Series switches. Transceiver Compatibility Transceiver Modules Compatibility Information Regulatory Compliance Guides Regulatory, Compliance, and Safety Information for the Cisco Nexus 3000 and 9000 Series switches. Cisco Nexus 3000 Series Hardware Installation Guide... - Page 8 Preface Related Documentation Cisco Nexus 3000 Series Hardware Installation Guide viii...
-
Page 9: Overview
Overview of the Cisco Nexus 31128PQ Switch, on page 23 Overview of the Cisco Nexus 3016 Switch The Cisco Nexus 3016 (N3K-C3016-40GE) is a 1 rack unit (RU) switch with 16 fixed 40-Gigabit Ethernet downlink (host-facing) and uplink (network-facing) ports, 2 fixed 100/1000 management ports, 1 RS-232 console port, and 1 USB port. - Page 10 Overview Overview of the Cisco Nexus 3016 Switch Figure 1: Fan-Side View of the Cisco Nexus 3016 Chassis AC or DC power supply Status LED (1 or 2) Fan tray (1) USB port (1) Management ports (2) Console port (1)
-
Page 11: Overview Of The Cisco Nexus 3048Tp Switch
Grounding pad Overview of the Cisco Nexus 3048TP Switch The Cisco Nexus 3048TP (N3K-C3048TP-1GE) is a 1 rack unit (RU) switch with 48 fixed 10/100/1000 Ethernet downlink ports, 4 fixed 10-Gigabit Ethernet uplink ports, 1 console port, and 1 fixed 100/1000 management port. - Page 12 Overview Overview of the Cisco Nexus 3048TP Switch Figure 3: Fan-Side View of the Cisco Nexus 3048TP Chassis AC or DC power supply Console, Management, (1 or 2) and USB ports Fan tray (1) Screw holes for mounting brackets The following figure shows the port-side chassis features that you use when installing the chassis or replacing its modules.
-
Page 13: Overview Of The Cisco Nexus 3064 Switches
1 console port, and 1 USB port. The Cisco Nexus 3064-X (N3K-C3064TQ) is a 1 rack unit (RU) switch with 48 fixed 1- and 10-Gigabit Ethernet SFP+ downlink and 4 fixed 40-Gigabit Ethernet QSFP+ uplink ports (each capable of using 40-Gigabit or 4 x 10-Gigabit mode), 2 fixed 100/1000 management ports, 1 console port, and 1 USB port. - Page 14 Overview Overview of the Cisco Nexus 3064 Switches Figure 5: Fan-Side View of the Cisco Nexus 3064 Chassis AC or DC power supply Status LED (2) (AC power supply shown) Fan tray (1) USB port (1) Management ports (2) Console port (1)
-
Page 15: Overview Of The Cisco Nexus 3132Q Switches
QSFP+ port. Each QSFP+ port can operate in native 40-Gigabit or 4 x 10-Gigabit modes. The Cisco Nexus 3132Q-XL (N3K-C3132Q-XL) is a 1 rack unit (RU) switch with 8GB of RAM and dual-core 2.5GHz x86 CPUs and 32 40-Gigabit enhanced quad small form-factor pluggable (QSFP+) ports and 4 SFP+ ports that are internally multiplexed with the first QSFP+ port. - Page 16 Overview of the Cisco Nexus 3132Q Switches The following figure shows the fan-side chassis features that you use when installing the chassis or replacing its modules. Figure 7: Fan-Side View of the Cisco Nexus 3132 Chassis AC or DC power supply Console, Management,...
-
Page 17: Overview Of The Cisco Nexus 3132C-Z Switch
Overview of the Cisco Nexus 3132C-Z Switch The Cisco Nexus 3132C-Z (N3K-C3132C-Z) is a 1 rack unit (RU) switch with 32 fixed 100-Gigabit QSFP28 ports, 2 SFP+ ports, 2 management ports, 1 console port, and 1 USB port. This switch supports both port-side exhaust and port-side intake airflow schemes. -
Page 18: Overview Of The Cisco Nexus 3164Q Switch
Overview of the Cisco Nexus 3164Q Switch The Cisco Nexus 3164Q (N3K-C3164Q-40GE) is a 2 rack unit (RU) switch with 64 fixed 40-Gigabit enhanced quad small form-factor pluggable (QSFP+) ports that can run in either 40-Gigabit native mode or 4 x 10-Gigabit mode, 1 RJ-45 management port, 1 RS-232 console port, and 1 USB port. - Page 19 Overview Overview of the Cisco Nexus 3164Q Switch Figure 12: Fan-Side View of the Cisco Nexus 3164Q Chassis Grounding pad Fan modules (2) Power supply modules (2) Beacon (BCN) and Status (STS) LEDs The following figure shows the port-side chassis features that you use when installing the chassis or replacing its modules.
-
Page 20: Overview Of The Cisco Nexus 3172 Switches
100-Mbps, 1-Gbps, or 10-Gbps mode, and each QSFP+ port can operate in native 40-Gbps or 4 x 10-Gbps mode. The Cisco Nexus 3172PQ-XL (N3K-C3172PQ-XL) is a 1 rack unit (RU) switch with 8GB of RAM and dual-core 2.5GHz x86 CPUs and 10-Gigabit enhanced small form-factor pluggable (SFP+) ports with 48 SFP+ ports and 6 Quad SFP+ (QSFP+) ports. - Page 21 Overview Overview of the Cisco Nexus 3172 Switches Figure 14: Fan-Side View of the Cisco Nexus 3172 Chassis Power Supply modules Fan modules (4) The following figure shows the port-side chassis features that you use when installing the chassis or replacing its modules.
-
Page 22: Overview Of The Cisco Nexus 3232C Switch
Overview of the Cisco Nexus 3232C Switch The Cisco Nexus 3232C (N3K-C3232C) is a 1 rack unit (RU) switch with 32 10- or 100-Gigabit QSFP28-100 and 2 10G SPF+ ports. This switch supports both port-side exhaust and port-side intake airflow schemes. The switch requires one AC or DC power supply for operations, but it can have a second power supply for redundancy. -
Page 23: Overview Of The Cisco Nexus 3264C-E Switch
10 Gigabits require a QSFP-to-SFP adapter [CVR-QSFP-SFP10G] and an SFP+ transceiver. Overview of the Cisco Nexus 3264C-E Switch The Cisco Nexus 3264C-E (N3K-C3264C-E) is a 2 rack unit (RU) switch with 64 100-Gigabit QSFP28 and 2 10-Gigabit SPF+ ports. This switch supports both port-side exhaust and port-side intake airflow schemes. - Page 24 Template 3: 128-ports X 25-Gigabit or 128-ports X 10-Gigabit • Ports 1-28 and 33-36 are operational. • Ports 1-28 and 33-36 support 2X50-Gigabit, 4X25-Gigabit, and 4X100-Gigabit dynamic breakout. • SLIC adapter is supported on 1-24 ports. Cisco Nexus 3000 Series Hardware Installation Guide...
- Page 25 & the system is used in 40C ambient temp or less; for other optics or higher ambient temps, 930W-DC is supported with 2 PSUs in non-redundancy mode only. The following figure shows the switch features on the port side of the chassis. Cisco Nexus 3000 Series Hardware Installation Guide...
- Page 26 To determine which transceivers, adapters, and cables are supported by this switch, see the Cisco Transceiver Modules Compatibility Information document. The following figure shows the switch features on the power supply side of the chassis. Cisco Nexus 3000 Series Hardware Installation Guide...
- Page 27 Notch on both sides of the chassis for locking the power supply end of the chassis to the bottom support rails (four-post rack installations). Management port Screw holes for (1—RJ-45 copper port) center-mount bracket (two-post rack installations) Cisco Nexus 3000 Series Hardware Installation Guide...
-
Page 28: Overview Of The Cisco Nexus 3264Q Switch
Overview of the Cisco Nexus 3264Q Switch The Cisco Nexus 3264Q (N3K-C3264Q) is a 2 rack unit (RU) switch with 64 fixed 10- or 40-Gigabit quad small form-factor pluggable (QSFP) ports, 2 SFP+ ports, 1 RJ-45 management port, 1 RS-232 console port, and 2 USB ports. -
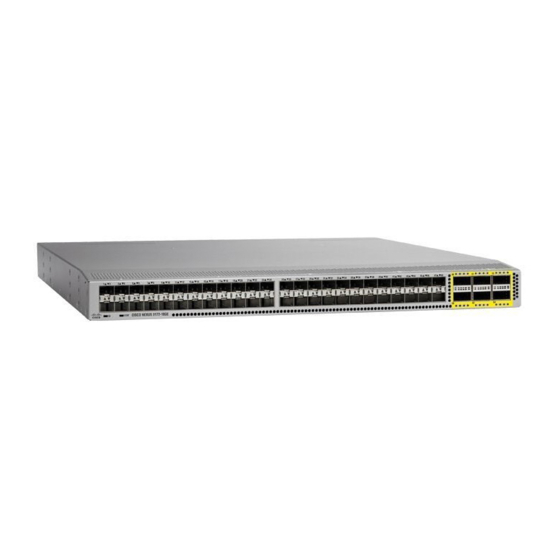
Page 29: Overview Of The Cisco Nexus 31108 Switch
Overview of the Cisco Nexus 31108 Switch The Cisco Nexus 31108PC-V (N3K-C31108PC-V) is a 1 rack unit (RU) top of rack (ToR) L2/L3 switch with 16-GB of RAM and dual-core 2.5-GHz x86. The switch comes with 48 10G SFP+ and 6 QSFP28 ports, 1 management port (RJ-45 or SFP), 1 console port, and 1 USB port. - Page 30 Overview Overview of the Cisco Nexus 31108 Switch Figure 20: Fan-Side View of the Cisco Nexus 31108 Chassis AC power supply (1 or 2) Screw holes for mounting brackets Fan modules (4) Grounding pad Console, Management, and USB ports The following figure shows the port-side chassis features that you use when installing the chassis or replacing its modules.
-
Page 31: Overview Of The Cisco Nexus 31128Pq Switch
Overview of the Cisco Nexus 31128PQ Switch Overview of the Cisco Nexus 31128PQ Switch The Cisco Nexus 31128PQ (N3K-C31128PQ-10GE) is a 2 rack unit (RU) switch with 96 fixed 10-Gbps enhanced small form-factor pluggable (SFP+) ports and 8 fixed 40-Gbps quad small form-factor pluggable (QSFP+) ports, 1 management port, 1 console port, and 2 USB ports. - Page 32 Overview Overview of the Cisco Nexus 31128PQ Switch Figure 23: Port-Side View of the Cisco Nexus 31128PQ Chassis Console port (1) 10-Gigabit SFP+ ports that can operate at 1 or 10 Gigabits (96) USB ports (2) 40-Gigabit uplink ports Beacon (BCN), Status...
-
Page 33: Preparing The Site
To prevent contaminant buildup and increased internal chassis temperatures, make sure that the operating environment is as clean as possible and free of dust and other contaminants. Do not permit smoking, food, or drinks near the switch. Cisco Nexus 3000 Series Hardware Installation Guide... - Page 34 Preparing the Site Dust and Contaminants Cisco Nexus 3000 Series Hardware Installation Guide...
-
Page 35: Installing The Chassis
Starting the Switch, on page 50 Safety Before you install, operate, or service the switch, see the Regulatory, Compliance, and Safety Information for the Cisco Nexus 3000 and 9000 Series for important Safety Information. Warning Statement 1071 Warning Definition IMPORTANT SAFETY INSTRUCTIONS Before you work on any equipment, be aware of the hazards involved with electrical circuitry and be familiar with standard practices for preventing accidents. -
Page 36: Installation Options With Rack-Mount Kits, Racks, And Cabinets
You can install the switch using the following 1 (RU) rack-mount options: • Rack-mount kit (NXK-ACC-KIT-1RU) which you can order from Cisco. This option offers you easy installation, greater stability, increased weight capacity, added accessibility, and improved removability with front and rear removal. - Page 37 If available, you can use an uninterruptible power supply (UPS) to protect against power failures. Caution Avoid UPS types that use ferroresonant technology. These UPS types can become unstable with systems such as the Cisco Nexus 3000 Series switches. These switches can have substantial current draw fluctuations because of fluctuating data traffic patterns.
- Page 38 • You have the following equipment in addition to the switch and the kits shipped with the switch: • Eight customer-supplied 12-24 or 10-32 screws (required for attaching slider rails and mounting bracket to the mounting rails) • Number 1 and number 2 Phillips screwdrivers with torque capability Cisco Nexus 3000 Series Hardware Installation Guide...
-
Page 39: Unpacking And Inspecting The Chassis
• Invoice number of shipper (see the packing slip) • Model and serial number of the damaged unit • Description of damage • Effect of damage on the installation • Photos of the damaged shipping containers and damaged product Cisco Nexus 3000 Series Hardware Installation Guide... -
Page 40: Installing A 1 (Ru) Chassis In A Four-Post Rack
• Port-side exhaust airflow direction indicated with blue coloring Installing a 1 (RU) Chassis in a Four-Post Rack This section describes the rack installation for the Cisco Nexus 3000 series switch into a four-post rack. Installing the Switch Using the NXK-ACC-KIT-1RU Rack-Mount Kit To install the switch, you must attach front and rear mounting brackets to the switch, install slider rails on the rear of the rack, slide the switch onto the slider rails, and secure the switch to the front of the rack. - Page 41 (see the following figure). Tighten 12-24 screws to 30 in-lb (3.39 N·m) of torque and tighten 10-32 screws to 20 in-lb (2.26 N·m) of torque. Cisco Nexus 3000 Series Hardware Installation Guide...
- Page 42 Holding the chassis level, insert screws (12-24 or 10-32, depending on the rack type) in each of the two front rack-mount brackets (using a total of six screws) and into the cage nuts or threaded holes in the vertical rack-mounting rails (see the following figure). Cisco Nexus 3000 Series Hardware Installation Guide...
-
Page 43: Installing The Switch Using The N3K-C3064-Acc-Kit Rack-Mount Kit
• The rack is installed and secured to its location. Step 1 Install two front-mount brackets to the switch as follows: a) Determine which end of the chassis is to be located in the cold aisle as follows: Cisco Nexus 3000 Series Hardware Installation Guide... - Page 44 Two M4 screws used to attach the bracket to the the chassis chassis Two M4 screws used to attach the bracket to the Rear rack-mount guide aligned to the port end of the chassis chassis Cisco Nexus 3000 Series Hardware Installation Guide...
- Page 45 Repeat Step 3 to attach the other slider rail to the other side of the rack. To make sure that the slider rails are at the same level, you should use a level tool, tape measure, or carefully count the screw holes in the vertical mounting rails. Cisco Nexus 3000 Series Hardware Installation Guide...
- Page 46 Holding the chassis level, insert two screws (12-24 or 10-32, depending on the rack type) in each of the two front rack-mount brackets (using a total of four screws) and into the cage nuts or threaded holes in the vertical rack-mounting rails (see the following figure). Cisco Nexus 3000 Series Hardware Installation Guide...
-
Page 47: Installing A 1 (Ru) Chassis In A Two-Post Rack
Installing a 1 (RU) Chassis in a Two-Post Rack This section describes the rack installation for the Cisco Nexus 3000 series switch into a two-post rack. To install a switch, you must attach mounting brackets to the switch and secure the switch to the rack. - Page 48 Position the bracket so that four of its screw holes are aligned to the screw holes on the side of the chassis. Cisco Nexus 3000 Series Hardware Installation Guide...
- Page 49 Repeat previous step for the other front rack-mount bracket on the other side of the switch and be sure to position that bracket the same distance from the front of the switch. Cisco Nexus 3000 Series Hardware Installation Guide...
-
Page 50: Installing A 2 (Ru) Chassis In A Four-Post Rack
M4 screws (2 each side) Installing a 2 (RU) Chassis in a Four-Post Rack This section describes the rack installation for the Cisco Nexus 3000 series switch into a four-post rack. Before moving or lifting the chassis, follow these guidelines: •... - Page 51 Repeat Steps 1a and 1b to attach the other expanding bottom-support rail to the other side of the rack at the same level as the attached bottom-support rail. Verify that the two sets of bottom-support rails are level with each other before going to the next step. Note Cisco Nexus 3000 Series Hardware Installation Guide...
- Page 52 When you have fully pushed the chassis all the way onto the bottom-support rails, the chassis stops on the bottom-support rails insert into the chassis notches and the front-mount brackets touch the front vertical mounting rails. Cisco Nexus 3000 Series Hardware Installation Guide...
- Page 53 • M6 screws—use 40 in-lb (4.5 N·m) of torque • 10-32 screws— use 20 in-lb (2.26 N·m) of torque If the rack requires another type of screw, use the appropriate torque setting for that type of screw. Cisco Nexus 3000 Series Hardware Installation Guide...
-
Page 54: Installing A 2 (Ru) Chassis In A Two-Post Rack
Installing a 2 (RU) Chassis in a Two-Post Rack This section describes the rack installation for the Cisco Nexus 3000 series switch into a two-post rack. You need to attach a right-angled bracket to each side of the chassis. This bracket centers the chassis and secures it in place on a two-post rack. - Page 55 If these modules have a blue coloring for port-side exhaust airflow, then you must position the modules by the cold aisle. If the modules have a burgundy coloring for port-side intake airflow, you must position the modules by the hot aisle. Cisco Nexus 3000 Series Hardware Installation Guide...
-
Page 56: Grounding The Chassis
You can also ground the chassis, which is required if the rack is not grounded, by attaching a customer-supplied grounding cable. Attach the cable to the chassis grounding pad and the facility ground. Cisco Nexus 3000 Series Hardware Installation Guide... - Page 57 Step 3 Secure the grounding lug to the chassis grounding pad with two M4 screws, see the previous figure. Tighten the screws to 11 to 15 in-lb (1.24 to 1.69 N·m) of torque. Cisco Nexus 3000 Series Hardware Installation Guide...
-
Page 58: Starting The Switch
4. Place the power cable positive-wire terminal ring on the positive terminal for the power source and secure them with a terminal nut. 5. Place the power cable ground-wire terminal ring on the ground terminal for the power source and secure them with a terminal nut. Cisco Nexus 3000 Series Hardware Installation Guide... - Page 59 If not green, try removing the module part way from its slot and reinstalling it. • System Status LED—lit and green (if this LED is orange or red, then one or more environmental monitors is reporting a problem.) • Link LEDs for the Ethernet connector—Off Cisco Nexus 3000 Series Hardware Installation Guide...
- Page 60 Installing the Chassis Starting the Switch Cisco Nexus 3000 Series Hardware Installation Guide...
-
Page 61: Connecting The Switch To The Network
The console port on the switch is an RS-232 port with an RJ-45 interface. This is an asynchronous (async) serial port; any device connected to this port must be capable of asynchronous transmission. Cisco Nexus 3000 Series Hardware Installation Guide... -
Page 62: Connecting The Management Interface
After you perform the initial configuration for the switch and create a management connection, you are ready to connect the interface ports on the switch to other devices. Depending on the types of interface ports on the Cisco Nexus 3000 Series Hardware Installation Guide... -
Page 63: Installing Sfp+ And Sfp Transceivers
Note If you cannot install the cable into the transceiver, insert or leave the dust plug in the cable end of the transceiver. Cisco Nexus 3000 Series Hardware Installation Guide... -
Page 64: Installing Qsfp+ Transceivers
Hold the transceiver so that the identifier label is on the top. b) Align the QSFP+ transceiver in front of the module's transceiver socket opening and carefully slide the QSFP+ transceiver into the socket until the transceiver makes contact with the socket electrical connector. Cisco Nexus 3000 Series Hardware Installation Guide... -
Page 65: Installing Sfp+ And Sfp Optical Cables
If you cannot install the cable into the transceiver, insert or leave the dust plug in the cable end of the transceiver. For instructions on verifying connectivity, see the appropriate Cisco Nexus Series configuration guide. Maintaining Transceivers and Optical Cables Transceivers and fiber-optic cables must be kept clean and dust free to maintain high signal accuracy and prevent damage to the connectors. - Page 66 Connecting the Switch to the Network Maintaining Transceivers and Optical Cables Cisco Nexus 3000 Series Hardware Installation Guide...
-
Page 67: Replacing Modules
• Verify that the replacement fan tray has the correct direction of airflow (it has the same coloring as the other fan and power supply modules in the same chassis). Step 1 Remove the fan tray that you are replacing as follows: Cisco Nexus 3000 Series Hardware Installation Guide... -
Page 68: Replacing A 1 (Ru) Fan Module
You can attach the ESD device to any earth ground or grounded object, such as a grounded rack or ground connection on a chassis. Step 2 Remove the fan module that you are replacing as follows: Cisco Nexus 3000 Series Hardware Installation Guide... -
Page 69: Replacing A 2 (Ru) Fan Module
On the fan module that you are removing, press the two sides of the fan module handle next to where it connects to the fan module and pull on the handles enough to unseat the module from its connectors. Cisco Nexus 3000 Series Hardware Installation Guide... -
Page 70: Replacing An Ac Power Supply
Either place the power supply on an antistatic surface or pack it in its packing materials. d) If the power supply slot is to remain empty, install a blank power supply filler panel (part number N2200-P-BLNK). Step 3 Install the replacement power supply as follows: Cisco Nexus 3000 Series Hardware Installation Guide... -
Page 71: Replacing A Dc Power Supply
• Verify that the replacement power supply module has the same direction of airflow as the other modules in the same chassis. Otherwise the switch can overheat and shut down. • Verify that the circuit breaker for the DC power source is turned off. Cisco Nexus 3000 Series Hardware Installation Guide... - Page 72 Clip the clear plastic cover over the terminals to prevent accidental touching of the terminals. f) Turn on the power at the circuit breaker. g) Verify the power supply operation by checking that the OK LED is green. Cisco Nexus 3000 Series Hardware Installation Guide...
-
Page 73: Rack Specifications
See below. The cabinet or rack must also meet the following requirements: • The minimum vertical rack space per Cisco Nexus 3000 Series switch chassis must be one RU (rack units), equal to 1.75 inches (4.4 cm). • The width between the rack-mounting rails must be at least 17.75 inches (45.0 cm) if the rear of the device is not attached to the rack. -
Page 74: About Requirements For Perforated Cabinets
• The roof should be perforated with at least a 20-percent open area. • The cabinet floor should be open or perforated to enhance cooling. The Cisco R Series rack conforms to these requirements. About Requirements for Open Racks In addition to the requirements listed in the “General Requirements for Cabinets and Racks” section on page... -
Page 75: System Specifications
Cisco Nexus 3048 chassis 17.3 inches (43.9 cm) 19.7 inches (50.04 cm) 1.72 inches (4.37 cm) (1 Cisco Nexus 3064-T 17.3 inches (43.9 cm) 22.45 inches (57.0 cm) 1.72 inches (4.37 cm) (1 chassis Cisco Nexus 3000 Series Hardware Installation Guide... - Page 76 Cisco Nexus 31108PC-V 17.3 inches (43.9 cm) 22.28 inches (56.6 cm) 1.72 inches (4.37 cm) (1 Cisco Nexus 31108TC-V 17.3 inches (43.9 cm) 22.28 inches (56.6 cm) 1.72 inches (4.37 cm) (1 Cisco Nexus 3000 Series Hardware Installation Guide...
-
Page 77: Ac Power Cable Specifications
9.8 feet (3 m) VAC 10 A, C13-C14 Connectors CAB-C13-C14-JMPR Cabinet Jumper Power Cord 250 2.2 feet (0.7 m) VAC 13 A, C13-C14 Connectors CAB-IND-10A 250 VAC 10 A, EL-208B plug 8.2 feet (2.5 m) Cisco Nexus 3000 Series Hardware Installation Guide... -
Page 78: Dc Power Cable Specifications
There is no earth ground connection on this input terminal block, thus the earth grounding is provided by the system being grounded. HVDC Power Cable Specifications Type Power Cord Part Number Cord Set Description HVDC CAB-HVDC-3T-2M 6.6-foot (2.0 m) cable with Saf-D-Grid and three terminal connectors Cisco Nexus 3000 Series Hardware Installation Guide... -
Page 79: Leds
Chassis LEDs, on page 71 • Fan LEDs, on page 73 • Power Supply LEDs, on page 74 Chassis LEDs This table provides information about chassis LEDs for Cisco Nexus 3000 Series switches. Cisco Nexus 3000 Series Hardware Installation Guide... - Page 80 This port is not in use. This port is unusable during breakout. All diagnostics pass. Status (STS) Solid on (green) The module is operational. The module is not receiving power. On (amber) Cisco Nexus 3000 Series Hardware Installation Guide...
-
Page 81: Fan Leds
The module has a runtime failure and is brought offline. Fan LEDs This table provides information about fan LEDs for Cisco Nexus 3000 Series switches. Cisco Nexus 3000 Series Hardware Installation Guide... -
Page 82: Power Supply Leds
The module has a runtime failure and is brought offline. Power Supply LEDs This table provides information about power supply LEDs for Cisco Nexus 3000 Series switches. Component Status Description Power supply OK (green) Solid on Power supply is on and okay. -
Page 83: Spare Parts Table
Passive QSFP cables are used & the system is used in 40C ambient temp or less; for other optics or higher ambient temps, 930W-DC is supported with 2 PSU’s in non-redundancy mode only. Cisco Nexus 3000 Series Hardware Installation Guide... - Page 84 Nexus 1 RU AC port-side exhaust Port-side exhaust (N3K-C3048-FAN=) Accessory kit 3064-X (N2200-PAC-400W=) (N9K-C9300-ACK) Port-side intake (N3K-C3048-FAN-B=) AC port-side intake Rack mount kit (N2200-PAC-400W-B=) (N3K-C3064-ACC-KIT) DC port-side exhaust (N2200-PDC-400W=) DC port-side intake (N3K-PDC-350W-B=) Cisco Nexus 3000 Series Hardware Installation Guide...
- Page 85 AC port-side exhaust Port-side exhaust Accessory kit 3132Q-X (N2200-PAC-400W=) (NXA-FAN-30CFM-F) (N9K-C9300-ACK) AC port-side intake Port-side intake Rack mount kit (N2200-PAC-400W-B=) (NXA-FAN-30CFM-B) (N3K-C3064-ACC-KIT) DC port-side exhaust Filler blank module (N2200-PDC-400W=) (N2200-P-BLNK) DC port-side intake (N3K-PDC-350W-B=) Cisco Nexus 3000 Series Hardware Installation Guide...
- Page 86 (NXA-FAN-30CFM-F) (N9K-C9300-ACK) AC port-side intake Port-side intake Rack mount kit (N2200-PAC-400W-B=) (NXA-FAN-30CFM-B) (N3K-C3064-ACC-KIT) AC port-side exhaust Filler blank module (NXA-PAC-500W=) (N2200-P-BLNK) AC port-side intake (NXA-PAC-500W-B=) DC port-side exhaust (N2200-PDC-400W=) DC port-side intake (N3K-PDC-350W-B=) Cisco Nexus 3000 Series Hardware Installation Guide...
- Page 87 Nexus 1 RU AC port-side exhaust Port-side exhaust Accessory kit 3232C (N9K-PAC-650W-B=) (NXA-FAN-30CFM-F) (N9K-C9300-ACK) AC port-side intake Port-side intake Rack mount kit (N9K-PAC-650W=) (NXA-FAN-30CFM-B) (N3K-C3064-ACC-KIT) DC port-side intake Filler blank module (UCSC-PSU-930WDC=) (N2200-P-BLNK) Cisco Nexus 3000 Series Hardware Installation Guide...
- Page 88 930W-DC is supported with 2 PSU’s in non-redundancy mode only. Nexus 2 RU AC port-side exhaust Port-side exhaust Accessory kit 3264Q (N9K-PAC-650W-B=) (N9K-C9300-FAN-B) (N9K-C9300-ACK) AC port-side intake Port-side intake (N9K-C9300-FAN3) Rack mount kit (N9K-PAC-650W=) (N9K-C9300-RMK) Cisco Nexus 3000 Series Hardware Installation Guide...
- Page 89 (N3K-C3064-ACC-KIT) DC port-side exhaust Filler blank module (N2200-PDC-400W=) (N2200-P-BLNK) DC port-side intake (N3K-PDC-350W-B=) AC port-side intake (NXA-PAC-650W-PI) AC port-side exhaust (NXA-PAC-650W-PE) AC port-side exhaust (N9K-PAC-650W-B=) AC port-side intake (N9K-PAC-650W=) DC port-side intake (UCSC-PSU-930WDC=) Cisco Nexus 3000 Series Hardware Installation Guide...
- Page 90 The N3K-PDC-350W-B power supply is the same as the N2200-PDC-350-B power supply and they are interchangeable. Table 2: Fan Speeds for this Switch Note Port-Side Intake Port-Side Exhaust Fan Speed % Fan Speed % Typical/Minimum Maximum 100% 100% Cisco Nexus 3000 Series Hardware Installation Guide...
Need help?
Do you have a question about the Nexus 3000 Series and is the answer not in the manual?
Questions and answers