Table of Contents
Advertisement
Available languages
Available languages
Quick Links
Advertisement
Chapters
Table of Contents

Subscribe to Our Youtube Channel
Related Manuals for Blumfeldt Hot Roddy


Summary of Contents for Blumfeldt Hot Roddy
- Page 1 Hot Roddy Terrassenheizstrahler Terrace Infrared Heater 10028606...
-
Page 3: Table Of Contents
Sehr geehrter Kunde, wir gratulieren Ihnen zum Erwerb Ihres Gerätes. Lesen Sie die folgenden Hinweise sorgfältig durch und befolgen Sie diese, um möglichen Schäden vorzubeugen. Für Schäden, die durch Miss- achtung der Hinweise und unsachgemäßen Gebrauch entstehen, übernehmen wir keine Haftung. Scannen Sie den QR-Code, um Zugriff auf die aktuellste Bedienungsanleitung und weitere Infor- mationen rund um das Produkt zu erhalten. -
Page 4: Sicherheitshinweise
SICHERHEITSHINWEISE VORSICHT Verbrennungsgefahr! Einige Teile dieses Geräts können sehr heiß werden und Verbrennungen verursachen. Besondere Aufmerksamkeit ist erforderlich, wenn Kinder und schutzbedürftige Personen anwesend sind. • Kinder ab 8 Jahren, psychisch, sensorisch und körperlich eingeschränkte Menschen dürfen das Gerät nur benutzen, wenn sie vorher von einer für sie verantwortlichen Aufsichtsperson ausführlich mit den Funktionen und den Sicherheitsvorkehrungen vertraut gemacht wurden und die damit verbundenen Risiken verstehen. - Page 5 • Ersetzen Sie das Heizelement nicht oder versuchen Sie nicht, es zu entfernen. • Verwenden Sie den Heizstrahler nicht in der unmittelbaren Umgebung eines Bades, einer Dusche oder eines Schwimmbades. • Dieses Gerät darf nicht über einen längeren Zeitraum im Freien der Witterung ausgesetzt werden.
-
Page 6: Übersicht
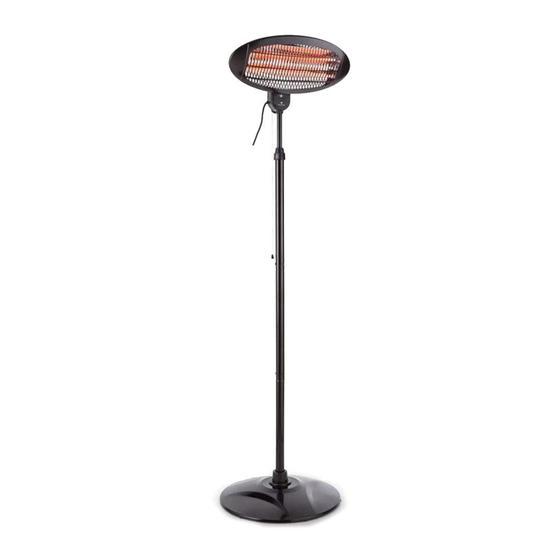
ÜBERSICHT Heizelement Knauf Gehäuse Stellungsanzeige Zugschalter Stangenmanschette Obere Stange Schrauben (Kreuzschlitz) Mittlere Stange Schrauben (Kreuzschlitz) Untere Stange Klemme Netzkabel Rosette Schrauben (Kreuzschlitz) Standfuß... -
Page 7: Montage
MONTAGE Führen Sie die untere Stange (11) in Klemme den Standfuß (16) und ziehen Sie ihn mit einer Kreuzschlitzschraube fest. untere Stange Schrauben Standfuß Stecken Sie die mittlere Stange (9) in mittlere Stange die untere Stange (11) und befestigen Sie die Stange mit einer Kreuzschlitz- Schrauben schraube. -
Page 8: Bedienung
Je nach Bedarf kann der Heizelement Winkel des Heizelements auf einen Winkel von 0-45 Grad eingestellt werden. Gehäuse BEDIENUNG Bedienen Sie den Schalter (5), um das Gerät einzuschalten. Die leichte Vibration, die sich nach dem Einschalten bemerkbar macht, hört nach einigen Sekunden auf. Leistungsstufen Position 0 Position 1... -
Page 9: Hinweise Zur Entsorgung
HINWEISE ZUR ENTSORGUNG Wenn es in Ihrem Land eine gesetzliche Regelung zur Entsorgung von elektrischen und elektronischen Geräten gibt, weist dieses Symbol auf dem Produkt oder auf der Verpackung darauf hin, dass dieses Produkt nicht im Hausmüll entsorgt werden darf. Stattdessen muss es zu einer Sammelstelle für das Recycling von elektrischen und elektronischen Geräten gebracht werden. -
Page 11: Technical Data
Dear Customer, Congratulations on purchasing this device. Please read the fol- lowing instructions carefully and follow them to prevent pos- sible damages. We assume no liability for damage caused by disregard of the instructions and improper use. Scan the QR code to get access to the latest user manual and more product information. - Page 12 SAFETY INSTRUCITONS CAUTION Risk of burns! Some parts of this appliance can become very hot and cause burns. Special attention is required when children and vulnerable persons are present. • Children from the age of 8, mentally, sensory and physically impaired persons may only use the appliance if they have been familiarised in detail with the functions and safety precautions by a supervisor responsible for them beforehand and understand the risks involved.
- Page 13 • Do not replace or attempt to remove the heating element. • Do not use the radiant heater in the immediate vicinity of a bath, shower or swimming pool. • Do not expose this appliance to the weather outdoors for a long period of time.
-
Page 14: Overview
OVERVIEW Heating element Knob Body Position indication plate Pull switch Tube cover Upper post assembly Phillips screws Middle post 10 Phillips screws 11 Lower post assembly 12 Clamp 13 Power cord 14 Base cover 15 Phillips screws 16 Base assembly... -
Page 15: Assembly
ASSEMBLY Insert the lower post assem- clamp bly (11) into the base assem- lower post bly (16) and then fix it tightly assembly by means of a Phillips screw, screws insert the clamp (12) into the lower post (11). base assembly Join the lower post assem- middle post bly (11) and the middle post... -
Page 16: Operation
You can adjust the angle of the heating element heating element according to your needs at an angle of 0-45° body OPERATION The appliance is switched on by means of the pull switch (5). The slight vibration noticeable when the appliance is switched on will stop after a few seconds. - Page 17 DISPOSAL CONSIDERATIONS If there is a legal regulation for the disposal of electrical and electronic devices in your country, this symbol on the product or on the packaging indicates that this product must not be disposed of with household waste. Instead, it must be taken to a collection point for the recycling of electrical and electronic equipment.
Need help?
Do you have a question about the Hot Roddy and is the answer not in the manual?
Questions and answers