
Related Manuals for ILX Lightwave LDX-3412


Summary of Contents for ILX Lightwave LDX-3412
- Page 1 (217) 352-9330 | Click HERE Find the Newport / ILX Lightwave LDX-3412 at our website:...
- Page 2 User’s Guide Precision Current Source LDX-3412 ILX Lightwave Corporation P. O. Box 6310 Bozeman, MT, U.S.A. 59771 · · · U.S. & Canada 1-800-459-9459 · International Inquiries: 406-586-1244 Fax 406-586-9405 · E-mail: support@ilxlightwave.com www.ilxlightwave.com 70001304_R00_01/04 Artisan Technology Group - Quality Instrumentation ... Guaranteed | (888) 88-SOURCE | www.artisantg.com...
- Page 3 Artisan Technology Group - Quality Instrumentation ... Guaranteed | (888) 88-SOURCE | www.artisantg.com...
-
Page 4: Table Of Contents
LDX-3412 Familiarization ........ - Page 5 Troubleshooting ..........11 LDX-3412...
-
Page 6: Safety And Warranty Information
• Prolonged storage under adverse conditions • Failure to perform intended measurements or functions If necessary, return the instrument to ILX Lightwave, or authorized local ILX Lightwave distributor, for service or repair to ensure that safety features are maintained (see the contact information on page vii). -
Page 7: Safety Symbols
See the Table of Contents to locate the specifications and other product information. The following classifications are standard across all ILX Lightwave products: • Indoor use only • Ordinary Protection: This product is NOT protected against the harmful ingress of moisture. -
Page 8: Warranty
Returning an Instrument If an instrument is to be shipped to ILX Lightwave for repair or service, be sure to: Obtain a Return Authorization number (RA) from ILX Customer Service. -
Page 9: Claims For Shipping Damage
W A R R A N T Y Claims for Shipping Damage When you receive the instrument, inspect it immediately for any damage or shortages on the packing list. If the instrument is damaged, file a claim with the carrier. The factory will supply you with a quotation for estimated costs of repair. You must negotiate and settle with the carrier for the amount of damage. -
Page 10: Comments, Suggestions, And Problems
W A R R A N T Y Comments, Suggestions, and Problems To ensure that you get the most out of your ILX Lightwave product, we ask that you direct any product operation or service related questions or comments to ILX Lightwave Customer Support. - Page 11 W A R R A N T Y in a container with at least 3 inches (7.5cm) of compressible packaging material on all sides. We look forward to serving you even better in the future! viii Safety and Warranty Information Artisan Technology Group - Quality Instrumentation ...
-
Page 12: General Information
Precision Current Source. Appendix A contains a brief troubleshooting guide. Product Overview The LDX-3412 is an easy to operate, precision current source. It is optimized for driving laser diodes and LEDs with an output range of 0 to 200 mA, with a compliance voltage of >6 volts. -
Page 13: Specifications
We invite you to contact us at any time with your suggestions. LDX-3412 Artisan Technology Group - Quality Instrumentation ... Guaranteed | (888) 88-SOURCE | www.artisantg.com... -
Page 14: Installation
C H A P T E R PERATION This chapter is a guide to setting up and operating the LDX-3412. The controls and connectors are described, and then step-by-step instructions for connecting and using the LDX-3412 are presented. Installation Before plugging in the LDX-3412 to your AC power source, AC Power Considerations . -
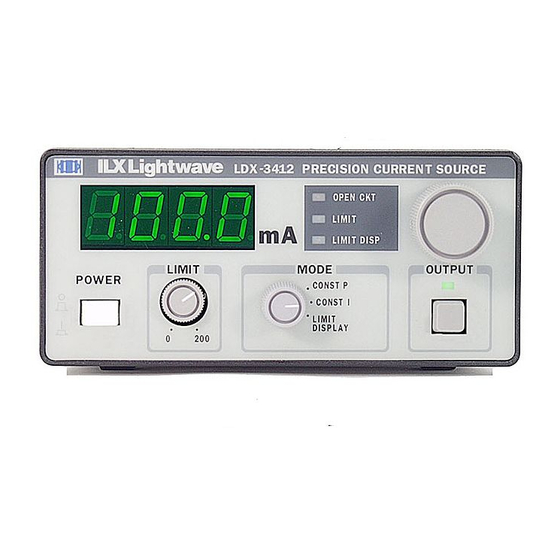
Page 15: Front Panel
Figure 2.1 LDX-3412 Front Panel Power-up Sequence With the LDX-3412 properly connected to an AC power source, pressing the AC POWER off/on switch causes the unit to initiate its power-up sequence. During this period the output terminals are unconditionally shorted and the OUTPUT off/on switch is inhibited for two seconds. -
Page 16: Output Current Adjustment
The OUTPUT off/on switch is located in the lower right-hand corner of the front panel. This switch has a toggling action which turns the output current of the LDX-3412 on and off. When the output is active, the LED indicator just above the switch will be lit. -
Page 17: Rear Panel
OPEN CKT indicator latches on. The OPEN CKT indicator will remain on until the output is manually turned on again. • LIMIT - indicates that the LDX-3412 output is being limited to the setting of the front panel LIMIT knob. When a LIMIT condition occurs, the LIMIT indicator becomes lit. -
Page 18: Output Connectors
Photodiode feedback gain may be adjusted by the user via the COARSE and FINE controls on the rear panel of the LDX-3412. When the CONST P mode is selected, the user may adjust the feedback gain for proper testing of a laser diode. -
Page 19: System Interlock
When disconnecting devices, it is only necessary to turn the OUTPUT off. System Interlock When the LDX-3412 is shipped, an interlock is incorporated at connector J105 (pins 1 and 2). Output current will not flow unless there is an electrical connection made between pins 1 and 2 of J105. - Page 20 +6 volt common mode voltage, relative to the "-" laser current output terminal. The circuit of Figure 2.5 should be used, if feasible. 01_04 LDX-3412 Artisan Technology Group - Quality Instrumentation ... Guaranteed | (888) 88-SOURCE | www.artisantg.com...
-
Page 21: Laser Diode Connections And Shielding
Installation Laser Diode Connections and Shielding Before connecting the laser diode to the LDX-3412, be sure that the front panel OUTPUT switch is in the OFF position (LED unlit). Before turning on the OUTPUT, be sure that the current LIMIT has been correctly set. - Page 22 COARSE control back down (CCW) a bit. Then repeat Steps 8 and 9 as necessary. Note: At any time during the operation of the LDX-3412, the output current limit setting may be observed by selecting LIMIT DISPLAY mode. In this mode, the output current will be off and the current limit setting will be displayed on the LED display.
- Page 23 O P E R A T I O N C H A P T E R Installation LDX-3412 Artisan Technology Group - Quality Instrumentation ... Guaranteed | (888) 88-SOURCE | www.artisantg.com...
-
Page 24: Chapter 3 Troubleshooting
Troubleshooting This appendix is a guide to troubleshooting the LDX-3412. Some of the more common symptoms are listed here, and the appropriate troubleshooting actions are given. We recommend that the user start at the beginning of this guide. Read the symptom descriptions, and follow the steps for the corrective actions which apply. - Page 25 If CONST P mode is used, check the feedback connections. Try reversing the polarity of the photodiode. OUTPUT intermittently turns off • Check the interlock circuit. A broken circuit will reset the LDX-3412 to during operation. the off state. •...
Need help?
Do you have a question about the LDX-3412 and is the answer not in the manual?
Questions and answers