Table of Contents
Advertisement
Quick Links
KVM over IP Matrix
Start-up Guide
This document provides step by step instructions on how to install and configure a KVM
over IP matrix using Apantac Tx and Rx modules. For a detailed description of some
features or specific configuration menus such as Video Wall, please refer to the specific
product manuals.
APANTAC LLC, 10200 SW Allen Blvd. Suite C, Beaverton, OR 97005 USA
info@apantac.com
– Telephone: +1 503 968 3000 - Fax: +1 503 389 7921 –
www.apantac.com
1
Advertisement
Table of Contents

Subscribe to Our Youtube Channel
Related Manuals for Apantac KVM

Summary of Contents for Apantac KVM
- Page 1 KVM over IP Matrix Start-up Guide This document provides step by step instructions on how to install and configure a KVM over IP matrix using Apantac Tx and Rx modules. For a detailed description of some features or specific configuration menus such as Video Wall, please refer to the specific product manuals.
-
Page 2: Table Of Contents
Rx Configuration – second pass ....................... 14 System Final Tests ..........................17 Contact Apantac Technical Support ................... 18 APANTAC LLC, 10200 SW Allen Blvd. Suite C, Beaverton, OR 97005 USA info@apantac.com – Telephone: +1 503 968 3000 - Fax: +1 503 389 7921 –... -
Page 3: Overview
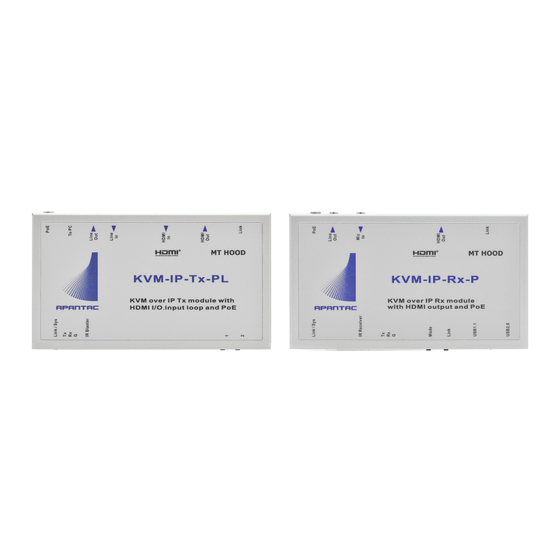
Overview Apantac offers various Tx and Rx models that can all reside on the same network and work together, which include: • The KVM-IP-Tx & KVM-IP-Rx have DVI-I input and output connectors and support resolutions up to 1920 x 1200 @ 60Hz. They ship with their own wall mount power supply. - Page 4 KVM-IP-Tx-PL & KVM-IP-Rx-P have an HDMI input and output, with an input loop for the KVM-IP-Tx-PL, POE and support resolutions up to 4K @ 30Hz. They ship without any power supply. An optional KVM-IP-Tx-PL-PS wall mount power supply is available in case the IP Switch does not have POE capability. It can be used with the Tx or the Rx.
-
Page 5: Installation
(this can be disabled in the configuration) and will not work if the IP Switch is not supporting or enabled for Jumbo frames first. If KVM-IP-Tx-PL or KVM-IP-Rx-P modules are used, a POE switch is preferred. We recommend configuring the IP Switch for IGMP, IGMP Snooping and Jumbo frames first. - Page 6 DC input jack to secure the power connection. With the KVM-IP-Tx-PL module or the OG-KVM-IP-Tx card you can use the HDMI loop out (HDMI Out) to connect to a local console monitor, for example.
-
Page 7: Configuration
For a quicker update, you may want to shut down the application and launch it again. APANTAC LLC, 10200 SW Allen Blvd. Suite C, Beaverton, OR 97005 USA info@apantac.com – Telephone: +1 503 968 3000 - Fax: +1 503 389 7921 –... -
Page 8: Tx Configuration - First Pass
• Press “Save”. The Tx will reboot. This Tx row will disappear from the GUI and pop up again with the new settings. • Repeat until all Tx are configured. APANTAC LLC, 10200 SW Allen Blvd. Suite C, Beaverton, OR 97005 USA info@apantac.com – Telephone: +1 503 968 3000 - Fax: +1 503 389 7921 –... -
Page 9: Rx Configuration - First Pass
You can also sort the modules based on different criteria by clicking on the corresponding column name. APANTAC LLC, 10200 SW Allen Blvd. Suite C, Beaverton, OR 97005 USA info@apantac.com – Telephone: +1 503 968 3000 - Fax: +1 503 389 7921 –... -
Page 10: Tx Configuration - Second Pass
Here is what you get when you connect to a Tx. There are three tabs, each one with its own settings. APANTAC LLC, 10200 SW Allen Blvd. Suite C, Beaverton, OR 97005 USA info@apantac.com – Telephone: +1 503 968 3000 - Fax: +1 503 389 7921 –... - Page 11 You may want to use this capability to limit the access that will be “visible” to a console to the proper Tx. APANTAC LLC, 10200 SW Allen Blvd. Suite C, Beaverton, OR 97005 USA info@apantac.com – Telephone: +1 503 968 3000 - Fax: +1 503 389 7921 –...
- Page 12 30 or 60 frame per seconds for a few seconds and then have a frozen picture for several seconds because of network congestion. APANTAC LLC, 10200 SW Allen Blvd. Suite C, Beaverton, OR 97005 USA info@apantac.com – Telephone: +1 503 968 3000 - Fax: +1 503 389 7921 –...
- Page 13 Tx IP addresses. A dual head Tx configuration is shown here. APANTAC LLC, 10200 SW Allen Blvd. Suite C, Beaverton, OR 97005 USA info@apantac.com – Telephone: +1 503 968 3000 - Fax: +1 503 389 7921 –...
-
Page 14: Rx Configuration - Second Pass
This takes a few tens of seconds. There is no other setting to care of in this tab. APANTAC LLC, 10200 SW Allen Blvd. Suite C, Beaverton, OR 97005 USA info@apantac.com – Telephone: +1 503 968 3000 - Fax: +1 503 389 7921 –... - Page 15 Tx it connects to / assign it externally. You could for example use the “Connection Manager” for this purpose. APANTAC LLC, 10200 SW Allen Blvd. Suite C, Beaverton, OR 97005 USA info@apantac.com – Telephone: +1 503 968 3000 - Fax: +1 503 389 7921 – www.apantac.com...
- Page 16 USB memory sticks from this console. Multi-Screen Setting. The Apantac KVM over IP solution allows you to switch single, dual head, and up to four head computers in one shot. One Rx per console head is needed.
-
Page 17: System Final Tests
Tx as soon as you see the new video. The popup menu information and style can be cycled by pressing the F8 key. Do not hesitate to contact your Apantac representative or Apantac contact if you need help with the KVM over IP Matrix configuration. -
Page 18: Contact Apantac Technical Support
Email: Randall.Durand@Apantac.com Daryn Edwards Technical Support Engineer Phone: +1 (503) 968-3000 Email: Daryn.Edwards@Apantac.com APANTAC LLC, 10200 SW Allen Blvd. Suite C, Beaverton, OR 97005 USA info@apantac.com – Telephone: +1 503 968 3000 - Fax: +1 503 389 7921 – www.apantac.com...
Need help?
Do you have a question about the KVM and is the answer not in the manual?
Questions and answers