Advertisement
Quick Links
·
Before you install your shower door, please read
these instructions carefully to familiarize yourself
with the required tools, materials, and installation
sequences. Follow the sections that pertain to your
particular installation. This will help you avoid costly
mistakes. In addition to proper installation, read all
operating and safety instructions.
·
All information is based on the latest product
information available at the time of publication.
Kohler China Ltd. reserves the right to make
changes in product characteristics, packaging, or
availability at any time without notice.
·
These instructions contain important care, cleaning,
and warranty information-
instructions for the consumer.
·
Make sure that the bath and the finished wall
material are completely and correctly installed prior
to installing your shower door. Prepare waterproof
layer to wall and floor of the showering area. It is not
allowed for any presence of electric switches and
sockets. Make sure the floor drain runs smoothly.
·
Before starting the door installation, lay out and
identify all the parts. Use the exploded view
illustrated on page 2 for reference.
·
For the installation method of customized shower
with different dimensions, please refer to this
instructions.
CAUTION: Risk of injury or product damage.
Tempered glass cannot be cut, drilled or knocked
by hard object. Make sure corner area of the
glass refraining from knocking so as to cause
personal injury due to broken glass.
ATTENTION:
Please install this door on Kohler
receptors or curbs (Not included). If the curb is not
Kohler-branded, please note its top width should fall
above 80mm.
IMPORTANT:
The shower door requires a flat vertical
finished wall. The squareness of the wall is
recommended no more than 3 mm/m. KOHLER
Company won't take responsibility of the installation
quality.
1146426-T01-B
please leave these
·
·
·
·
·
·
3mm/m
13-1
-1-
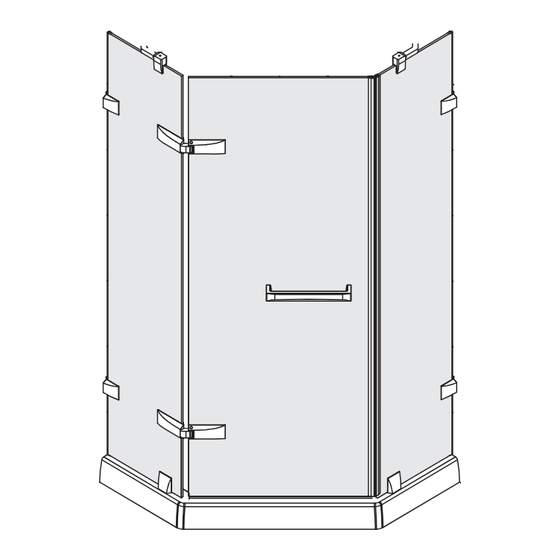
MEMOIRS
SINGULIER
INSTALLATION INSTRUCTIONS
HINGED, ANGLE, 1DR2PAN, 8mm
K-36938T/K-36952T
HINGED, ANGLE, 1DR2PAN, 10mm
K-36945T/K-36959T
2
80mm
528437
Copyright Kohler China Ltd., 2013
8mm
10mm
, 2013
Advertisement

Related Manuals for Kohler MEMOIRS


Summary of Contents for Kohler MEMOIRS
- Page 1 · · All information is based on the latest product information available at the time of publication. Kohler China Ltd. reserves the right to make changes in product characteristics, packaging, or availability at any time without notice. · ·...
-
Page 2: Parts Identification
SINGULIER Bracket Assy SINGULIER Wall Clip Assy MEMOIRS Handle Assy SINGULIER 135 DEG Hinge Assy SINGULIER Handle Assy MEMOIRS 135 DEG Hinge Assy MEMOIRS Wall Clip Body Cover SINGULIER Wall Clip Body Cover SINGULIER Bottom Clip Assy MEMOIRS Bottom Clip Assy °... -
Page 3: Installation
INSTALLATION Fix the gasket to the glass. Affix the wall clip to the glass ,screws not locked. Note: Please insert the glass in the correct direction. STEP STEP Fix the wall clip and the floor clip. STEP 1146426-T01-B... - Page 4 Align the glass to level, and lock the wall clip and the Complete the glass installation of the other side floor clip. following the same steps. STEP STEP If the door opens inward, please first insert the Affix the hinge to the hole on top of the glass, gasket into the glass.
- Page 5 Align the cam with tools to up the hinge to level, then Affix the hinge to the hole on the bottom of the glass, lock the screws. screws not locked. Tips: there are two Be auare of the holes on the surface direction of the hige: of the cam, the The upper part should...
- Page 6 Align the cam with tools to level the glass, then lock Fix the handle. the screws. Tips: there are two holes on the surface of the cam, the bigger one and the smaller one separately mark the highest and the lowest point of the cam.
- Page 7 Fix the magnetic stripe and the gasket. If the door opens unwell, please loosen the wall clip and the floor clip slightly, adjust the glass until the door closed completely, then lock the screws. Be aware of the direction of the magnetic stripe and the gasket.
- Page 8 Fix the cover caps to the hinges. Fix the bottom of the glass and use the water- resistant gel. STEP STEP Do not use the enclosure for at least 24 hours. 24hrs STEP 1146426-T01-B...
Need help?
Do you have a question about the MEMOIRS and is the answer not in the manual?
Questions and answers