Table of Contents
Advertisement
Available languages
Available languages
Quick Links
Advertisement
Chapters
Table of Contents

Related Manuals for Sonnenkonig VLAM


Summary of Contents for Sonnenkonig VLAM
- Page 1 VLAM GARTENFLAMME Bedienungsanleitung Artikel-Nr. VLAM 30310288...
-
Page 2: Table Of Contents
INDEX 1 Sicherheitshinweise ����������������������������������������������������������������������������������������� 3 2 Stand und Lage ����������������������������������������������������������������������������������������������� 5 3 Gasbedarf / Gasanforderung ��������������������������������������������������������������������������� 5 4 Dichtheitsprüfung�������������������������������������������������������������������������������������������� 6 5 Betrieb und Lagerung �������������������������������������������������������������������������������������� 6 6 Reinigung und Pflege� ������������������������������������������������������������������������������������� 7 7 Teilbeschreibung ��������������������������������������������������������������������������������������������� 8 8 Montage ������������������������������������������������������������������������������������������������������� 10 9 Garantie / Entsorgung / Technische Änderungen ����������������������������������������������11... -
Page 3: Sicherheitshinweise
1 Sicherheitshinweise Bitte lesen Sie vor erster Inbetriebnahme die Gebrauchsanweisung genau durch und beachten Sie die Sicherheitshinweise um Schäden durch falsche oder unsachgemäße Bedienung sowie unzulässige Umgebungsbedingungen zu vermeiden. Bewahren Sie diese zum späteren Nach- schlagen gut auf. Kontrollieren Sie das Gerät nach dem Entfernen der Verpackung auf Beschädigungen. Setzen Sie das Gerät bei Verdacht auf eine Beschädigung nicht in Betrieb und wenden Sie sich an einen Fachmann. - Page 4 • Kontrollraum, Brenner und Zirkulationsdurchgänge der Heizung müssen sauber gehalten wer- den. Reinigen Sie das Gerät nach Bedarf. • Der Treibgastank sollte abgeschaltet werden, wenn die Heizung nicht in Betrieb ist. • Die Schlauchleitung ist so zu platzieren, dass niemand darüber stolpern kann. •...
-
Page 5: Stand Und Lage
2 Stand und Lage • Die Heizung ist in erster Linie nur für den Aussenbereich. Achten Sie immer darauf, dass ausreichende Frischluftzu- fuhr vorhanden ist. • Halten Sie immer den vorgeschriebenen Abstand zu brennbaren Materialien ein: oben mindestens 40 cm und seitlich mindestens 60 cm. -
Page 6: Dichtheitsprüfung
4 Dichtheitsprüfung Die Gasanschlüsse der Heizung werden im Werk vor der Auslieferung auf ihre Dichtigkeit ge- prüft. Eine vollständige Dichtigkeitsprüfung muss am Aufstellort nach der Installation durchge- führt werden. • Mischen Sie eine Seifenlösung aus einem Teil flüssigem Reinigungsmittel und einem Teil Was- ser. -
Page 7: Reinigung Und Pflege
So schalten Sie die Heizung aus 1. Schalten Sie den Drehknopf auf die LO-Position. 2. Drücken und drehen Sie den Drehknopf auf die OFF-Position. 3. Schalten Sie das Ventil an der Gasflasche vollständig aus. Off: Die Heizung stellt ab Lo: Minimaltemperatur Hi: Höchsttemperatur Drehknopf Zündung... -
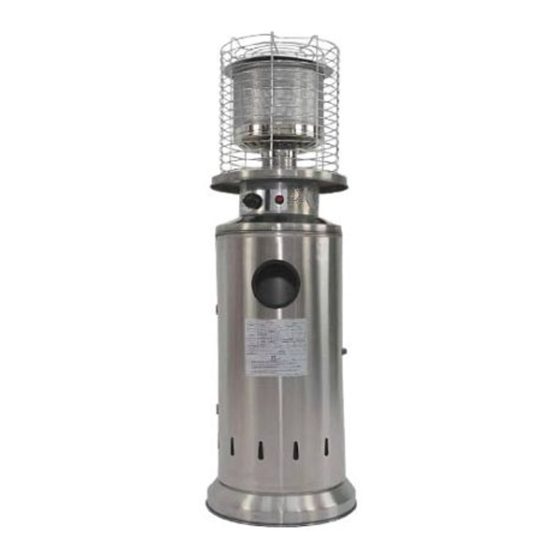
Page 8: Teilbeschreibung
7 Teilbeschreibung Schutzschild Reflektierende Abdeckung Brenner Brennerboden Tablett Schalter Zylindergehäuse Basis... - Page 9 Konstruktion und Eigenschaften • Transportable Terrassen- und Gartenheizung mit Tankgehäuse • Gehäuse aus Stahl mit Pulverbeschichtung oder Edelstahl • Gasschlauchverbindungen mit Metallklemme (Schraubkappen für Deutschland) • Wärmeabgabe Reflektor Technische Daten • Verwenden Sie ausschliesslich Propan-, Butangas oder deren Mischungen • Max. Wattzahl: 12000 Watt •...
-
Page 10: Montage
8 Montage SCHRITT 1 SCHRITT 2 SCHRITT 3 SCHRITT 4 SCHRITT 1 1.1 Montage der Räder an der Basis 1.2 Verwenden Sie 2 Stück M8*16 und 2 Stück M8 Muttern und 4 Stück Schrauben. SCHRITT 2 2.1 Montage der Basis am Tank 2.2 Verwenden Sie 3 Stück CC und 3 Stück DD M8*16 Flanschmutter und 3 Stück EE M6*10. -
Page 11: Garantie / Entsorgung / Technische Änderungen
9 Garantie / Entsorgung / Technische Änderungen Garantie Die Geräte werden vor Auslieferung genau kontrolliert. Sollte trotzdem wider Erwarten ein Mangel an Ihrem Gerät auftreten, wenden Sie sich bitte an Ihren Verkäufer. Bringen Sie den Kaufbeleg mit, der bei Inanspruchnahme von Garantieleistungen vorzulegen ist. Die Garantie beträgt 24 Monate ab dem Kaufdatum. - Page 12 ENTSORGUNGSHINWEISE FÜR DEN ELEKTRISCHEN TEIL DES PRODUKTS Gemäß Artikel 26 des Gesetzeserlass vom 14. März 2014 zur Umsetzung der Richt- linie 2012/19/EG und des Erlasses vom 4. März 2014 zur Umsetzung der Richtlinie 2011/65/EG zur Verringerung der Verwendung gefährlicher Stoffe in Elektro- und Elektronikgeräten und zur Abfallentsorgung.
- Page 13 Firma Armin Schmid Olensbachstrasse 9–15 CH-9631 Ulisbach Tel. Int. +41 71 987 60 60 Tel. Nat. 0848870850 www.sonnenkoenig.ch Firma Armin Schmid Peter-Henlein-Strasse 5 D-89331 Burgau Tel: 0180 500 64 35 info@sonnenkoenig.ch www.sonnenkoenig.ch 0.14 Cent/Minute...
- Page 14 VLAM CHAUFFAGE Mode d’emploi Article-nr. VLAM 30310288...
- Page 15 SOMMAIRE 1 Consignes de sécurité ������������������������������������������������������������������������������������ 16 2 Position et emplacement du Phönix ��������������������������������������������������������������� 18 3 Consommation de gaz / exigences en matière de gaz ������������������������������������ 18 4 Contrôle d‘étanchéité �������������������������������������������������������������������������������������19 5 Fonctionnement et stockage ��������������������������������������������������������������������������19 6 Nettoyage et entretien ���������������������������������������������������������������������������������� 20 7 Carastériques ������������������������������������������������������������������������������������������������...
-
Page 16: Consignes De Sécurité
1 Consignes de sécurité Avant la première mise en service, veuillez lire scrupuleusement le mode d‘emploi dans son Intégralité et tenir compte des consignes de sécurité afin d‘éviter les dommages liés à une com- mande mauvaise ou non conforme ainsi qu‘à des conditions d‘environnement non autorisées. Conservez ce mode d‘emploi afin de pouvoir le consulter de nouveau ultérieurement. - Page 17 • Ne transportez jamais le chauffage lorsqu‘il est en état de fonctionnement. • Après avoir éteint l‘appareil, ne déplacez pas le chauffage tant qu‘il n‘a pas refroidi. • Veillez à ce qu‘il n‘y ait pas de saletés sur les ouvertures d‘aération du cylindre. •...
-
Page 18: Position Et Emplacement Du Phönix
2 Position et emplacement du Phönix • Le chauffage est conçu en premier lieu pour une utili- sation à l‘extérieur. Veillez toujours à ce qu‘il y ait assez d‘air frais. • Respectez toujours la distance prescrite entre l‘appareil et tout matériau combustible : au moins 40 cm en hauteur et au moins 60 cm sur les côtés. -
Page 19: Contrôle D'étanchéité
4 Contrôle de l‘étanchéité L‘étanchéité des raccordements de gaz du chauffage sont contrôlés à l‘usine avant la livraison. Un contrôle total de l‘étanchéité doit être effectué au lieu où l‘appareil se trouve après son installation. • Créez une solution savonneuse en mélangeant un produit nettoyant liquide avec de l‘eau. La solution savonneuse peut être utilisée à... -
Page 20: Nettoyage Et Entretien
Pour éteindre le chauffage 1. Mettez le bouton en position LO. 2. Appuyez sur le bouton et placez-le sur la position OFF. 3. Fermez complètement la valve de la bouteille de gaz. Off: Le chauffage se désactive Lo: Témperature minimale Hi: Témperature maximale Bouton rotatif Ignition... -
Page 21: Carastériques
7 Caractéristiques Ecran de protection Couverture réfléchissante Brûleur Base du brûleur Plateau Interrupteur Boîtier du vérin Base... - Page 22 Construction et caractéristiques • Chauffage de terrasse et de jardin transportable avec réservoir • Boîtier en acier avec revêtement par poudrage ou en acier inoxydable. • Raccordements de conduites de gaz avec pince en métal (capuchons à visser pour l‘Allemagne) •...
-
Page 23: Notice De Montagé
8 Matériel de fixation ÉTAPE 1 ÉTAPE 2 ÉTAPE 3 ÉTAPE 4 ÉTAPE 1 1.1 Montage des roues à la base 1.2 Utiliser 2 écrous M8*16 et 2 écrous M8 et 4 boulons. ÉTAPE 2 2.1 Montage de la base sur le réser- voir 2.2 Utiliser 3 écrous à... -
Page 24: Garantie / Élimination / Modifications Techniques
9 Garantie / élimination / modifications techniques Garantie Les appareils font l’objet d’un contrôle précis avant la livraison. Si malgré tout un vice devait être constaté sur votre appareil, adressez-vous en toute confiance à notre revendeur. Veuillez joindre la preuve d’achat pour bénéficier de la garantie. La période de garantie est de 24 mois à... - Page 25 INSTRUCTIONS D’ÉLIMINATION DES COMPOSANTS ÉLECTRIQUES DU PRODUIT Conformément à l’article 26 du décret-loi du 14 mars 2014 portant application de la directive 2012/19/CE et à la loi du 4 mars 2014 portant application de la directive 2011/65/CE concernant la réduction de l’utilisation de substances dangereuses dans les équipements électriques et électroniques et la gestion des déchets.
- Page 26 Maison Armin Schmid Olensbachstrasse 9-15 CH-9631 Ulisbach Tel. Int. +41 71 987 60 60 Tel. Nat. 0848870850 www.sonnenkoenig.ch Maison Armin Schmid Peter-Henlein-Strasse 5 D-89331 Burgau Tel: 0180 500 64 35 info@ sonnenkoenig.ch www.sonnenkoenig.ch 0.14 Cent/Minute...
- Page 27 VLAM RISCALDATORE PER ESTERNI Manuale dell‘utente Nr. articolo VLAM 30310288...
- Page 28 INDICE 1 Avvertenze di sicurezza ��������������������������������������������������������������������������������� 29 2 Posizione e collocazione del riscaldatore ������������������������������������������������������� 31 3 Fornitura del gas ������������������������������������������������������������������������������������������� 31 4 Verifica della tenuta d‘aria ���������������������������������������������������������������������������� 32 5 Funzionamento e stoccaggio ������������������������������������������������������������������������� 32 6 Pulizia e manutenzione ��������������������������������������������������������������������������������� 33 7 Schema del prodotto �������������������������������������������������������������������������������������...
-
Page 29: Avvertenze Di Sicurezza
1 Avvertenze di sicurezza Si prega di leggere attentamente le seguenti istruzioni e di osservare le norme di sicurezza al fine di evitare danni a persone o cose dovuti ad un uso scorretto o improprio del riscaldatore. Conservare questo manuale d‘uso come riferimento per le necessità future. Accertarsi dell‘assenza di eventuali danni dell‘apparecchio dopo averlo rimosso dall‘imballag- gio. - Page 30 • Se si percepisce odore di gas: 1. Staccare l’alimentazione del gas. 2. Non accendere alcun attrezzo, prodotto, corrente elettrica. 3. Se l’odore persiste contattare immediatamente il vostro fornitore di gas e seguire le sue indicazi- oni. • Non trasportare il riscaldatore quando è in funzione. •...
-
Page 31: Posizione E Collocazione Del Riscaldatore
2 Posizione e collocazione del riscaldatore • Il riscaldatore è adatto esclusivamente per uso in ester- ni. Assicurarsi che una corretta ventilazione sia sempre disponibile. • Mantenere sempre uin’adeguata distanza da materiali infiam- mabili, almeno 40 cm in altezza e 60 cm ai lati. •... -
Page 32: Verifica Della Tenuta D'aria
4 Verifica della tenuta d‘aria I collegamenti del gas del riscaldatore e la loro ermecità viene testata in fabbrica prima della consegna. Un completo controllo della tenuta del gas e dell’ermicità del riscaldatore deve essere effettuato nel luogo di montaggio e dopo l’installazione. •... -
Page 33: Pulizia E Manutenzione
Come accendere il riscaldatore 1. Schalten Sie den Drehknopf auf die LO-Position. 2. Pressare e ruotare la manopola di controllo sulla posizione OFF. 3. Chiudere completamente la valvola della bombola del gas. Off: Il riscaldamento si spegne Lo: Temperatura minima Hi: Temperatura massima Manopola Ignizione... -
Page 34: Schema Del Prodotto
7 Schema del prodotto Scudo protettivo Coperchio riflettente Bruciatore Base del bruciatore Vassoio Interruttore Cassa del cilindro Base... - Page 35 Struttura e carattreristiche • Traspoprtabile in terrazzo e giardino con l’apposita custodia per il serbatoio. • Corpo in acciaio con verniciatura a polvere o in acciaio inox. • Connessione dei tubi del gas con morsetto in metallo (Tappi a vite per la Germania) •...
-
Page 36: Istruzioni Di Montaggio
8 Matériel de fixation FASE 1 FASE 2 FASE 3 FASE 4 FASE 1 1.1 Montaggio delle ruote alla base 1.2 Utilizzare 2 pezzi M8*16 e 2 pezzi M8 dadi M8 e 4 pezzi bulloni FASE 2 2.1 Montaggio della base al serbatoio 2.2 Utilizzare 3 pezzi CC e 3 pezzi DD M8*16 dado flangiato e 3 pezzi EE M6*10... -
Page 37: Garanzia / Smaltimento / Modifiche Tecniche
9 Garanzia / Smaltimento / Modifiche tecniche Garanzia I prodotti vengono controllati attentamente prima della spedizione. Se dovesse comunque pre- sentarsi un vizio sul vostro apparecchio, vi invitiamo a rivolgervi in tutta tranquillità al vostro rivenditore. Vi rammentiamo di portare appresso la ricevuta d’acquisto, che deve essere presen- tata per ogni prestazione in garanzia. - Page 38 INFORMATIVA SMALTIMENTO RELATIVA ALLA PARTE ELETTRICA DEL PRODOTTO Ai sensi del D.L. del 14 marzo 2014 art. 26, di attuazione della direttiva 2012/19/ EU e del D.L. 27 del 4 marzo 2014, di attuazione della direttiva 2011/65/EU relativa alla riduzione dell‘uso di sostanze pericolose nelle apparecchiature elettriche ed elettroniche, nonché...
- Page 39 Ditta Armin Schmid Olensbachstrasse 9-15 CH-9631 Ulisbach Tel. Int. +41 71 987 60 60 Tel. Nat. 0848870850 www.sonnenkoenig.ch Ditta Armin Schmid Peter-Henlein-Strasse 5 D-89331 Burgau Tel: 0180 500 64 35 info@ sonnenkoenig.ch www.sonnenkoenig.ch 0.14 Cent/Minute...
- Page 40 VLAM PATIO HEATER Manual Article-Nr. VLAM 30310288...
- Page 41 INDEX 1 Safety Instructions ���������������������������������������������������������������������������������������� 42 2 Heater stand and location ����������������������������������������������������������������������������� 44 3 Gas requirements ������������������������������������������������������������������������������������������ 44 4 Leak test ������������������������������������������������������������������������������������������������������� 45 5 Operation and storage ���������������������������������������������������������������������������������� 45 6 Cleaning and maintance� ������������������������������������������������������������������������������� 46 7 Parts description ������������������������������������������������������������������������������������������� 47 8 Assembly instructions �����������������������������������������������������������������������������������...
- Page 42 1 Safety instructions Please read before first commissioning the safety instructions carefully and observe the safety instructions to prevent damage due to misuse, improper operation, and improper environmental conditions to be avoided. Keep these for later reference . Check the device after removing the packaging for damage . Do not put the unit in case of suspected corruption in operation and consult a specialist.
- Page 43 • Reconnect, and perform another leak test. If you continue to see bubbles after several attempts, the cylinder valve is defective and should be returned to its place of purchase. • Do not transport heater while it’s operating. • Do not move the heater after it has been turned off until the temperature has cooled down. •...
- Page 44 2 Heater stand and location • The heater is primarily for outdoor use only. Always ensu- re that sufficient fresh air is supplied. • Always maintain proper clearance to combustible materi- als, i.e. minimum 40 cm above and minimum 60 cm on the sides.
- Page 45 4 Leak test Gas connections on the heater are leak tested at the factory prior to shipment. A complete gas tightness check must be performed at the installation site because of possible mishandling in shipment or excessive pressure being applied to the heater. •...
- Page 46 To turn off the heater: 1. Turn the control knob to LO position. 2. Press and turn the control knob to OFF position. 3. Completely turn off the valve on the gas supply cylinder. Off: The heater stops work Lo: Minimum temperature position Hi: Maximum temperature position Control knob Igniter...
- Page 47 7 Parts description Protective shield Reflective cover Burner Burner base Tray Switch Cylinder case Base...
- Page 48 Construction and characteristics: • Transportable terrace/garden heater with tank housing • Stell housing with powder-coating or made of stainless steel • Gas hose connections with metal clamp (screw caps for Germany) • Heat emission from reflector Specifications • Use propane or butane only •...
- Page 49 8 Assembly instructions STEP 1 STEP 2 STEP 3 STEP 4 STEP 1 1.1 Assemble the wheels to the base 1.2 Use 2 pcs M8*16 and 2 pcs M8 nuts and 4 pcs bolts STEP 2 2.1 Assembly the base to the tank 2.2 Use 3 pcs CC and 3 pcs DD M8*16 flange nut and 3 pcs EE M6*10 STEP 3...
- Page 50 11 Warranty / Disposal / Technical change Warranty The Products are controlled just before delivery. If despite a lack of your product, try trustfully your seller. Please bring your receipt, as this is to be submitted for each warranty. The guarantee period is 24 months from date of purchase.
- Page 51 DISPOSAL INSTRUCTIONS FOR THE ELECTRICAL PART OF THE PRODUCT In accordance with Article 26 of the Decree-Law of 14 March 2014 implementing Direc- tive 2012/19/EC and the Law of 4 March 2014 implementing Directive 2011/65/EC on the reduction of the use of hazardous substances in electrical and electronic equipment and on waste management.
- Page 52 Company Armin Schmid Olensbachstrasse 9–15 CH-9631 Ulisbach Tel. Int. +41 71 987 60 60 Tel. Nat. 0848870850 www.sonnenkoenig.ch Company Armin Schmid Peter-Henlein-Strasse 5 D-89331 Burgau Tel: 0180 500 64 35 info@sonnenkoenig.ch www.sonnenkoenig.ch 0.14 Cent/Minute...
Need help?
Do you have a question about the VLAM and is the answer not in the manual?
Questions and answers