Table of Contents
Advertisement
Advertisement
Table of Contents

Related Manuals for TigerStop SAWGEAR


Summary of Contents for TigerStop SAWGEAR
- Page 1 2017 TigerStop, LLC ® ® Panel Saw February 2017 Mk 1...
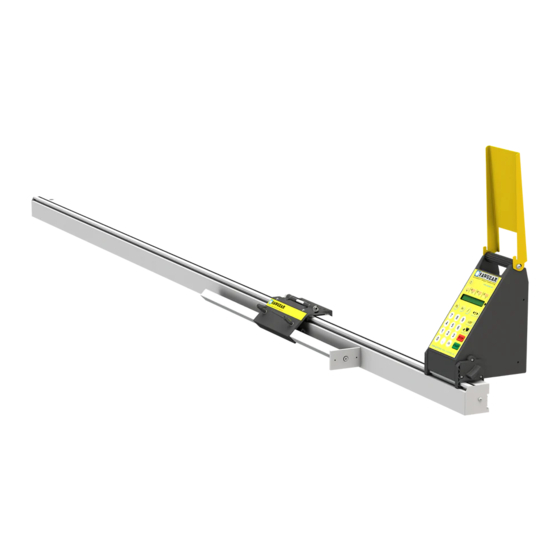
- Page 2 Controller PowerHead Cable Guard Power Cable Stop Bar Support Leg Universal Bracket Bench Mount Brackets Nut Pack Flip Away Stop Assembly Measuring Bar...
- Page 3 IMPORTANT SAFETY INFORMATION. READ ALL WARNINGS BEFORE OPERATING THIS PRODUCT. WARNING: Installation of your TigerStop Product must be done by a person trained in the safe design and installation of automation products, and in the safe operation of power equipment. Ensure...
- Page 4 IMPORTANT SAFETY INFORMATION. READ ALL WARNINGS BEFORE OPERATING THIS PRODUCT. Keep the work area clean and well lighted to avoid accidental injury. Do not use TigerStop machines in a dangerous environment. Using power tools in damp or wet locations or in rain can cause shock or electrocution.
-
Page 5: Table Of Contents
Table of Contents Table of Contents Installation........................6 SawGear Setup......................12 Register Your Warranty Enable Your SawGear First Power Up Routine Basic SawGear Use....................15 Moving SawGear Calibrating SawGear Using the Increment Feature Using the List Feature Sleep Mode Password Protection Switching Between Inches and Metric... -
Page 6: Installation
Installation Installation Install Universal Brackets to Saw Note: Drilling and Tapping may be required. Install Bench Mount Brackets to Universal Brackets... - Page 7 Attach SawGear Measuring Bar to Bench Mount Brackets Note: Ensure the Universal Brackets are level before attaching the SawGear Measuring Bar. Failure to do so will impact overall system accuracy. Assemble Support Leg Leveling Nuts...
- Page 8 Attach Support Leg...
- Page 9 Attach PowerHead to Measuring Bar Locking Handle Attach Cable Guard to PowerHead To attach the Cable Guard to the PowerHead, carefully remove the 4 screws on the back of the PowerHead. Hold the Cable Guard in place as shown and replace the 4 PowerHead screws.
- Page 10 Attach Flip Away to Carriage Assemble the Flip Away Stop as shown and attach it to the SawGear carriage. Tighten the Flip Away Stop so that it will stay up when its flipped to the up position.
- Page 11 Install Stop Bar in Flip Away Stop Lock Attach Controller to Saw Note: Drilling and Tapping may be required.
-
Page 12: Sawgear Setup
SawGear installation is now complete. SawGear Setup SawGear Setup Register Your Warranty When your new SawGear arrives, you will find a warranty registration sheet in the accessory box. Fill out this form and fax or e-mail it to TigerStop Customer Service. (360) 260-0755 service@tigerstop.com TigerStop Customer Service will contact you by phone to give you your SawGear enable code, within the hour during regular business hours. -
Page 13: Enable Your Sawgear
• SawGear will stop when finished Note: If SawGear doesn’t do the routine in this exact order, you may have selected the saw side incorrectly. Remove the power cord and hold while plugging it back in to repeat the first start up routine. - Page 14 6. SawGear will now move back a few inches. Put a piece of material against the SawGear stop bar and cut it. 7. Measure the cut piece and enter into the SawGear keypad. Press when finished.
-
Page 15: Basic Sawgear Use
Basic SawGear Use Basic SawGear Use Moving SawGear Moving SawGear is as easy as entering a length on the number pad and pressing to move. Lengths may be entered as decimals or as fractions. Entering Fractions ® Example: I want to cut a piece that is 2 feet and 8 and 1/2 inches. -
Page 16: Calibrating Sawgear
Calibrating SawGear As you use your SawGear, you will have to calibrate the length measurement after saw blade replacements or each time the machine is moved, before putting it into operation. How To Calibrate ® 1. Send SawGear to any length. -
Page 17: Using The Increment Feature
Using the Increment Feature SawGear has an increment feature that allows you to move SawGear forward or backwards in set increments. Setting the Increment ® 1. Press 2. Press the right or left increment button. 3. Enter the increment length for the selected button. -
Page 18: Using The List Feature
Using the List Feature SawGear can store up to 9 dimensions in each of 10 cut list memory slots. Selecting a Memory Slot 1. Press ® 2. Enter a memory slot number (0 - 9). 3. Press Programming a List 1. -
Page 19: Sleep Mode
Sleep Mode Sleep mode will turn off the SawGear display when left inactive for a set amount of time. 1. Press , then 2. Enter the number of minutes that SawGear should remain powered up after inactivity. Note: The smallest value allowed is .25 minutes. Enter a value of 0 to disable sleep mode. -
Page 20: Switching Between Inches And Metric
Deactivate Password Protection 1. Remove the power cable from the SawGear PowerHead. 2. Hold the button. 3. Plug the power cable back into the PowerHead while holding the button. 4. Press 5. Enter the existing password and press 7. Press 8. - Page 24 FIND US ONLINE AT www.tigerstop.com 12909 NE 95th Stree Vancouver, WA 98682-2426 1.360.254.0661 sales@tigerstop.com TigerStop B.V. Holland 31 546 575 171 info@tigerstop.nl...
Need help?
Do you have a question about the SAWGEAR and is the answer not in the manual?
Questions and answers