Table of Contents
Advertisement
Quick Links
WARNINGS AND CAUTIONS:
If the information in this instruction sheet is not followed exactly, SHOCK OR FIRE MAY RESULT CAUSING PROPERTY DAMAGE, PERSONAL INJURY OR DEATH.
•
•
Connect to a 120/240VAC, 60Hz dedicated branch circuit.
•
For outdoor installations, hard wire connection is required to maintain NEMA 4 weatherproof rating.
•
Hard-wire installation and service must be performed by an electrician.
IMPORTANT: Save these instructions for local electrical inspector's use and future reference.
•
INTRODUCTION
Thank you for purchasing the Level 2 16A Electric Vehicle Charging Station. This
installation sheet includes the latest information at the time of printing. Leviton
reserves the right to make changes to this product without further notice. Changes or
modifications to this product by other than an authorized service provider could void
the product warranty. If you have questions about the use of this product, contact your
Customer Service Representative. Refer to the Customer Support section located in
these instructions.
Important Notes to the Installer:
• Read all instructions contained in these installation instructions before installing
hard-wired version of the Charging Station.
• The installer is responsible for verifying that the wall structure/surface will safely
support a total load of 200 lbs.
• Observe all governing codes and ordinances.
• Be sure to leave these instructions with the consumer.
Important Notes to the Consumer:
• Keep these instructions with your User Guide for future reference.
• Ensure the Charging Station is installed by an electrician or service technician.
PLUG-IN INSTALLATION
NOTE: The Plug-In Charging Station must be installed with a Leviton Pre-Wire Kit
(sold separately). Failure to do so means the station no longer complies with its
UL listing. The listing requires the station be removable without tools. Refer to
Pre-Wire Kit instructions first if a mounting location has not been established.
1. Locate the slot above the thumb screw. Locate the four Mounting Buttons on the
back of the Charging Station (see Figure 1).
2. Align the slot with the guide pin, and the four Mounting Buttons with the four key
holes on the Mounting Bracket.
3. Once aligned, gently press the Charging Station onto the Mounting Bracket.
4. Allow the Charging Station to slowly slide down into place.
5. Tighten the thumb screw to secure Charging Station to Mounting Bracket.
Proceed to POWER CHARGING STATION section.
Figure 1
Thumb
screw
Charging Station Mounting
HARD-WIRE INSTALLATION
Gather the required tools and parts before starting installation. Be sure to follow
manufacturer's instructions for use of any tools or parts used for this installation.
Tools:
•
Drill with 3/16" bit
•
Stud finder
•
Scratch awl
•
#2 and #3 Phillips screwdriver
•
Measuring tape
•
Wire cutters/strippers
Additional Parts (not included):
•
Copper electrical cable (12 AWG minimum)
•
20A Circuit breaker
•
#14 wood mounting screws (2) - stud mount
For Metal Stud Applications:
•
Wall anchors capable of supporting a maximum allowable load of 200 lbs.
For Solid Wall Applications:
•
Wall anchors capable of supporting a maximum allowable load of 200 lbs.
•
Appropriate conduit and applicable mounting hardware.
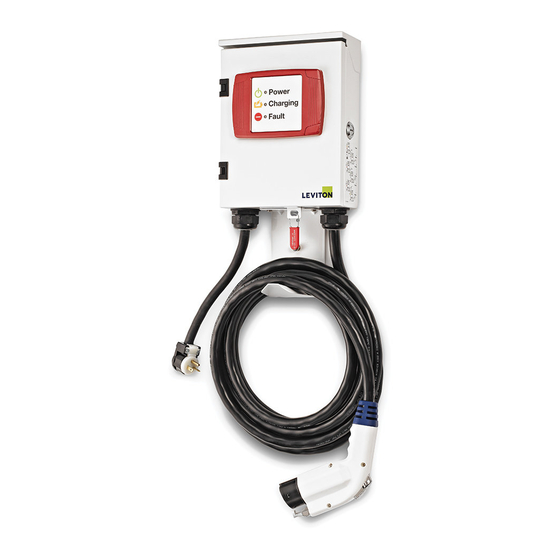
Level 2 Electric Vehicle Charging Station
Installation Instructions
Voltage
120/240V 60Hz Split-phase (L1-G/L2-G – 120V, L1-L2 – 240V)
Current
16A
NOTE: Charging Station operates on 120/240V circuit only. Does not operate on 120V circuit.
Rear view
Keyhole
(stud mount)
Mounting
bracket
(mounted
to wall)
Guide pin
Mounting buttons
(bracket mount)
•
Level
•
Utility knife
•
Keyhole saw
•
Conduit
•
Strain relief (if applicable)
•
H100-TB Hub
(or engineering equivalent)
Cat. No. EVB22
RATINGS
MOUNTING LOCATION
The Charging Station should be located in close proximity to the electric vehicle's
parking location. The Charging Station must connect to the electric vehicle via a
Charge Connector and Charge Connector Cord. NOTE: The path from the Charging
Station to the electric vehicle should be free from obstacles, and be within the range
of the Charge Connector Cord (18 feet standard length).
The recommended mounting height of the Charging Station is not to exceed 48
inches, but not less than 42 inches. This provides convenient access and operation
of the Charging Station, and meets ADA requirements for access.
NOTE: The area surrounding the Charging Station enclosure should be free from
obstruction. Recommended clearance around station: 5" above and 3-1/2" on either side.
MOUNTING INSTALLATION
Select a location that is suitable for mounting the Charging Station based on
the criteria presented in the MOUNTING LOCATION section. For stud walls, the
Charging Station can be mounted to bare studs or walls with drywall. For metal stud or
solid wall applications, you will need to procure wall anchors for the Charging Station,
capable of supporting a maximum allowable load of 200 lbs. For solid wall applications
you will also need to procure appropriate conduit and appropriate wall anchors.
NOTE: A hard-wired installation can be mounted to the wall with use of the Mounting
Bracket included in the Pre-Wire Kit (purchased separately).
To mount directly to a stud wall, follow directions below:
TO INSTALL:
1. To install the charging station by use of mounting screws, first remove the
4 mounting buttons from the charging station (see Figure 1 - Rear view).
2. Locate a wall stud in the area in which the Charging Station will be installed
(see Figure 2).
3. Measure 48" up from the floor and place a mark on the stud that will be used
for mounting.
4. For wood studs, drill a 3/16" diameter pilot hole, 2-1/2" deep, directly in the middle of
the stud. For metal studs, follow manufacturer's instructions for wall anchor installation.
5. Loosely fasten a #14 x 2-1/2"L wood screw by turning the screw into the pilot hole
until approximately 1/2" length remains. Hook the Charging Station onto the screw
using the top keyhole slot. Secure in place by installing an additional screw through
the bottom set screw hole.
6. Cut off and remove Warranty Void Padlock (see Figure 5).
7. Use a standard screwdriver to open the Enclosure Door from the side to gain access
and tighten top mounting screw. Proceed with Hard-Wiring Charging Station.
Figure 2
Wall stud
48"
Center line
for wall stud
Drywall
DG-420-EVB22-00B
Pilot hole
for mounting
screw
Top
mounting
screw
Bottom
mounting
screw
Stud Wall Installation
Advertisement
Table of Contents

Subscribe to Our Youtube Channel
Related Manuals for Leviton EVB22


Summary of Contents for Leviton EVB22
- Page 1 NOTE: A hard-wired installation can be mounted to the wall with use of the Mounting Bracket included in the Pre-Wire Kit (purchased separately). NOTE: The Plug-In Charging Station must be installed with a Leviton Pre-Wire Kit To mount directly to a stud wall, follow directions below: (sold separately).
- Page 2 Charging Station Leviton warrants to the original consumer purchaser and not for the benefit of anyone else that this product at the time of its sale by Leviton is free of defects in materials and workmanship under 240V normal and proper use for three years from the purchase date. Leviton’s only obligation is to correct...
Need help?
Do you have a question about the EVB22 and is the answer not in the manual?
Questions and answers