
Related Manuals for ADS Technologies USBAV-190


Summary of Contents for ADS Technologies USBAV-190
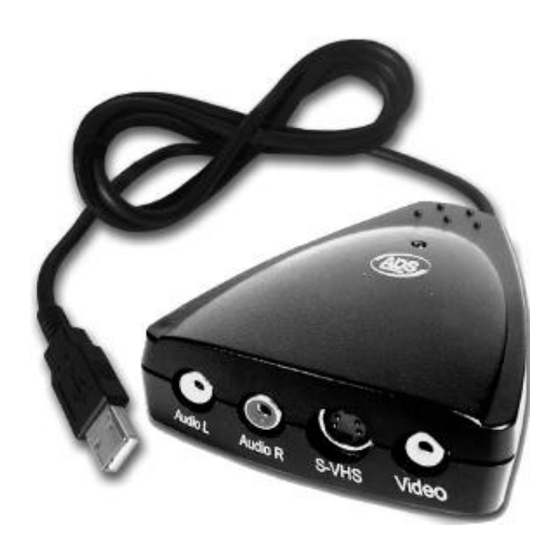
- Page 1 U S B I n s t a n t V id e o C D User’s Guide Product Part#: USBAV-190 Product UPC: 7-57887-19000-2 www.adstech.com...
- Page 3 Machines, Inc. ADS is a registered trademark of ADS Technologies Inc. ADS Technologies (ADS) makes no warranty of any kind with regard to this material, including but not limited to, the implied war- ranties of merchantability and fitness for a particular purpose. The information furnished within this written document is for information purposes only and is subject to change without notice.
-
Page 4: Table Of Contents
Table of Contents Introduction....5 Package Contents ....5 System Requirements . -
Page 5: Introduction
I n t r o d u c t i o n Package Contents: 1. USB Instant VideoCD device w/ 6 ft. USB cable attached 2. Audio/Video connection cable 3. USB Instant VideoCD CD 4. User ’s Guide System Requirements: •... - Page 6 I N S T A L L A T I O N G U I D E NOTE: INSERT the CD and install the Drivers before plugging the USB Instant VideoCD Device in your computer!
-
Page 7: Quick Installation Guide
Q u i ck I nst al lat i o n G u id e This Quick Installation Guide should be used as a reference guide only. It is highly recommended that you read the complete USB Instant VideoCD Manual before using this product to help ensure you get the most out of your USB Instant VideoCD! Follow these instructions when using USB Instant VideoCD for... -
Page 8: Installation Instructions
I n s t a l l a t i o n I n s t r u c t i o n s : Windows 98SE, ME, 2000 and XP (NOTE: Actual screens may differ depending on which OS is used) Step 1. - Page 9 (Does Not Apply to Windows ME/2000/XP) Check the box next to “CD-ROM” and make sure the rest of the boxes are unchecked. Then click “Next”. 3) USB Instant Video will start to install the drivers into your system. Note: This alert might appear 3-4 times depending on your OS.
-
Page 10: Step 2. Plugging In
Step 2. Plugging In: Connect Your USB Instant VideoCD Device To Your Computer A. Plug the USB cable on the device into the USB port on your computer. Note: Some computers may be equipped with USB ports on the front of the computer tower. B. - Page 11 C. The Wizard will once again appear due to the USB Instant VCD Audio device which is built-in into the unit. 1) Make sure that “Install the software 2) Wait while Windows searches for Note: now detected. Click “Finish”. automatically (Recommended)” is selected.
-
Page 12: Step 3. Checking It
Step 3. Checking It Verifying Proper Installation of Devices A. Making sure that the Instant VideoCD devices are properly installed. is now detected. Click “Finish”. 1) Right-click “My Computer”. 2) Click on “Properties”. 3) Click on the “Hardware” tab. 4) Click on “Device Manager”. 5) When the Device Manager appears click on the "+"... -
Page 13: Videostudio 6
First English edition for Ulead VideoStudio version 6.0, November 2001. © 1992-2002 Ulead Systems, Inc. All rights reserved. No part of this publication may be reproduced or transmitted in any form or by any means, electronic or mechanical, including photocopying, recording or storing in a retrieval system, or translated into any language in any form without the express written permission of Ulead Systems, Inc. -
Page 14: Step 1. Installing Software Applications
S o f t w a r e A p p l i c a t i o n I n s t a l l a t i o n : STEP 1. Installing Software applications A. Insert the USB Instant VideoCD CD. B. - Page 15 I I - Setting Capture Options 1) Click on “Options” (1) 2) It will bring up the Options pane. Click on “Capture Properties” (2). 3) The Capture Properties window appears. Make sure “Video Capture Filter” is selected. Click on “Properties”.
- Page 16 Window will appear. Click on the “Video Setting” tab. 5) Now click on the arrow under “Video Input” (1) which will bring down the menu. Select “Composite 1” (2). Then click “OK” (3). *Note: You can adjust the picture brightness under the “Video Proc.
- Page 17 2) Click on “Properties”. 3) The Audio Source Window appears. Make sure that “USB Instant VCD Audio” is selected. Click “OK”. I V- Using the DVDWi z a r d 1) Click on “Export” (1), which brings down the Export pane. Next, click on “Ulead DVD Wizard”...
- Page 18 2) This brings up the 3) Select scenes to use in the scene selection menu and use the Preview window to browse for scenes and click “Add” (1) to place them in the Scenes list. You can select up to 99 scenes. Select “Locate scene frames”...
- Page 19 5) Use the remote control to observe the behavior of your DVD/VCD/SVCD project in the Playback Simulation dialog box. Click “Next”. 6) Select the folder location where to output files in the “Determine Output Options Settings” window. Determine also the settings of your CD burner.
-
Page 20: Help Resources
H E L P R E S O U R C E S : Video Studio Help – Press "F1" on your keyboard at any time. Video Studio User Manual – on CD Video Studio Guide – Turn this on by clicking on "G" (global properties) and selecting preferences. -
Page 21: Service And Warranty
R e t u r n / R e p l a c e m e n t : If you need to return your ADS Technologies product you should return the product directly to the dealer or store where you purchased the product. Each individual computer store or dealer sets product returns policies for their customers. -
Page 22: Fcc Information
ADS Technologies, Inc. product or inability to use the product, even if the dealer or ADS Technologies, Inc. has been advised of such lia- bility or other claims. This includes damage to property and, to the extent permitted by law, damages for personal injury. - Page 25 North America Office 12627 Hidden Creek Way Cerritos, CA 90703 Phone: (562) 926-1928 Fax: (562) 926-0518 Support: (562) 926-4338 European Office Shannon Industrial Estate Shannon Co. Clare, Ireland Phone: +353.61.702042 Part #: 190-511 www.adstech.com...
Need help?
Do you have a question about the USBAV-190 and is the answer not in the manual?
Questions and answers