Advertisement
Available languages
Available languages
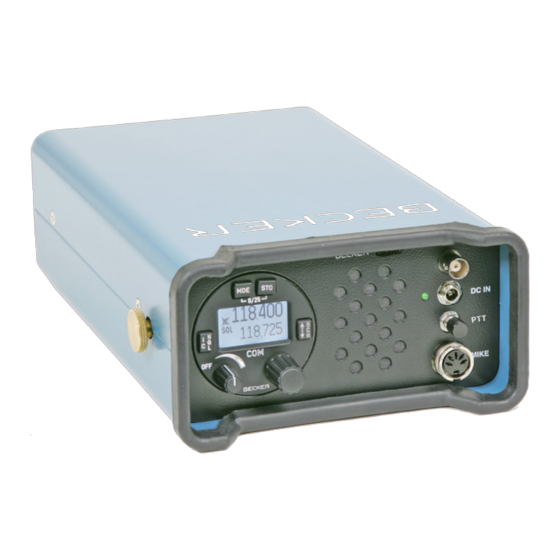
Product Design
Connect an External PTT or Foot
PTT Switch
• A PTT switch can be connected to
the microphone socket at front
panel pin5 (PTT) and pin1 (ground).
We reserve the right to make technical changes. The data correspond to the current status at the time of printing.
Figure: Front view - Controls GK61X-XX Carrying Case
0646.921-071 Issue 03 08/2015
Quick Start Guide
Portable VHF Stations GK61X
Figure: Wiring Diagram 5 Way DIN Socket
Advertisement
Table of Contents

Related Manuals for Becker GK61 Series


Summary of Contents for Becker GK61 Series
- Page 1 Quick Start Guide Portable VHF Stations GK61X Product Design Figure: Front view - Controls GK61X-XX Carrying Case Connect an External PTT or Foot PTT Switch • A PTT switch can be connected to the microphone socket at front panel pin5 (PTT) and pin1 (ground). Figure: Wiring Diagram 5 Way DIN Socket 0646.921-071 Issue 03 08/2015 We reserve the right to make technical changes.
- Page 2 Quick Start Guide Portable VHF Stations GK61X Figure: Rear view GK61X Figure: Wiring Diagram Connector P2 Start-Up • Connect the antenna and the mike/speaker to the corresponding jacks • Turn "ON" the device by turning the volume knob clockwise. • During PBIT (Power-On Built In Test) the display indicates the message "WAIT", the software version of "Control Head"...
- Page 3 Kurzanleitung Mobile VHF Stationen GK61X Produkt Design Abbildung: Frontansicht – Anzeige-, Bedienelemente GK61X-XX Transportkoffer Anschluss eines externen PTT oder eines PTT Fußschalters • An der Mikrofonbuchse (Frontseite) kann ein PTT Schalter angeschlossen werden (Pin5 PTT, Pin1 Ground). Abbildung: Verdrahtung 5pol. DIN Buchse 0646.921-071 Issue 03 08/2015 Änderungen vorbehalten.
- Page 4 Kurzanleitung Mobile VHF Stationen GK61X Abbildung: Rückansicht GK61X Abbildung: Verdrahtung Stecker P2 Erst-Inbetriebnahme • Verbinden Sie Antenne und Mikrofon/Lautsprecher mit den entsprechenden Buchsen. • Schalten Sie das Gerät "AN" (Drehschalter im Uhrzeigersinn drehen). • Während dem PBIT (Power-On Built In Test) wird auf dem Display "WAIT", die Softwareversion des "Controllers"...
Need help?
Do you have a question about the GK61 Series and is the answer not in the manual?
Questions and answers