
Related Manuals for Blastrac 2-45DTM


Summary of Contents for Blastrac 2-45DTM
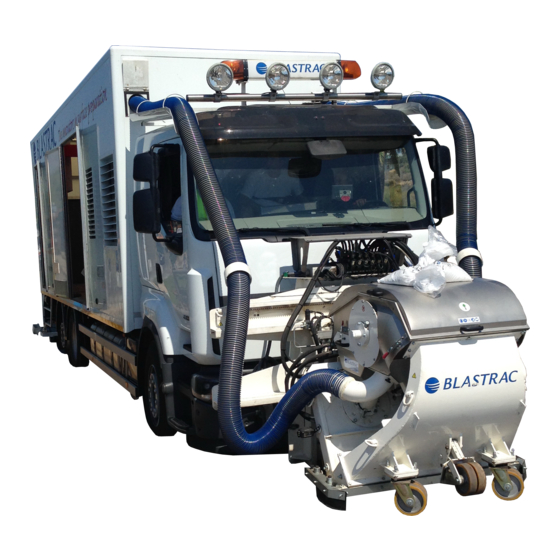
- Page 1 2-45D-UNIT-ROEHSLER Original instructions OPERATING INSTRUCTIONS 2-45DTM VERSION 3.4...
-
Page 2: Ec-Konformitätserklärung
(Übersetzung des Originals. Das Original ist in englischer Sprache) EC-KONFORMITÄTSERKLÄRUNG in Übereinstimmung mit Appendix II sub A der Richtlinie 2006/42/EC BLASTRAC B.V. Utrechthaven 12 NL-3433PN NIEUWEGEIN Tel.: +31 (0)30 6018-866 Fax: +31 (0)30 6018-333 info@blastrac.nl Niederlande Wir erklären in alleiniger Verantwortung, dass die unten beschriebene Maschine mit den Gesundheits- und Sicherheits-Anforderungen der europäischen Richtlinie... - Page 3 Switching from ‘Drive-mode to ‘Hydro-mode’ Connecting the blast unit with the truck Start-up of the dust collector 5. Operation of the blast unit Before blasting Blasting with the 2-45DTM Switching the machine off Driving backwards Adjusting the blast pattern Setting the control cages...
-
Page 4: Machine Description
This machine is not intended for use by persons (including children) with reduced physical, sensory or mental capabilities, or lack of experience and knowledge. Blastrac BV offers a course on the use of the machine in order to make the operating and maintenance personnel familiar with all elements of the machine. - Page 5 Separator inc. hopper Separator tray Magnet drum drive Dust hose connection Feed spout Control cage clamps Abrasive sealing Rebound Transport castor (foldable) Separator, magnetic drum and hopper The abrasive separator is mounted to the end of the recovery duct. It separates the abrasive from contaminants and feeds the cleaned abrasive onto the magnetic drum(2).
-
Page 6: Abrasive Sealing
Blast wheel The heart of the blast cleaning machine are two blast wheels that throw the abrasive onto the surface to be cleaned by using centrifugal force. The blast wheels are placed in a protective housing lined with replaceable wear parts. The blast wheels are driven by two hydraulic motors. Control cage Impeller Blades (set of 6) - Page 7 Side shift and adapter The side shift and machine adapter is designed to mount a Blastrac 2-45D blast cleaning machine on a truck. During blasting it is possible to shift the blast head from the total left side to the total right side, outside the reach of the wheels of the truck.
- Page 8 The 2-45TDC is a very powerful truck mounted dust extractor. This high performance machine is exclusively designed and built to be used in combination with the Blastrac 2-45D blast cleaning machine. It is equipped with 24 pieces of specially designed high quality Blastrac cartridge filters. The rotating valves transport all generated debris directly into 2 BigBags for easy removal.
- Page 9 Dust emissions into the environment Class Value of performance Retains at least 99 % of Most Penetrating Particle Size (MPPS) 0.3 µm Retains at least 99,9 % of Most Penetrating Particle Size (MPPS) 0.3 µm Retains at least 99,995 % of Most Penetrating Particle Size (MPPS) 0.3 µm In the case of dust harmful to health, contact the local health and safety authorities, and observe national regulations in force both during use and disposal.
- Page 10 The air streaming through the complete system during the application of the blast cleaning machine and dust extractor has the following functions: Cooling of the blast wheels Cooling of the abrasive Transport of the abrasive Transport of dust through the system Separation of the dust from the re-useable abrasive Transport of the dust to the dust collector The dust extractor is provided with an air pulse cleaning system which increases the life of the filter cartridges.
- Page 11 Tow behind sweeper (option) The Blastrac 2-45TBS is a fully hydraulic controlled automatic magnetic sweeper. It can be mounted at the back of the truck and it will pick up the abrasive that was left behind after blast cleaning. The magnets will pick up the abrasive from the surface and the conveyor-belt will transport it to the rear for safe access to the storage buckets.
-
Page 12: General Safety Rules
Any damage to the electric cables and/or electrical components is not permitted. b) If a cable or plug is damaged, it must be replaced immediately. Only use original Blastrac parts. c) Inspect and test the electrical components regularly. The electrical components have to satisfy with the... -
Page 13: Personal Safety
The work area must sealed off using a red and white safety chain and a danger sign. All repair work has to be done by qualified Blastrac personnel, this guarantees a safe and reliable machine. -
Page 14: Maintenance Safety
Always switch on the dust collector before blasting! Safety regarding the dust collector a) The Blastrac dust collector can only be used for dry cleaning. It should only be used for removing noncombustible/non-explosive dust or substances. b) The 2-45TDC may not be applied for carcinogenic, pathogenic or asbestos substances. -
Page 15: Hydraulic Safety
as contaminated when they are removed from the hazardous zone and appropriate actions must be taken to prevent dust from dispersing. h) When maintenance or repair procedures are carried out, all the contaminated elements that cannot be properly cleaned, must be destroyed. These elements must be disposed of in sealed bags according to the applicable regulations and in accordance with the local laws governing the disposal of such material. -
Page 16: Transport Safety
o) Avoid sparks, open flames, extremely high temperatures and other sources of ignition. p) Please read the Safety Data Sheets for additional information regarding the hydraulic oil. q) Only use HV46 hydraulic oil (E00481), non-compatible fluids could cause damage to the unit or serious injury. - Page 17 Hoisting transport mode Manual transport mode max. 1 g or 13,8 kN Max. 1,5 g or 20,7 kN Max. 0,67 g or 9,2 kN...
-
Page 18: Signs On The Machine
3.10 Signs on the machine The following stickers are placed on the machine. Meanings of these symbols are: • Danger, disconnect electrical supply before working on this equipment • Warning! Hot surface • Forbidden to lift persons • Danger of crushing •... -
Page 19: Initial Operation
4. Initial operation Before using the machine it is of great importance to inspect the machine. It is not permitted to use the machine if the machine safety is not according the checkpoints below. Checkpoints: Machine in general Operating and safety functions must work correct. Check all screws and other fasteners for tightness. - Page 20 Switching from ‘Drive-mode’ to ‘Hydro-mode’ In order to enable blasting and hydrostatically driving, the truck has to be set to its ‘Hydro-mode’. 1: Electrobox 2: Filter unit 3: BigBag 4: 2-45 Blasthead 5: Touch screen 6: Gear lever 7: Control unit with -Joystick for hydrostatically driving forward/backward.
- Page 21 5. Choose “Gearbox setting” The gearbox of the truck should ALWAYS be in neutral before switching from Drive to Hydro and vice versa. Make sure the handbrake of the truck is off. 6. Push in the clutch and choose: “Switch to Hydraulic” When switching from Drive to Hydro it is important to use the clutch, because it is like shifting gears.
- Page 22 9. In the main screen the “Boost Pressure” indicator can be found at the bottom right. If the needle is in the red area, do NOT continue. Wait for 5 minutes. If the pressure does not build up, call Blastrac for help.
- Page 23 Connecting the blast machine with the truck The blast unit is secured inside the truck with: Wheel brackets Load binders 24V Winch + Remote control When unloading the blast unit, remove the wheel bracket and load binders. Use the remote control of the winch to carefully transport the blast unit to the tail lift of the truck and lower it to the ground.
- Page 24 14. Release the transportation wheels from the side shift unit, by moving the blasthead up off the ground. They are secured with fast-locking pins. While the blasthead is still off the ground, remove the steering handle and flip the front wheel castor up and lock it with the fast locking pin.
-
Page 25: Troubleshooting
Start-up of the dust collector Before switching on the machine make sure that no-one can be endangered when the machine starts up. 1. Wear personal protective equipment. 2. Slide dust hoses through point A, and connect the end of the dust hoses with point B. 3. - Page 26 All persons in the proximity of the machine must wear safety glasses with lateral protection as well as safety shoes and ear protection. Blasting with 2-45DTM Make sure the truck has the required engine RPM’s (Chapter 4.2 step 10). Activate the magnetic drum by touching “ON” in the magnetic drum section.
-
Page 27: Switching Off The Machine
Adjust speed as required for the blasting process on the touch screen in the cruise control section by touching the - button (reduce speed) or the + button (to increase speed) Note, the “memorized speed” can also be adjusted in advance with the + or - buttons during stand still(picture 5) The parameters on speed are pressure as well as percentage of max. - Page 28 Correct adjustment of the control cage and thus of the blast pattern is a very important factor for optimum working with the 2-45DTM blast cleaning machine. Incorrect adjustment of the control cage results in very high wear and premature blasting-through of the liners in the blast wheel housing, as well as reduced blasting performance, uneven cleaning and a possible loss of the rebounce energy of the abrasive.
- Page 29 Setting the control cages: The cast grooves on the control cage show the position of the control cage opening. The following adjustment standard value is valid: the control cage opening is approximately opposite to the throwing angle. The abrasive grain size plays an important role here. Different types of abrasive have different throwing characteristics due to their different weights and frictional resistance.
- Page 30 This process has to be repeated until an even temperature across the blast pattern is achieved. Notes: With increased wear of the blast wheels, blades, impellers and control cages, the blast pattern will change. The size of the abrasive affects the blast pattern. With every exchange of abrasive, the blast pattern must be re-adjusted.
- Page 31 How to replace a full BigBag (weight appr. 1000kg.) Left & Right Rotating valve ON/OFF switches Important note!! Make sure the operator in the cabin is aware of the works in the rear the truck while performing this action!!! For your safety an emergency switch is placed that cuts off the Emergency shutdown complete system.
-
Page 32: Interrupting Work
Blower throttle With the sliding blower throttle it is possible to adjust the suction power of the machine. The normal value for the blower throttle is 3. If the blast machine has a bad cleaning performance it has to be opened a bit further. -
Page 33: Touch Screen
5.13 Transport • The dust collector cannot be lifted from the truck floor. • Remove the dust from the dust collector and the hoses before the dust collector is transported, take precautions to prevent dust from escaping. • Make sure the dust hoses are disconnected and put away properly before transport. •... - Page 34 Check the hydraulic system for leaks or other causes for loosing hydraulic oil and fill up to “Oil level OK” again. Make sure right type of oil is added. (Check with Blastrac) When oil level indicator turns red showing the message ”oil level alarm”...
-
Page 35: Maintenance
6. Maintenance Pay attention to Chapter 3 "Safety" during maintenance and repair works. Failures due to inadequate or incorrect maintenance may generate very high repair costs and long standstill periods of the dust collector. Regular maintenance therefore is imperative. Operational safety and service life of the dust collector depend, among other things, on proper maintenance. The following table shows recommendations about time, inspection and maintenance with normal use of the machine. - Page 36 Prepare a suitable inspection schedule considering your own working conditions and experience. We recommend to execute the first repair works on the dust collector having support of Blastrac personnel. With this your maintenance personnel gets the opportunity to be trained intensely.
- Page 37 Otherwise Blastrac BV cannot guarantee the safety of the machine. The part numbers can be found in the Service Manual. All repair work must to be done by qualified Blastrac personnel, this to guarantee a safe and reliable machine. Any guarantee on the machine is expired when:...
- Page 38 Changing blast wheel blades, impellers and cages Make sure the power unit is stopped, disengage the hydraulics and switch off the PTO. Remove the feed spouts. (1) Remove the cage plates (2) by loosening the 6 nuts. Unscrew the impeller bolt and remove the impeller. (3) Clean the blast wheel and the blades with air.
- Page 39 Deflector maintenance Dirt could build up on the inside of the deflector, especially when the surface contains a lot of bitumen. During the blasting process the bitumen will heat up, become sticky and it will stick to the inside of the deflector.
- Page 40 Side shift & Adapter maintenance Connection plate Machine adapter compl. Lift cylinder bolt Hydraulic cylinder Side shift unit complete M24 nut + slw + pw Adapter plate arm Split pin Lift unit complete Swivel bracket RH Plain washer Adapter frame Swivel bracket LH Hydraulic cylinder M24x80 bolt + pw...
- Page 41 Continuing work with a broken/leaking filter can cause serious damage to the machine and is a health hazard! Never expose the filter cartridges to moisture! Blastrac Cartridge Filter IFA/BIA certificate M-class Order nr. 490803-1...
-
Page 42: Filter Replacement
Filter replacement Warning! Always wear Personal Protective Equipment, the dust can be hazardous to the health! • Make sure the machine is turned off. • Always wear gloves and a dustmask of at least class FFP3. • Use an extra vacuum cleaner in order to work as dust free as possible. Open the bottom maintenance doors (1) of the filter unit in order to get access to the filter cartridges. -
Page 43: Pulse System
Make sure that both the wing nut and the rod seal washer end up in your hands or pockets. (Spares are available at Blastrac.) Remove the old filter cartridge and Replace it with a new one. While mounting a new filter cartridge... - Page 44 If however doubts arise about settings, this unit can be checked. We advise to contact Blastrac support in order to prevent operational problems. After each day, let the pulse system run for 10 minutes without...
-
Page 45: Water Separator
The oil level should be approximately halfway of the oil level indicator, about 0.25 liter. Use only oil especially intended for compressors, according specification C.T. 68 (ISO 68- viscosity). Blastrac Compressor oil – Part nr. E00498 Prior to draining off the oil, the compressor unit should have operating temperature. Regularly... -
Page 46: Tensioning The Belts
6.10 Belts The belt drives are designed for the required drive power. Forcing the drives to grant a higher output by over tensioning the belts results in belt breaks, bearing damage and thus to lower efficiency. A low belt tension results in slippage causing an increased belt temperature and thus to premature destruction of the belts. -
Page 47: Blower Maintenance
Use an Allen key to fasten if necessary. The bearing units (4) of the blower have to be greased every 3 months. There are 2 greasing nipples, both need about 2 pumps of grease. Use LGWA 2/0.4 Bearing grease. Blastrac partnr. E08729... - Page 48 6.14 Rotating valves Hydraulic motor Level sensor Motor bracket Level sensor nut Coupling hub Big bag adapter Coupling sleeve Latch clamp Dust hopper RH Clamp ring Rotating valve (incl. motor bracket) Limit switch Vibrator motor Clamp swivel tube Safety flange Clamp mount plate RH Sensor bracket Big bag 91 x 91 x 70 cm...
- Page 49 The rotor blades will wear in time, which results in too much clearance inside the housing. This causes leaks and a lower efficiency and suction power. A new vulkollan rotor is in diameter approximately 2 mm and in length about 0,5 mm bigger than the housing. Check the rotorblades regularly for damages and wear, and replace them if necessary.
- Page 50 6.16 The 24V Winch and Remote Control Wire rope Winch lever Receiver for remote control Remote control Winch Inspect the wire rope before and after each winching operation. If the wire rope has WARNING! NEVER become kinked or frayed, the wire rope needs to be replaced. Be sure to also inspect operate the winch the winch hook and hook pin for signs of wear or damage.
- Page 51 6.17 Shot valves and actuators The shot valves and actuators should be checked for correct performance regularly. On the electrobox inside the truck there is a “TEST SWITCH” , when this switch is actuated it is possible to operate the actuators and shot valves without blasting.
-
Page 52: Troubleshooting
7. Troubleshooting Prior to any repair works on the equipment or its drives the equipment must be secured against unintentional switching-on. Put the machine to its Safety off position. Fault Possible cause Remedy Unusual noises To little clearance or wrong Check alignment adjustment of the rotating... - Page 53 Fault Possible cause Remedy Loud running noises Too little grease in fan Lubricate the fan bearing. bearing. Silencer assembly Replace parts. defective. Airflow problems Bad cleaning performance. Open the blower throttle until best performance. Too much shot disappears in the filter. Close the blower throttle until best performance.
- Page 54 The Blastrac blast cleaning machines are designed and built to operate with Blastrac abrasive. Blastrac abrasive has a very high quality and has the rebouncing ability required for the efficient use of the machine. The selection of abrasive is very important since this is the material to carry out the surface treatment.
-
Page 55: Technical Data
2 x 1000 kg (max. / 2 big bags) Filtration area 120 m (24 x 5 m The electrical diagrams of the electrical system are placed inside of the control panel. Design and specifications are subject to change without notice by Blastrac BV... - Page 56 Blast unit dimensions Side shift & adapter dimensions Blasthead 2-45D Side shift & adapter Length 1576 mm Length 1050 mm Width 1420 mm Width 2350 mm Height 1420 mm Height 2000 mm Weight 1650 kg Weight 1000 kg Dust collector dimensions: Dust collector Dust collector (incl.
-
Page 57: Sound And Vibration Data
9.1 Sound and vibration data The measurements are executed in full conformance with EN-ISO 11201. There is no machine specific noise test code available. the A-weighted emission sound pressure level at some positions could exceed 80dB (A), in this case suitable ear protection is obliged. - Page 58 Despite the fact that this guide is made with care, Blastrac takes no liability for errors in the manual and the possible consequences. We are naturally very interested in your findings and additions.
- Page 59 Headquarter Blastrac Poland Blastrac Italy Blastrac The Netherlands Golina, Dworcowa 47a S.S. 10 Padana Inferiore, 41 Utrechthaven 12 PL – 63-200 Jarocin IT – 29012 Caorso (PC) NL – 3433 PN Nieuwegein Tel – 0048 627 40 41 50 Tel – 0039 0523 81 42 41 Tel –...
Need help?
Do you have a question about the 2-45DTM and is the answer not in the manual?
Questions and answers