Table of Contents
Advertisement
Quick Links
Maker Uno
MAKER-UNO
User's Manual
Rev 1.0
Dec 2017
Informa on contained in this publica on regarding device applica ons and the like is intended through
sugges on only and may be superseded by updates. It is your responsibility to ensure that your applica on
meets with your specifica ons. No representa on or warranty is given and no liability is assumed by Cytron
Technologies Incorporated with respect to the accuracy or use of such informa on or infringement of
patents or other intellectual property rights arising from such use or otherwise. Use of Cytron Technologies's
products as cri cal components in life support system is not authorized except with express wri en approval
by Cytron Technologies. No licenses are conveyed, implicitly or otherwise, under any intellectual property
rights.
Advertisement
Table of Contents

Related Manuals for Cytron Technologies Maker Uno


Summary of Contents for Cytron Technologies Maker Uno
- Page 1 Technologies Incorporated with respect to the accuracy or use of such informa on or infringement of patents or other intellectual property rights arising from such use or otherwise. Use of Cytron Technologies’s products as cri cal components in life support system is not authorized except with express wri en approval by Cytron Technologies.
- Page 2 ROBOT.HEAD to TOE M AKER-UNO Product User’s Manual - INDEX PAGES 2 INTRODUCTION 4 PACKING LIST 5 PRODUCT SPECIFICATIONS 6 BOARD LAYOUT 8 HARDWARE INSTALLATION 10 GETTING STARTED 13 EXTRA FEATURES 15 WARRANTY Created by C ytron Technologies Sdn Bhd – All Rights Reserved Back to INDEX...
- Page 3 CT-UNO, making it more affordable, and more beginner friendly. It is Arduino UNO R3 compa ble, and by that, Maker UNO can be programmed via Arduino IDE and compa ble with all the example code and libraries for Arduino UNO.
- Page 4 ROBOT.HEAD to TOE M AKER-UNO Product User’s Manual - Not to forget the change of FTDI chip to CH340 IC, the low cost yet stable USB to UART IC. Maker-UNO combines the simplicity of the UNO Op boot bootloader (which load program faster), the stability of the CH340 and the R3 shield compa bility of the latest Arduino UNO Of course, we preserve the good feature of CT-UNO, the USB Micro B socket for program loading and to power the board.
- Page 5 ROBOT.HEAD to TOE M AKER-UNO Product User’s Manual - Maker Uno Comparison Table Created by C ytron Technologies Sdn Bhd – All Rights Reserved Back to INDEX...
-
Page 6: Packing List
Please check the parts and components according to the packing list. If there are any parts missing, please contact us at immediately. sales@cytron. ITEMS QUANTITY Maker Uno (Code: MAKER-UNO ) Created by C ytron Technologies Sdn Bhd – All Rights Reserved Back to INDEX... -
Page 7: Product Specifications
ROBOT.HEAD to TOE M AKER-UNO Product User’s Manual - 3. PRODUCT SPECIFICATIONS Dimension: Absolute Maximum Ra ng of Maker Uno: PARAMETERS Unit Input Voltage via USB connector – DC Current for 3.3V Pin (Max Con nuous) – – DC Current per I/O Pin (Max) –... -
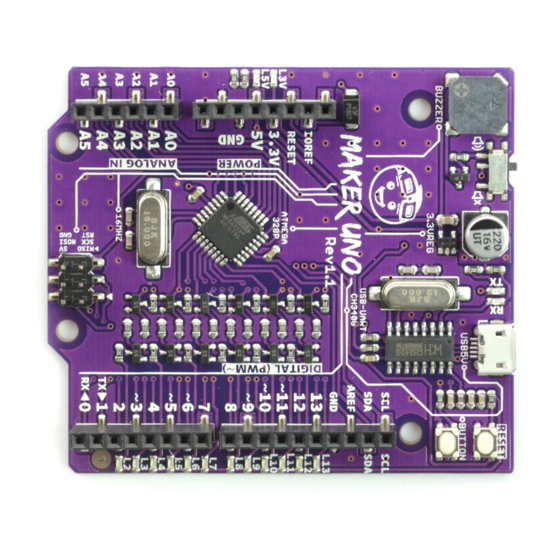
Page 8: Board Layout
This bu on is connected to pin 2 and GND. To use it, user need to configure it as INPUT_PULLUP. ARDUINO UNO R3 STANDARD FEMALE PIN HEADER I Maker UNO female header pin follows Arduino UNO R3 standard. The only difference is, Maker UNO does not have Vin. Created by C ytron Technologies Sdn Bhd – All Rights Reserved... - Page 9 Product User’s Manual - MAIN MICROCONTROLLER (ATMEGA328P) J Main controller for Maker Uno is ATmega328P, same as Arduino Uno R3. SERIES OF MOSFET K These series of MOSFET is a ‘secret’ why you can control LED or make it as indicator for input, even for pull-up input.
-
Page 10: Hardware Installation
ROBOT.HEAD to TOE M AKER-UNO Product User’s Manual - 5. HARDWARE INSTALLATION 5.1 Maker Uno Power Supply Main power for Maker-UNO is through USB connec on. If you would like to make your Maker-UNO portable, you can use power bank or Cytron LiPo... - Page 11 Cytron SKM53 GPS Shield ● ● Etc… So which Arduino shield is not compa ble with Maker Uno? Below is the example of shield that need Vin and it don’t have op on to select power source. GPRS Shield V3.0 ●...
-
Page 12: Getting Started
ROBOT.HEAD to TOE M AKER-UNO Product User’s Manual - 6. GETTING STARTED 6.1 Preparing Hardware To get started, you must have: Maker-UNO board ● USB Micro B Cable ● ● Laptop/PC. Please connect as follows to your laptop/PC. 6.2 Install Arduino IDE Download the latest Arduino IDE at www.arduino.cc/en/Main/So ware . - Page 13 ROBOT.HEAD to TOE M AKER-UNO Product User’s Manual - 6.3 Install Maker Uno Driver Download Maker-UNO driver at Maker Uno product page (under A achment tab). Please choose appropriate driver depends on your OS. Complete the download, proceed with the installa on as usual.
- Page 14 (e.g. COM3). Try Blink example (File - Examples - 01.Basic - Blink). Click Upload icon to upload Arduino code to Maker Uno. MAKER UNO ONLINE TRAINING For more detail you can refer to Maker Uno Online Training at Cytron Youtube channel. MAKER UNO ONLINE TRAINING (YOUTUBE) Created by C ytron Technologies Sdn Bhd – All Rights Reserved...
- Page 15 6.5 Board Package Updated 21 March 2018 1. Maker UNO comes with board package too. You can install it using URL link below. Copy the URL link below and paste to Additional Boards Manager URLs (File - Preferences). Then click OK.
- Page 16 NOTE You need an internet connection during board package installation. 3. Finish installed, you should be able to select Maker UNO as your Board (Tools - Board), and proceed with uploading as usual. Created by C ytron Technologies Sdn Bhd – All Rights Reserved...
- Page 17 Arduino/Genuino Uno by default will set all IO pins to INPUT. If you upload a Blink example to Maker UNO, you will get LED 13 blink and also other LEDs light up randomly, (some mes all LED turns on). This is because INPUT is floa ng, as long as you don’t set those pins to OUTPUT or connect to external circuit, it will produce a floa ng voltage (can...
-
Page 18: Extra Features
ROBOT.HEAD to TOE M AKER-UNO Product User’s Manual - 7. EXTRA FEATURES Maker-UNO incorporates 3 extra features which make it interes ng and more suitable for beginner. Below are the detailed descrip ons for each feature. 7.1 LEDs at Every Digital Pins 7.2 Programmable Push Button Created by C ytron Technologies Sdn Bhd – All Rights Reserved Back to INDEX... - Page 19 ROBOT.HEAD to TOE M AKER-UNO Product User’s Manual - 7.3 On-board Piezo Buzzer Created by C ytron Technologies Sdn Bhd – All Rights Reserved Back to INDEX...
-
Page 20: Warranty
● Product warranty is valid for 6 months. ● Warranty only applies to manufacturing defect. ● Damaged caused by misuse is not covered under warranty. ● Warranty does not cover freight cost for both ways. Prepared by: Cytron Technologies Sdn Bhd www.cytron.io No. 1, Lorong Industri Impian 1, Taman Industri Impian, 14000 Bukit Mertajam, Penang, Malaysia.
Need help?
Do you have a question about the Maker Uno and is the answer not in the manual?
Questions and answers