Table of Contents
Advertisement
Advertisement
Table of Contents

Subscribe to Our Youtube Channel
Related Manuals for Flowserve Scienco SEM-10


Summary of Contents for Flowserve Scienco SEM-10
- Page 1 Operator Manual SEM-10 and SEM-10FT Electronic Flow Meter...
-
Page 2: Safety Notices
Safety Notices • MISUSE AND ABUSE OF THIS METER CAN CAUSE SERIOUS INJURIES. • READ ALL CAUTIONS AND INSTRUCTIONS BEFORE USING METER. • INSPECT BEFORE USING AND REPLACE ANY DEFECTIVE COMPONENTS. • EXPOSURE TO CHEMICALS CAN CAUSE SERIOUS INJURIES. ALWAYS WEAR PROPER PROTECTIVE CLOTHING AND DEVICES WHEN METERING CHEMICALS. -
Page 3: Technical Specifications
Technical Specifications Inlet Port, SEM-10 ------------------------- 1-inch Male NPT Outlet Port, SEM-10 ------------------------- 1-inch Male NPT Inlet Port, SEM-10FT ------------------------- 1-inch Female NPT Outlet Port, SEM-10FT ------------------------- 1-inch Male NPT Flow Range ------------------------- 2 to 30 GPM Maximum Pressure ------------------------- 60 PSI (410 kPa) Accuracy -------------------------... - Page 4 Figure 1: SEM-10 Figure 2: SEM-10FT...
-
Page 5: Meter Operation
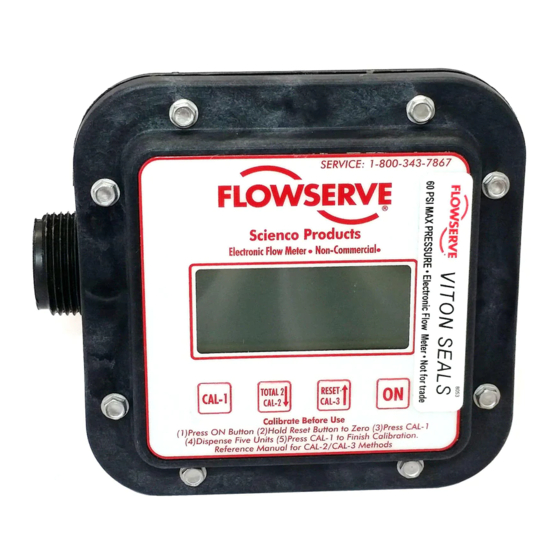
Meter Operation Wakes up display in Current Total mode. Unit will automatically shut off after 40 seconds with no input. Resets Current Total to zero. Also used to enter CAL-3 mode, and to increase the CAL-3 number during the calibration. When depressed and held with Current Total displayed it shows Total 2. -
Page 6: Operating Procedures
Operating Procedures TO METER FLUID: With pump properly installed onto a pumping system meter will wake-up automatically and begin to display Current Total as fluid is pumped. TO DISPLAY CURRENT TOTAL: Press “ON” button. TO RESET CURRENT TOTAL TO ZERO: Press and hold the “RESET” button for 3 seconds while Current Total is displayed. - Page 7 CAL-2 Calibration 1. Press “ON” button to wake up meter. 2. Press and hold the Reset button to zero (“.00”) the Current Total screen. 3. Press “CAL-1” to enter calibration mode. 4. Press “CAL-2” to enter calibration CAL-2 mode. 5. Dispense desired amount. Note: For greatest accuracy pump a minimum volume of 2.5 gallons or 9.5 liters.
-
Page 8: Battery Removal/Replacement
Meter Installation Procedures Flow can be metered in either direction through the SEM-10 and SEM-10FT meters. SEM-10: Thread the meter inlet into the female discharge port of the pump. Using an elbow or coupling, screw the discharge hose onto the other port of the meter. Use thread sealant tape, or pipe dope to seal threaded connections. - Page 9 Battery Removal: To replace battery, remove the eight (8) (PH-13) screws that hold the electronic assembly to the meter assembly. Remove the electronic housing, one battery will be found on the back side. Remove and dispose of used battery. Battery Replacement: Install the new battery into the batter holder. Note the polarity marking, (+) and (-), shown for the battery.
-
Page 10: Troubleshooting Guide
Remove the meter cartridge and clean. Problem: The meter will not power up or the display appears dim. Solution: Replace the battery. For additional Trouble Shooting Questions please call Flowserve-Scienco Technical Service & Support: 1-800-343-PUMP (7867) -
Page 11: Parts List And Parts Diagram
PH-03 SS. Screw, Short S10-02 Meter Plate Metering Chamber SEM-10 KIT-2 Kit: S10-03 or S10-07 S10-04 or S10-08 SFM10000-01 SFM10000-02 SFM10000-03-0A S10-14 SEM-10 Fluid S10-05/05N Housing SEM-10FT Fluid S10-10/10P Housing For additional assistance please call Flowserve-Scienco Sales Department: 1-800-343-PUMP (7867) - Page 12 Figure 3: SEM-10 and SEM-10FT Parts Diagram Note: S10-05N is 90° Nylon Housing S10-10 is Nylon flow through Housing S10-10P is Polypropylene flow through Housing...
-
Page 13: Product Warranty
Product Warranty Flowserve Corporation (the Company) warrants that the Equipment will be free of defects in material and workmanship for a period of twelve months from the date of placing the Equipment in operation or eighteen months from the date of shipment, whichever shall first occur. Parts shall be warranted for a period of six (6) months from date of shipment.
Need help?
Do you have a question about the Scienco SEM-10 and is the answer not in the manual?
Questions and answers