
Related Manuals for Lantronix E210 Series


Summary of Contents for Lantronix E210 Series
- Page 1 E210 Series Cellular Router User Guide Part Number PMD-00017 Revision B February 2021...
- Page 2 949-453-3995 Technical Support Online: www.lantronix.com/support Sales Offices For a current list of our domestic and international sales offices, go to the Lantronix web site at www.lantronix.com/about-us/contact Disclaimer All information contained herein is provided “AS IS.” Lantronix undertakes no obligation to update the information in this publication. Lantronix does not make,...
- Page 3 Open Source software may be available directly from Lantronix’ licensors. Your use of each Open Source component or software is subject to the terms of the applicable license. The BSD license is available at http://opensource.org/licenses.
-
Page 4: Table Of Contents
Connect the Antennas _________________________________ 16 5.6.3 Connect the AC Power _________________________________ 17 5.6.4 Connect the Router to a Computer _______________________ 17 5.6.5 Quick Setup _________________________________________ 19 5.6.6 Default Configuration __________________________________ 21 5.6.7 SNAP CAP™ RS-485 __________________________________ 22 E210 Series Cellular Router User Guide... -
Page 5: Safety Precautions
Do not pull the power supply cable. Please attach or detach it by holding the connector after switching off the supply. Install and connect the router in accordance with this document. Failure to do so will void the warranty. E210 Series Cellular Router User Guide... -
Page 6: About This Guide
2 About this Guide 2.1 Purpose and Audience This guide provides the information needed to install the Lantronix E210 series cellular router. It covers hardware features, installation instructions, and network IP configuration information. This document does not cover how to configure your E210 series cellular router. -
Page 7: E210 Series Compatible Models
CE; RCM; NCC E218F102S 28/20/8/3/1/7 Table 3-1: E210 Series Compatible Models Please consult us regarding the models or features shown in grey italics, which are subject to MOQ and other considerations Uplink / Downlink maximum data rates Ranked by increasing frequencies Please consult us, should any other certification be required incl. -
Page 8: Product Features
Stand-by (WLAN, LAN, Wi-Fi, RS-232 & TF card connected, cellular module idle) W-CDMA in communication mode (Tx max.) LTE in communication mode (Tx max.) E214G#00 Idle (WLAN, LAN, Wi-Fi, RS-232 & TF card disconnected, cellular module off) E210 Series Cellular Router User Guide... - Page 9 Stand-by (WLAN, LAN, Wi-Fi, RS-232 & TF card connected, cellular module idle) GSM in communication mode (PCL=5) GPRS (2Tx,3Rx)@900/850MHz (PCL=5) W-CDMA in communication mode (Tx max.) LTE in communication mode (Tx max.) Table 4-2: Power Consumption (mA) E210 Series Cellular Router User Guide...
-
Page 10: Back Panel Connections
Cellular diversity antenna, SMA connector GPS antenna, SMA connector Cellular main antenna, SMA connector MicroSD-XD card slot Dual SIM slots, Left: SIM2, Right: SIM1 Note: Depending on the device model, the number of antenna connectors may vary. E210 Series Cellular Router User Guide... -
Page 11: Front Panel Connections
Reboot – Press and hold the reset button for more than one second but less than 5 seconds Note: For any pressed or released event to be detected the duration of the press/release event must be at least 200ms. E210 Series Cellular Router User Guide... -
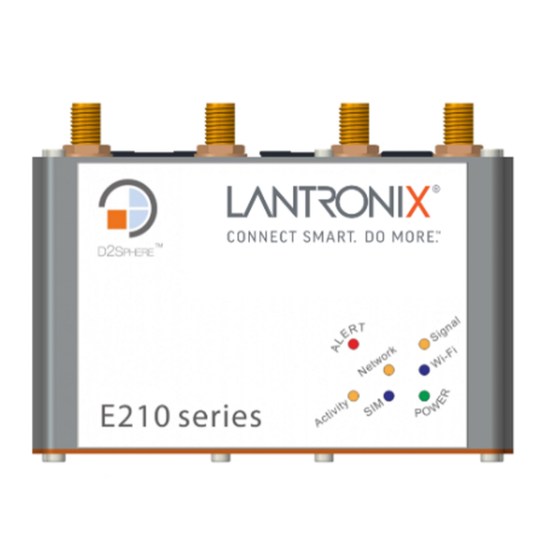
Page 12: Led Status Indicators
Strong signal (CSQ > 12) SIM in use Blue ON SIM 1 Flashing SIM 2 Power Power off Green ON Power on Alert No alert Red Flashing Cellular module reboot, kernel rebooting Red ON Hardware fault E210 Series Cellular Router User Guide... -
Page 13: Installation
Please consult the SNAP CAP™ RS-485 Datasheet for more details about this add-on. 5.4 Accessories Lantronix accessories for use with the E210 series router are listed in the table below. Lantronix accessories are available individually or as accessory bundles. For ordering... - Page 14 THREE IN ONE LTE + LTE + GNSS, 2*LTE ANTENNA, 2*3-METER CABLE, SMA MALE, ADHESIVE MOUNT Miscellaneous BR551 all models MOUNTING HARDWARE L-SHAPE DIN CLIP, 1.2MM SPCC; COLOR ZINC- PLATED; WITH CLIP SPRING, SUS304; WITH SCREW AND WASHER Table 5-1: Lantronix Accessories E210 Series Cellular Router User Guide...
-
Page 15: Preparing To Install
Web browser such as Internet Explorer 10+ or Google Chrome 30+, Mozilla Firefox 20+ or Apple Safari 4+ to access the Lantronix Web Admin Console DHCP client enabled on the computer to obtain a valid IP Address from the router. -
Page 16: Connecting The E210 Router
2. Pull the SIM tray out from the slot. 3. Place the mini-SIM card on the tray with SIM chip facing up. 4. Insert the tray in place carefully. Figure 5-1: Inserting the SIM Card E210 Series Cellular Router User Guide... -
Page 17: Connect The Antennas
5: Installation 5.6.2 Connect the Antennas The table shows the cellular/GPS main and auxiliary antenna options and the cellular/GPS/Wi-Fi antenna connections on the different E210 series models. Model Cellular Cellular Antenna connections Main Auxiliary E213 Cellular only E215 E214 Cellular only... -
Page 18: Connect The Ac Power
1. Connect the AC power to the DC in connector, then connect the Micro-Fit connector to the power input, located on the front panel of the Lantronix Router. 2. Plug the AC cord into a standard AC receptacle as shown below. For connection details, refer to Section 4.4, Front Panel... - Page 19 To connect via Ethernet: 1. Connect an Ethernet cable between the LAN port on the front panel of the router and the Ethernet port on the computer. Figure 5-5: Router to Computer LAN Connection E210 Series Cellular Router User Guide...
-
Page 20: Quick Setup
To skip the Quick Setup and directly configure the network settings including advanced settings, go to the Network tab. For details on software configuration, please refer to the Lantronix ePack User Guide for E210 and E220 Devices. - Page 21 After storing the network configuration, the cellular connection should be established within one minute, provided there is adequate signal reception (if the default setting is used. 4. To see the status of the network connections, click Status and view the Overview page. E210 Series Cellular Router User Guide...
-
Page 22: Default Configuration
Wireless Access Point SSID The wireless access point SSID may be configured in the Web Admin console. Parameter Details SSID Lantronix E21X - for E210 series devices Lantronix E22X - for E220 series devices WPA/WPA2 TKIP Key W1rele$$ Table 5-5: Default Wi-Fi Credentials 5.6.6.3... -
Page 23: Snap Cap™ Rs-485
5: Installation 5.6.7 SNAP CAP™ RS-485 SNAP CAP™ RS-485 connects to the E210 series router's RS-232 port and converts it to half-duplex or full-duplex RS-485 port. The duplex setting is configured by a switch on the side of the SNAP CAP RS-485. The port parameters are configured in the software (ePack).
Need help?
Do you have a question about the E210 Series and is the answer not in the manual?
Questions and answers