
Related Manuals for Ikan OTT-CONTROLLER


Summary of Contents for Ikan OTT-CONTROLLER
- Page 1 Manual OTT-CONTROLLER OTTICA IP PTZ Camera Controller VISCA, ONVIF, PELCO www.ikancorp.com sales@ikancorp.com - 1 -...
-
Page 2: Precautions
Precautions 1. What is the function of CAM NUM when adding a network device? CAM NUM will be associated and bound with the currently entered IP and port information. It will quickly switch to the CAM NUM bound device when adding a device with the “CAM” button. -
Page 3: Table Of Contents
Table of Contents Precautions 1. Product Overview 1.1 Product Features 1.2 Wiring Diagram 1.3 Technical Specifications 2. Function Description 2.1 Button Description 2.2 Rocker Switch and Knob 2.3 Joystick Control 2.4 Terminal Description of Back Panel Interfaces 3. Local Settings (SETUP) 3.1 Basic Settings 3.2 VISCA &... -
Page 4: Product Overview
1. Product Overview 1.1 Product Features Two IP control modes: IP VISCA & ONVIF Two analog control modes: RS422 & RS232 Three Control Protocols: VISCA, ONVIF and PELCO 1.2 Wiring Diagram Both the Controller and PTZ camera must be connected to the same LAN. The IP addresses of both the PTZ Camera and Controller must operate within the same network segment. -
Page 5: Technical Specifications
1.3 Technical Specifications Ethernet 1 x Ethernet Port Four-dimensional joystick control (up, down, left, right) Joystick Rotatable for zooming Tele/Wide Connection Lead Display Prompt Tone Button Sound Prompts On/Off Power Supply DC 12V1A±10% Power Consumption 0.6 W Max Operating Temperature 32°F-122°F Storage Temperature -4°F-158°F... - Page 6 [AUTO FOCUS] Sets the camera in auto focus mode with this button. It will light up when the camera is in manual focus mode. [AE AUTO] (Auto Aperture) Set the camera in automatic aperture mode with this button. It will light up when camera is in manual aperture mode.
-
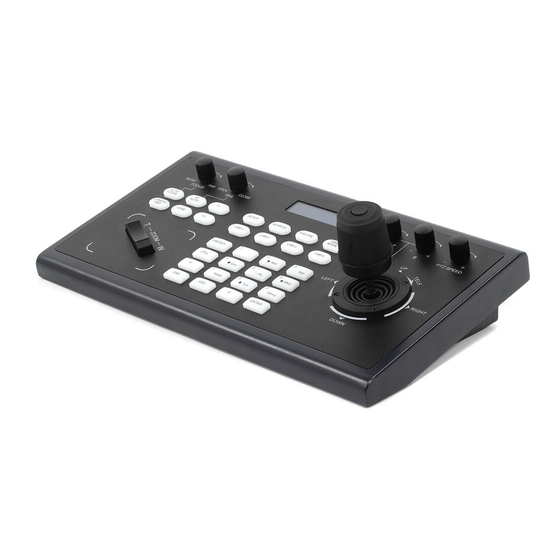
Page 7: Rocker Switch And Knob
2.2 Rocker Switch and Knob [NEAR] [FAR] Manually adjust the focal length. [OPEN] [CLOSE] Manually adjust the aperture, OPEN(Aperture Plus)/CLOSE(Aperture minus) [R-] [R+] Manually adjust the Red Gain [B-] [B+] Manually adjust the Blue Gain [PTZ SPEED-] [PTZ SPEED+] Adjust PTZ Speed 1-8: “-” = Slow. “+” = Fast. [T-ZOOM-W] Zoom Tele and Zoom Wide 2.3 Joystick Control - 7 -... -
Page 8: Terminal Description Of Back Panel Interfaces
2.4 Terminal Description of Back Panel Interfaces Back Panel Details: RS422, RS232, DC-12V, Ethernet, Power Switch Number Label Physical Interface Description Connect to RS422 bus of the camera: TA to camera RA Control Output RS422 TB to camera RB (TA, TB, TA, TB) RA to camera TA RB to camera TB Ground... -
Page 9: Visca & Ip Visca Mode Shared Setting
3.2 VISCA & IP VISCA Mode Shared Setting 1. F1: Custom function for F1 button (VISCA command) 2. F2: Custom function for F2 button (VISCA command) Input custom name > ENTER > Input VISCA command For example: If the command is 8101040702FF, then input 01040702 (0 can’t be omitted) 3.3 IP VISCA Mode Setting Delete the saved device: Move the joystick up and down to view devices;... -
Page 10: Onvif Mode Setting
EX: Select the address: 1 > ENTER > Select the protocol: PELCO-D > ENTER > Select the baud rate: 9600 > ENTER When the controller is switched to address 1, the control baud rate is 9600, protocol is PELCO-D 3.6 ONVIF Mode Setting Delete Saved Device: Move the joystick up and down to view devices. -
Page 11: Connection And Control In Ip Visca Mode
4.2 Connection and Control in IP VISCA Mode The Searching function is not available in IP VISCA mode, but you can manually add a device. 1. Manually add device via the [IP] button. 2. Press the “INQUIRE” button to view the added device. Move the joystick up/down to view the saved device (move the joystick rightward to view the port);... -
Page 12: Lan Settings
4. The home page consists of three segments: Search Device List (green); Added Device List (blue) or Manually Add (yellow); Device Details (orange). 5. Click the “Search” button to find ONVIF devices in the LAN. Devices will be displayed in the green frame automatically. -
Page 13: Upgrade
5.3 Upgrade The upgrade function is available for maintenance and updates. Choose the update file and click “start” to update the controller. It will auto reboot after updating. Note: Do not operate the controller, shut the power off, or disconnect the device from the network during the upgrade process. -
Page 14: Support, Warranty, Copyright
• Damage caused by abuse or misuse, dismantling, or changes to the product not made by the company. • Damage caused by natural disaster, abnormal voltage, and environmental factors, etc. ©2020 Ikan International. All rights reserved. - 14 -...
Need help?
Do you have a question about the OTT-CONTROLLER and is the answer not in the manual?
Questions and answers