Table of Contents
Advertisement
Quick Links
Advertisement
Table of Contents

Subscribe to Our Youtube Channel
Related Manuals for Schuchmann momo tricycle


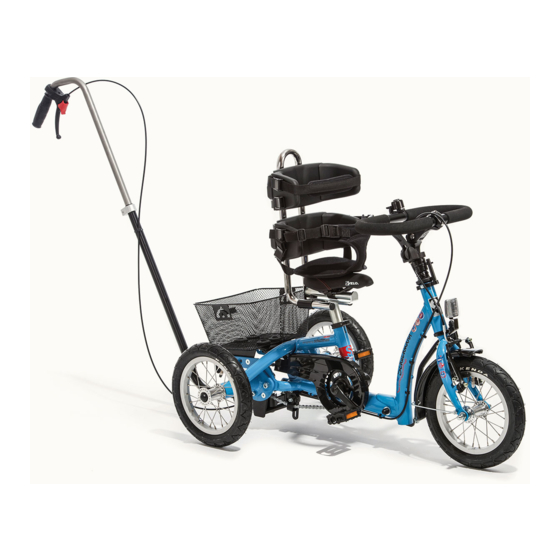
Summary of Contents for Schuchmann momo tricycle
- Page 1 Instructions for use. momo tricycle. The tricycle as therapy aid.
- Page 2 Instructions for use may deviate from your product due to differing equipment. We reserve the right to make technical modifications. Important information! Ensure that these Instructions for use remain with the product. Your schuchmann Team...
-
Page 3: Table Of Contents
Contents. 1. Preparation................... 05 1.1 Delivery ........................05 1.2 Safety measures prior to use ................05 1.3 Safe disposal ......................05 1.3.1 Packaging ....................05 1.3.2 Product ....................05 1.4 Where to store the Instructions for use .............05 2. Product description............... 06 2.1 General information .................... 06 2.2 Handling and transport ...................06 2. - Page 4 Contents. 4.11 Special crnak for knee contracture ............27 4.12 Removable axle stabilisers ................27 5. Foot fixations.................28 5.1 Exercise bike pedals .....................28 5.2 Foot fixation pedals ....................28 5.3 Footrests ........................28 5.4 Footrests with leg guidance ................29 5.5 Footrests with dynamic leg guidance ............29 6.
-
Page 5: Preparation
1. Preparation. 1.1 Delivery On receiving the product, please check it for completeness, lack of faults and check it for any transport damage. Inspect the goods in the presence of your forwarder Should transport damage have oc- curred, please arrange for an inventory (determination of the faults) to be made in the presence of the forwarder. -
Page 6: Product Description
(except for those with a rigid sprocket) and an air pressure-independent parking brake on the front wheel. 2.2 Handling and transport momo tricycle. is not designed to be carried, as it is fitted with tyres. Should you have to carry the equipment due to obstacles, ensure that all moving parts are tightened. -
Page 7: Product Description
2. Product description. 2.3 Application areas, use according to the intended purpose Indications momo tricycle. is suitable for children and teenagers with neuromu- scular diseases (e.g. cerebral palsy, muscular dystrophy), who cannot use conventional bicycles or vehicles, even with the aid of standard commercial stabilisers, due to their disabilities. -
Page 8: Use Not In Accordance With The Intended Purpose / Warning Guidelines
2. Product description. 2.4 Use not in accordance with the intended purpose / warning guidelines • Correct usage of the product requires precise and careful training of the accompanying person. • Replace bent handlebars and handlebar stems immediately! Continued use or repair means a risk of breakages. •... -
Page 9: Equipment For Basic Model
2. Product description. 2.5 Equipment for basic model • Aluminium frame with extra-low • Handlebar damper for stabilisation access point when moving straight on • Rim brake with separate parking • Drum brake in front wheel (16“ - 26“) brake •... -
Page 10: Overview Of Equipment / Accessories
2. Product description. 2.7 Overview of equipment / accessories Saddle Art. No. Saddle Width Length 37 01 001 Standard - saddle Size 1 15 cm 21 cm 37 02 001 Standard - saddle Size 2 15 cm 24 cm 37 03 001 Standard - saddle Size 3 18 cm 26 cm... - Page 11 2. Product description. Headrest Art. No. Headrest Width Height 37 01 029 Headrest Size 1 20 cm 15 cm 37 02 029 Headrest Size 2 23 cm 18 cm Handlebars Art. No.. Classic handlebars – black Breite 37 01 011 Classic handlebars for 12“...
- Page 12 2. Product description. Footrests Min. Max. Footrests with Min. Max. Min. Max. height of height Art. No. dynamic leg width width width width Length leg gui- Leg gui- guidance at front at front at rear at rear dance dance 37 01 035 Size 1 8,7 cm 10,4 cm...
- Page 13 2. Product description. Fixations Art. No. Manual fixation – for all handlebars Front width 37 00 054 Manual fixation Size 0 8,5 cm 37 01 054 Manual fixation Size 1 10 cm 37 02 054 Manual fixation Size 2 12 cm 37 03 054 Manual fixation Size 3 14 cm...
- Page 14 2. Product description. Light system Art. No. Light system Retrofitting of the lights system for 12“ side dynamos and reflectors acc. German 37 03 021 Road Traffic Regulations Retrofitting of a lights system for 16“ + 20“ with side dynamos and reflectors acc. 37 02 021 German Road Traffic Act Regulations Retrofitting of a lights system for 16“...
-
Page 15: Drive Possibilities
2. Product description. 2.8 Drive possibilities momo tricycle. can be equipped with the following drives: Rigid sprocket During active pedalling, the rigid spro- cket supports the user in overcoming the „dead“/apex point of the crank. A passive user is assisted in pedalling constantly;... -
Page 16: The Initial Riding Attempts
2. Product description. 3 or 7-gear freewheel brake hub (with backpedal brake) Using the 3 or 7-gear freewheel brake hub, the user can stop and start pe- dalling at will. They can brake by pedalling backwards. The user-friendly 3 or 7-gear hub gear system permits switching of gears when the tricycle is at a standstill. -
Page 17: Settings
Please ensure that none of the user‘s extremities are in the respective area when making adjustments to avoid the risk of injury. 3.1 Presettings momo tricycle. is supplied completely as- sembled. Prior to initial use, however, the follo- wing pre-settings must be made. -
Page 18: Saddle Adjustment
3. Settings. 3.1.2 Saddle adjustment You can find our selection of saddle forms on page 10 of these Instructions for use. Saddle height The height of the saddle can be adjusted on the frame saddle tube (A) by pulling the saddle post in or out. -
Page 19: Brakes
3. Settings. 3.2 Brakes momo dreirad. Various brakes are available for the depending on the individual requirements of the user. 3.2.1 Parking brake The parking brake supports the use when climbing on and off the tricycle and secures it against inadvertently rolling away. -
Page 20: Round Handlebars With Brake Lever Ring
3. Settings. 3.2.2 Round handlebars with brake lever ring On round handlebars with a brake lever ring, the brake functions through gentle pressing down of the ring (A) and is therefore suitable for children and adolescents with limited pow- er in their arms and hands, who simultaneous- ly need the round handlebars as a support point. -
Page 21: Tyres And Hoses
3. Settings. 3.3 Tyres and hoses The tyres on the tricycle must always have sufficient air pressure, otherwise the tyres may puncture and the rims may be damaged, or the riding characteristics negatively influen- ced. The optimum tyre pressure totals approx. 2.5 - 3.5 bar. -
Page 22: Accessories
4. Accessories. 4.1 Dynamic back and pelvic guide pelotte pads All back and pelvic guide pelotte pads can only be used in connection with a holding bra- cket (see point 4.7). For depth adjustment of the pelotte pad holding bracket, please loo- sen the screws (A) on the right and left-hand sides of the support under the saddle, and bring the holding bracket into the required... -
Page 23: Push Bar
4. Zubehör. 4.3 Push bar The push bar is height adjustable and equip- ped with an integrated antirotation lock. In addition, it can be dismantled. In order to adjust the height, please loosen the clamp (A) and bring the push bar into the required height. -
Page 24: Handlebar Lock Limiter
4. Zubehör. 4.6 Handlebar lock limiter The handlebar lock limiter can be adjusted to determine the direction of travel. In order to adjust the handlebar lock limiter, please loo- sen all grub screws (A) and bring the limiter (B) into the required position. You can determine the direction by moving both limiters (B) to- wards the handlebar stop (C) and tightening them. -
Page 25: Universal Adapter
4. Zubehör. 4.8 Universal adapter The universal adapter is mounted onto the holding bracket and is used to mount the strap set available for the tricycle. The univer- sal adapter is adjustable in height. To do this, simply loosen the screw (A) at the rear on the adapter and bring the universal adapter into the required position. -
Page 26: Special Crnak For Knee Contracture
4. Zubehör. 4.11 Special crnak for knee contracture The special crank for knee contractures is sui- table for 20“ - 26“ tricycles, and can either be mounted on the left or right-hand side. 4.12 Removable axle stabilisers To achieve more compact dimensions during transport, the nut must be re- moved and the quick-release clamp released. -
Page 27: Foot Fixations
5. Foot fixations. 5.1 Exercise bike pedals The exercise bike pedals are characterised by their integrated balancing weight, whereby the tread surface automatically balances its- elf horizontally. This permits the rider to climb on independently. The strap (A) is adjustable in length, and at the same time provides easy side guidance. -
Page 28: Footrests With Leg Guidance
5. Foot fixations. 5.4 Footrests with leg guidance For the function and adjustment of the footrests, see point 5.3. The leg guidan- ce also stabilises the foot joint and re- duces internal rotation of the leg. The adjustment of the leg guidance is to be undertaken through loosening of the screws (A) and moving them in the slot- ted hole. -
Page 29: Strap Systems
6. Strap systems. 6.1 Chest strap The chest strap is attached to the width adjustable back pelotte pad, and, if required, ensures secure fixation of the user. The strap is mounted with the aid of the socket lock to the back pelotte pad and threaded through the strap guidance on the click buckle. -
Page 30: Groin Harness, T-Shaped
6. Strap systems. 6.3 Groin harness, T-shaped The T-shaped groin harness is moun- ted onto the width adjustable pelvic pelotte pad. The strap is mounted onto the pelvic pelotte pad with the aid of the socket lock and threaded through the strap guidance on the click buckle. -
Page 31: Repairs And Cleaning
• Prior to extended storage of the tyres, check the air pressure and, if necessary, pump them up to the air pressure recommended by the manufacturer (see point 9). Please also pay attention to our general cleaning and hygiene advice. You www.schuchmann.de/momo can find them at... -
Page 32: Repairs
7. Repairs and cleaning. 7.2 Repairs Please carry out a daily visual inspection and check the tricycle regularly for cracks, breaks, missing parts and malfunctions. In case of a defect or malfunction, please contact the specialist dealer who supplied you with the product (see point 11.5). -
Page 33: Spare Parts
7. Repairs and cleaning. Controls to be performed by the user of the bicycle if necessary: • Check the chain and chain tension, adjust if necessary, clean and oil. • Check the chain for wear, oil and replace if necessary. •... -
Page 34: Technical Data
9. Technical data. Dimensions - basic model 12“ 16“ 20“ 24“ 26“ 26“ (XL) Pedal to top edge 30 - 38 42 - 57,5 50 - 64,5 56,5 - 66,5 - 83 74 - 90,5 of saddle min. 73,5 cm Pedal to top edge 33 - 41 45 - 60... -
Page 35: Identification
11. Identification. 11.1 EG-Konformitätserklärung Company Schuchmann GmbH & Co.KG Dütestr. 3 D-49205 Hasbergen Tel.: +49 (0) 54 05 / 909 - 0 Fax: +49 (0) 54 05 / 909 - 109 declares on their sole responsibility that the product named below is classified as product class 1 momo tricycle. -
Page 36: Serial Number / Date Of Manufacture
- Change status F; Issue 06.2019 11.5 Name and address of the manufacturer, specialist dealer supplying the product This product was manufactured by: Schuchmann GmbH & Co. KG Dütestraße 3 · 49205 Hasbergen Tel. +49 (0)5405/909-0 · Fax +49 (0)5405/909-109 info@schuchmann.de · www.schuchmann.de...
Need help?
Do you have a question about the momo tricycle and is the answer not in the manual?
Questions and answers