Table of Contents
Advertisement
Advertisement
Table of Contents

Related Manuals for Bpt TH 350


Summary of Contents for Bpt TH 350
- Page 1 THERMOPROGRAM DIGITAL PROGRAMMABLE THERMOSTAT TH 350 INSTRUCTIONS FOR USE...
- Page 2 THERMOPROGRAM TH350 Congratulations on your purchase of this TH350 program- mable thermostat. For best performance and to enable you to make best use of The TH350 programmable thermostat is designed to your programmable thermostat's characteristics and func- ensure perfect temperatures any time of day, any day of tions , please read this manual carefully and keep it available the week.
- Page 3 Temperature differential can be set between activate a manual timer-controlled programme, which 0 °C and 0.9 °C ensures a welcoming return home. Its installation requires a three-module recessed box and Suitable for systems with different thermal iner- can be connected to the heating and cooling system tias (fan coil units, floor-installed heating, electric with just two wires.
- Page 4 Calibration of temperature measurement The TH 350 programmable thermostat is composed of: +3°C If the TH is not properly installed (e.g. near a main body –3°C heat source), temperature measurement may be incorrect or may not correspond to the actual temperature.
- Page 5 hole plug adaptors (2 white, 2 anthracite grey and 2 covers (1 white, 1 anthracite grey and 1 aluminium grey) aluminium grey) frame screws for fastening to the recessed box...
- Page 6 8 9 11 13 14 15...
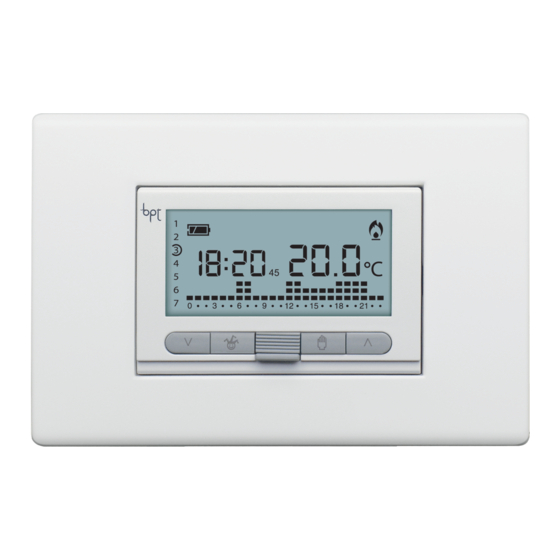
- Page 7 INDICATIONS AND EXTERNAL CONTROLS (see fig. 1) Digital thermometer. Button to increase temperature, day, time, etc. INDICATIONS Button for selecting MANUAL, AUTOMATIC, or 1 0 ÷ 23 Hourly scale in the graph of the programme. SYSTEM BYPASS. The flashing cursor indicates the time corre- Temperature measurement sensor.
- Page 8 24 25 26 27 28 29 30 31...
- Page 9 Selection of programme for HEATING ( COOLING ( ) or OFF 0÷23 Decrease hour in graph of daily pro- gramme. 29 0÷23 Increase hour in graph of daily pro- gramme. 1÷7 Selection of day. Copy programme.
-
Page 10: Table Of Contents
CONTENTS 17 - Thermal differential ......36 18 - Proportional-integral programming ... . 37 Chapter . -
Page 11: Installation
1 - INSTALLATION Install the unit in a position which is suitable for correct measurement of the room temperature, possibly an internal wall, avoiding installation in niches, behind doors or curtains, or near heat sources The TH350 is to be installed recessed in a 3-module box (depth 50 mm) proceeding as follows: •... - Page 12 ATTENTION. Inserting the batteries the wrong way can Choose the counter-frame (A or B) and the cover based on the plate to be installed. damage the unit. Once these steps have been performed, To remove the cover proceed as shown in figure 7. the display will appear as shown in figure 6.
- Page 13 • Make the electrical connections to the terminal board of the frame as shown in diagrams in figure 19 or 20. • Fasten the frame to the recessed box using the two screws provided (fig. 8, 9) complying with the UP indica- tion.
- Page 14 Adaptors Body Plate GEWISS Series Playbus (Playbus, Playbus Young) 3 module Counter-frame A Frame recessed The Playbus and Playbus Young brands are the property of GEWISS S.p.A...
- Page 15 BTICINO plate Body (Series Light, Series Light Tech, Series Living International) VIMAR plate (Series Plana, Series Eikon) LEGRAND plate Series Vela (Vela Square, Vela Round), Series Cross Counter-frame A Frame 3 module recessed The brands Light, Light Tech and Living International are the property of BTICINO S.p.A; The brands Plana, Idea, Eikon are the property of VIMAR S.p.A;...
- Page 16 Adaptors Body AVE plate (Series Banquise, SISTEMA 45) 3 module Frame Counter-frame B recessed The brands Banquise and SISTEMA 45 are the property of AVE S.p.A...
- Page 17 The unit is provided with two counter-frames A and B and 6 adaptors for the possible use of some commercially available models of plates (fig. 10÷12 and 16÷18). If the counter-frame is to be changed, proceed as shown in figure 13. To install Idea and Rondò...
- Page 18 Body Adaptors Plate VIMAR Series Idea (Idea, Idea Rondò) 3 module Frame Counter-frame B recessed The brand Idea Rondò is the property of VIMAR S.p.A...
- Page 19 Adaptors Plate Body (Series Elos) 3 module Frame Counter-frame B recessed The Elos brand is the property of ABB S.p.A...
- Page 20 Body Plate GEWISS (Series SYSTEM) BTICINO plate (Series Axolute, Series Luna) Frame Counter-frame B 3 module recessed The System brand is the property of Gewiss S.p.A The brands Axolute, Luna are the property of Bticino S.p.A...
-
Page 21: Electrical Connections
TH350 TH350 NCNA C NCNA C LOAD 2 - ELECTRICAL CONNECTIONS Wiring will depend on the type of equipment controlled by the programmable thermostat: refer, therefore, to the diagram in fig. 19, 20 or 21. TH350 Mains power supply wires NCNA C N = neutral LOAD... -
Page 22: Setting The Clock
Inputs for remote control 1 input 2 input Loads U1 = burner, circulation pump, solenoid valve, etc. U2 = motorized valve NOTE. For connection, refer to the technical documenta- tion of the device that is to be controlled. 3- SETTING THE CLOCK 3.1- Extract the unit body. - Page 23 3.5- Press the button until you reach the correct value for the hour (fig. 25). 3.6- Press the button (fig. 26). The indicator for the days of the week flashes. 3.7- Press the button until you come to the cur- rent day (fig.
-
Page 24: Programme For Heating, For Cooling
4 - PROGRAMME FOR HEATING, FOR COOLING AND SYSTEM OFF Press the button once to activate the cooling programme (fig. 29) or twice to turn the system OFF (fig. 30). When the icon is on, it confirms that the TH350 control of the system is bypassed. -
Page 25: Customization Of The Daily
5.2 - COOLING PROGRAMME The memorized cooling programme includes the tem- perature trend shown in figure 33, where the fixed tem- perature levels are: Range T1 24 °C Range T2 26 °C Range T3 28 °C If you are satisfied with the permanently memorized pro- grammes, the TH350 does not require any further instruction and is ready for immediate use. - Page 26 6.4- Use the button (fig. 36) to select the desired temperature range. Then press the button 0÷23 to go to the next hour and select the desired temperature in the same way (fig. 37). Continue in the same way until you come the hour 23. Programming for Monday is now complete.
-
Page 27: Customization Of The Temperature Levels
7 - CUSTOMIZATION OF THE TEMPERATURE LEVELS FOR THE HEATING PROGRAMME 7.1- Extract the unit body. 7.2- Make sure that the symbol for the heating pro- gramme is active , and if necessary press the button (fig. 41). 7.3- Press button P (fig. 42). You will see the temperature range for 1, the indication in place of the current time and the value of the temperature assigned to range T1 (set in memory at16 °C). -
Page 28: Customization Of The Temperature Levels For The Cooling Programme
8 - CUSTOMIZATION OF THE TEMPERATURE between16.1 °C and 19.9 °C. If you want a different tem- LEVELS FOR THE COOLING PROGRAMME perature range for T2, for example 21°C, the range for T3 will automatically be placed at 21.1 °C. Extract the body of the unit. -
Page 29: All-Purpose Programme
9 - ALL-PURPOSE PROGRAMME If you want to reserve the all-purpose programme for a The unit includes and all-purpose programme that can day other than the current one, proceed as follows: be used for holidays, when on vacation, and so on. It may 9.5- Make sure that the unit is in AUTOMATIC operating be activated at any time of the current day and it remains mode. -
Page 30: Manual Operation
To go back to AUTOMATIC operation and the current day, press button (fig. 48). This will happen in any case 10 seconds after the last action. The all-purpose programme expires at the end of the day. 9.11- Re-insert the body of the unit. 10 - MANUAL OPERATION If you want a temperature that is different than the pro- grammed one, without modifying the set programme,... -
Page 31: System Bypass In Heating Program
11- SYSTEM BYPASS IN HEATING PROGRAM System bypass can be set either with or without anti- freeze protection. This setting is useful during winter cleaning, mainte- nance work, or when you are away in summer, etc. The unit works simply as a clock and room thermometer. With anti-freeze protection 11.1- Press twice on button (fig. -
Page 32: System Bypass In Cooling Program
13 - MANUAL PROGRAMME OR BYPASS OF THE +2.5 °C, the minimum temperature that can be set for the TIMER-CONTROLLED SYSTEM anti-freeze protection to take effect is 2.5 °C. If you want to maintain a temperature for a few hours or 12 - SYSTEM BYPASS IN COOLING PROGRAM a few days (for example, to maintain a comfortable tem- 12.1- Press the button... - Page 33 13.2- Set the desired temperature using the button or . 13.3- Press button once to set the hours (fig. 54), twice to set the days (fig. 55). On the display, instead of the current time, the message will appear if you are setting the hours, or if you are setting the days.
-
Page 34: Setting Of System On-Off Time Delays
14 - SETTING OF SYSTEM ON-OFF TIME DELAYS It is possible to delay system start-up and shutdown 15, 30, or 45 minutes. To activate this function, proceed as follows: 14.1- Ensure you are in AUTOMATIC operating mode. 14.2- Press the button 0÷23 (fig. 58). The display indicates the value of the temperature set for the hour indicated on the current day. -
Page 35: Calibration Of Temperature Measurement
15 - CALIBRATION OF TEMPERATURE 16 - AUTOMATIC ADVANCE +3°C MEASUREMENT This function (only in heating mode) allows the –3°C If the TH is not properly installed (e.g. near a heat source), programmable thermostat to self-adjust the moment temperature measurement may be incorrect or may not that the system is started up based on the difference correspond to the actual temperature. -
Page 36: Thermal Differential
Selection of automatic advance 16.1- Ensure you are in MANUAL operating mode. 16.2- Press the button P twice (fig. 63). On the display, in the place of the hour, you will see and, in place of the indication for the temperature, there will appear 16.3- Press the button (forward) or (back) -
Page 37: Proportional-Integral Programming
On the display, in place of the temperature, there will appear the value of the set thermal differential 17.5- Press the button (forward) or (back) (fig. 68) to modify this value as desired. Setting the differential to 0 °C provides compliance with a minimum start-up/shutdown time of one minute, regardless of the measured room tempera- ture. - Page 38 Programme Cycle duration Minimum ON time Proportional Range Type of system Base for gas burner, fan 10 minutes 1 minute 1,5 °C coil units, zone valves, aluminium radiators 5 minutes 1 minute 1,5 °C Electric radiators Radiant or floor systems, 20 minutes 2 minutes 1,5 °C...
- Page 39 temperature there will appear (fig. 71). 18.7- Press the button (forward) or (back) to select a desired cycle time of 5, 10, 15 or 20 minutes (fig. 72). 18.8- Press button P (fig. 73). On the display, in the place of the hour, you will see and, in place of the indication for the temperature, there will appear .
-
Page 40: System Operating Time
19 - SYSTEM OPERATING TIME The TH350 features an hour-counter (up to 9,999), which enables you to keep count of the system's hours of operation. 19.1- To check this information, place the unit in MANUAL mode with the button (fig. 77), extract the body of the unit and then press button C (fig. -
Page 41: Remote Control
20 - REMOTE CONTROL By connection a special interface to terminals 1-2 (fig. 19 or 20) it is possible to remotely activate a special previously programmed FIXED-TIME programme. The TH350 stores two different programmes in memory, one for HEATING mode and one for COOLING mode. Upon activation of the remote command, the programme for the current mode will start. -
Page 42: Reset
Fixed-time manual programming by remote control 20.1- Make sure you are in MANUAL mode and select the HEATING or COOLING mode to which the set tempera- ture is to apply. If you wish to set a shutdown time, you will need to select SYSTEM BYPASS in the HEATING pro- gramme (see chapter 11) or SYSTEM BYPASS in COOLING mode (see chapter 12). -
Page 43: Battery Replacement
22 - BATTERY REPLACEMENT When the indicator flashes on the display, it means you have about 1 month to replace the batteries (fig. 85) When the indication plus the symbol appear on the display, the unit is no longer operative and has set the This operation causes the deletion of any customized heating and air-conditioning system to OFF (fig. - Page 44 The indications on the display disappear. 22.2- Insert three alkaline LR03 size AAA 1.5V batteries in the housing. Make sure the poles face the right way as shown on the bottom of the housing (fig. 89). After a few seconds the indications on the display will re-appear.
-
Page 45: Technical Features
ATTENTION. Clean the thermostat only with a soft cloth dampened with water. 23 - TECHNICAL FEATURES • Unit for domestic use. • Independently installed electronic device. • Display: LCD graphic backlit • Power supply: 3 alkaline LR03 size AAA 1.5V batte- ries. - Page 46 • Impulse voltage: 4 kV. DISPOSAL • Maximum temperature of control head: 40°C • Protection rating: IP30 Do not litter the environment with packing material: • Class II electrical insulation. make sure it is disposed of according to the regulations in •...
- Page 48 BPT S.p.A. Via Roma, 41 30020 Cinto Caomaggiore/VE/Italy http: www.bpt.it e-mail: info@bpt.it...
Need help?
Do you have a question about the TH 350 and is the answer not in the manual?
Questions and answers