
Related Manuals for Bpt TH 450


Summary of Contents for Bpt TH 450
- Page 1 THERMOPROGRAM DIGITAL PROGRAMMABLE THERMOSTAT TH 450 TH450 INSTRUCTIONS FOR USE TH450E 24806640 13-03-13...
- Page 2 Congratulations on the purchase of this TH450 pro- • Failure to comply with the above instructions may grammable thermostat. For best performance and compromise the unit's safety. to enable the best use of this programmable ther- mostat's characteristics and functions please read THERMOPROGRAM TH450 this manual carefully and keep it available for future The TH450 programmable thermostat has been...
- Page 3 This provides a greater reduction in energy consump- Three LR03 1.5V penlight AAA alkaline batteries tion while at the same time providing the highest are used to power the TH450 for over a year. Once levels of comfort. installed the unit is ready to operate based upon The TH450 has new features and functions that on its standard pre-define programme residing in include:...
- Page 4 The temperature differential can be Boiler ignition and shutdown setting set between 0°C and 0.9°C with 15 minute precision Suitable for systems with differing thermal In automatic operating mode the TH450 inertias (convector heaters, underfloor can ignite or shutdown the boiler on the heating, electric heaters) thus ensuring half or quarter of each hour, thus allowing best system use with the lowest possible...
- Page 5 Easy and complete daily and weekly 3-level programming With the TH450, temperatures for any time of any day of the week can be programmed in a simple and intuitive manner. Just a few buttons are used to set the hourly temperature while at the same time providing constant on-screen moni- toring of programming progress.
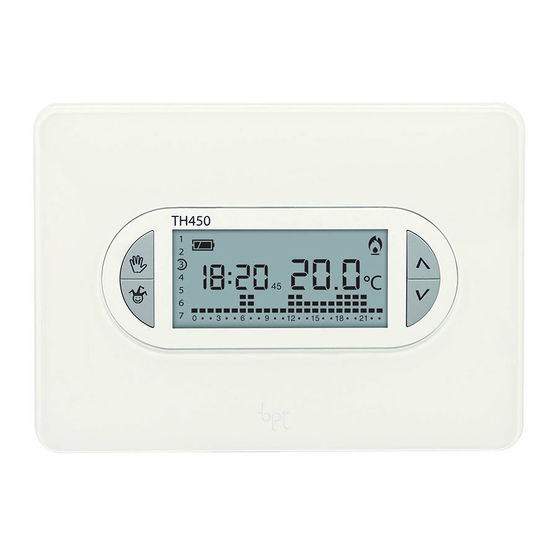
- Page 6 17 18 101113 TH450 Fig. 1...
- Page 7 EXTERNAL CONTROLS AND SYMBOLS (see fig. 1) 1÷7 Days of the week. Battery charge status. ATTENTION. To turn on the backlight simply press Digital clock. any button. To enter one of the selected functions System bypass. (e.g. setting the clock, etc.) the appropriate button Activation of the all-purpose pro- will need to be pressed twice.
- Page 8 Button to decrease temperature, time, etc. Digital thermometer. Copy programme. 1÷7 Day Selection. Decrease or increase of the hour 0÷23 within the ‘Daily’ programme display. HEATING ( ), COOLING ( ) or OFF programme selection. Temperature programming in the three ranges T1, T2, T3. Setting of operating parameters.
-
Page 9: Table Of Contents
CONTENTS 13 - FROST PROTECTION FUNCTION..Page 29 1 - INSTALLATION ......Page 11 14 - TIMED MANUAL PROGRAM. -
Page 11: Installation
1 - INSTALLATION Remove the terminal cover (fig. 3) and using the screws and expansion plugs supplied (fig. 5.6) fasten Install the unit in a position which is suitable for cor- the back of the unit either to the wall (fig. 4) or within rect room temperature measurement for example on the recessed box. -
Page 12: 2- Electrical Connections
Fig. 6 Fig. 4 2- ELECTRICAL CONNECTIONS Wiring will depend on the type of equipment to be controlled by the programmable thermostat: refer to the diagram in fig. 7, 8 or 9. Mains power supply wires N = neutral L = phase Fig. - Page 13 LOAD CLOSED OPEN Fig. 7 Fig. 9 Relay contacts C = common LOAD NO = normally open contact NC =normally closed contact Remote control inputs 1 input 2 input Loads U1 = boiler, circulation pump, solenoid valve, etc. U2 = motorised valve Fig.
-
Page 14: Power Supply
Use only ALKALINE batteries Fig. 10 Fig. 11 NOTE. For connection details, refer to the technical If nothing appears on the display within 10 seconds documentation of the device to be controlled. press the reset button R (fig. 82). Close the unit making sure that the hooks are inserted 3 - POWER SUPPLY into the slots (fig. -
Page 15: 4- Setting The Clock
TH450 TH450 Fig. 12 Fig. 13 4- SETTING THE CLOCK TH450 4.1- Open the cover. 4.2- Press button twice (fig.13). The first press of the button simply activates the backlight. The minutes digits flash. 4.3- Press button until the correct value for the minutes is reached(fig. - Page 16 TH450 TH450 Fig. 15 Fig. 17 4.5- Press either button until the correct TH450 value for the hour is reached (fig. 16). 4.6- Press button (fig. 17). The indicator for the days of the week flashes. 4.7- Press either button until the display shows the current day (fig.
- Page 17 TH450 TH450 Fig. 18 Fig. 20 If no button is pressed for 15 seconds, the unit auto- TH450 matically exits this procedure, saving the last data values. 4.9- Close the cover. Note. Each time buttons are pressed the numbers on the display decrease or increase by one. When pressed and held down the numbers on the display will scroll slowly for the first five seconds, and then more quickly.
-
Page 18: Pre-Memorised Programmes
TH450 TH450 Fig.21 Fig. 22 6 - PRE-MEMORISED PROGRAMMES 5 - PROGRAMME FOR HEATING, COOLING AND SYSTEM OFF 6.1 - Heating programme Press button once to activate the cooling pro- For easier use a heating programme has been mem- gramme (fig. 20) or twice to turn the system OFF (fig. 21). orised within the TH450 with the temperature trend When the icon is on, it confirms that the TH450... -
Page 19: Cooling Programme
TH450 TH450 Fig. 23 Fig. 24 6.2 - Cooling programme Once satisfied with the memorised programmes, the The memorised cooling programme includes the TH450 will not require any further intervention and will temperature trend shown in figure 24, where the be ready for immediate use. -
Page 20: Customisation Of The Daily Temperature Programme
TH450 TH450 Fig. 25 Fig. 26 7 - CUSTOMISATION OF THE DAILY Note. When this button is used, the information on the TEMPERATURE PROGRAMME display changes as follows: a) The clock shows the hour indicated by the flashing 7.1- Open the cover. segment . - Page 21 TH450 TH450 Fig. 27 Fig. 28 Then press button 0÷23 to go to the next hour and TH450 select the desired temperature in the same way (fig. 28). Continue in this way until the hour 23 is reached. Programming for Monday is now complete. 7.5- If the same programme is also to be used for the following day(s) press button C (fig.
- Page 22 TH450 TH450 Fig. 30 Fig. 31 7.8- Close the cover. 7.6- To programme subsequent days differently, advance the day using button 1÷7 and repeat the same procedure set forth in point 7.4 (fig. 30). 7.7- When programming is complete, in order to go back to the current day and time press button (fig.
-
Page 23: Customisation Of The Temperature Levels For The Heating Programme
TH450 TH450 Fig. 32 Fig. 33 8 - CUSTOMISATION OF THE The temperature range for T1 will be displayed, in place TEMPERATURE LEVELS FOR THE HEATING of the current time the symbol and the value of the PROGRAMME temperature assigned to the T1 temperature range (set in memory at, 16°C). - Page 24 TH450 TH450 Fig. 34 Fig. 35 Note. The value assigned to each temperature range is The entire graph for the ‘Daily’ programme reappears to limited to the values of the range just above or below. confirm that programming of the temperature ranges For example, if range T3 corresponds to 20°C and has been completed.
-
Page 25: Customisation Of The Temperature Levels For The Cooling Programme
9 - CUSTOMISATION OF THE TEMPERATURE LEVELS FOR THE TH450 COOLING PROGRAMME Open the cover. Select cooling mode . Then set the desired temperature levels in the same manner as set forth from point 8.3 on. Close the door. 10 - ALL-PURPOSE PROGRAMME The unit includes an all-purpose programme mode that can be used when on holiday and so on. - Page 26 TH450 TH450 Fig. 37 Fig. 38 If the all-purpose programme is to be reserved for a The symbol appears that confirms that programme day other than the current one, proceed as follows: has been assigned to that day. 10.5- Open the cover. 10.9- Proceed with the customisation (see paragraph 10.6- Make sure that the unit is in AUTOMATIC oper- 7.3 and 7.4).
-
Page 27: Manual Operation
TH450 TH450 Fig. 39 Fig. 40 button 11 - MANUAL OPERATION To go back to AUTOMATIC mode and the current day, press button (fig. 39). If a temperature that is different than the pro- This will happen in any case 10 seconds after the last grammed one is required but without modifying the action. -
Page 28: System Bypass
TH450 TH450 Fig. 41 Fig. 42 12 - SYSTEM BYPASS temperature is 20°C). After about 5 seconds from the last operation, the System bypass is useful during cleaning, maintenance work, or when absent, etc. The unit simply functions room temperature appears. as a clock and room thermometer In MANUAL operating mode, any temperature can 12.1- Open the cover. -
Page 29: Frost Protection Function
TH450 TH450 Fig. 43 Fig. 44 13 - FROST PROTECTION FUNCTION 12.3- Press the button once to go back to the Even if proportional-integral operating mode has heating programme (fig. 43) or twice to go back to been selected, in frost protection mode the tempera- the cooling programme (fig. - Page 30 TH450 TH450 Fig. 46 Fig. 45 Activation of symbols confirm frost protection TH450 mode. The display shows the default frost protection tem- perature (3°C) which will remain displayed for 5 seconds (fig. 46). 13.4- Press the button to select any temper- ature between 3°C and 16°C (fig.
-
Page 31: Timed Manual Program
TH450 TH450 Fig. 48 Fig. 49 14 - TIMED MANUAL PROGRAM In this case activation of the symbol confirms the return to system bypass mode (fig. 48). If a fixed temperature is to be maintained for a few By pressing button (fig. - Page 32 TH450 TH450 Fig. 51 Fig. 50 When it reaches zero, the unit switches from MANUAL On the display, instead of the current time, the message to AUTOMATIC mode, resuming the set programme. will appear if the hours are being set, or the days are being set.
-
Page 33: Setting Of System On-Off Time Delays
TH450 TH450 Fig. 52 Fig. 54 Note. To return to AUTOMATIC mode before the pro- grammed time has expired, press button (fig. 53). TH450 15 - SETTING OF SYSTEM ON-OFF TIME DELAYS It is possible to delay system start-up and shutdown by 15, 30, or 45 minutes. - Page 34 TH450 TH450 Fig. 55 Fig. 56 15.2- Make sure that the unit is in AUTOMATIC oper- or 45 minutes and press it again to cancel the setting. ating mode. For example, if a comfortable temperature is required 15.3- Press button 0÷23 (fig. 54). for 7:00, the system can be set to start at 6:30.
-
Page 35: Temperature Measurement Calibration
The delay can be programmed for several different TH450 hours during the same day. The settings are saved to permanent memory (see chapter 22). The delay can also be set for the remaining days of the week using the 1÷7 key. These settings are saved to permanent memory, see chapter 22 (reset). -
Page 36: Automatic Advance
TH450 TH450 Fig. 58 Fig. 59 This value is saved to permanent memory. See chap- It is possible to have an advance of up to three hours ter 22. with respect to the time at which the temperature to be reached has been set. 17 - AUTOMATIC ADVANCE Example of operation This function (only in heating mode) permits the... -
Page 37: Thermal Differential
On the display, in place of the hour, will be displayed TH450 and, in place of the indication for the temperature, will appear. 17.4 - To set the automatic advance press the buttons (forward) or (backwards) (fig. 60). On the display, in place of the temperature, will appear. - Page 38 TH450 TH450 Fig. 61 Fig. 62 18.3- Press button P three times (fig. 61). TH450 On the display, in place of the hour, will be dis- played and, in place of the indication for the tempera- ture, will appear. 18.4- Press button P (fig. 62). On the display, in place of the temperature, will appear the value of the set thermal differential.
-
Page 39: Proportional-Integral Programming
19 - PROPORTIONAL-INTEGRAL TH450 PROGRAMMING This type of adjustment allows the thermostat to reduce system running times as the room tempera- ture approaches the set temperature, thus substan- tially reducing energy consumption while maintain- ing excellent levels of comfort. It is possible to select from among three preset pro- grammes depending on the type of system to control (P1, P2 e P3). - Page 40 Programme Cycle duration Minimum ON time Proportional Range Type of system Base for gas burner, convector heaters, 10 minutes 1 minute 1.5°C zone valves, aluminium radiators 5 minutes 1 minute 1.5°C Electric radiators Radiant or underfloor 20 minutes 2 minutes 1.5°C systems, cooling 5-10-15-20-25-30-35-40...
- Page 41 TH450 TH450 Fig. 65 Fig. 67 (fig. 66) so as to select control system P1, P2, P3 or TH450 P4. Programmes P1, P2 and P3 are fixed programmes, whereas programme P4 can be completely pro- grammed by the user. 19.7 - If programme P1, P2 or P3, has been selected then in order to exit programming press button P.
- Page 42 TH450 TH450 Fig. 69 Fig. 68 19.8 - Press button (forward) or (backwards) TH450 select the desired cycle time from between 5, 10, 15, 20, 25, 30, 35 or 40 minutes (fig. 68). 19.9 - Press button P (fig. 69). On the display, in place of the hour, will be displayed and, in place of the indication for the temperature, will appear .
-
Page 43: System Operating Time
TH450 TH450 Fig. 71 Fig. 72 20 - SYSTEM OPERATING TIME On the display, in place of the hour, will be The TH450 features an hour-counter (up to 9,999), which displayed and, in place of the indication for the tempera- records the system’... -
Page 44: Remote Control
TH450 TH450 Fig. 73 Fig. 74 21 - REMOTE CONTROL This temperature will be maintained until the unit receives a remote deactivation command at which By connecting an interface to terminals 1-2 (fig. 7 or point the TH450 will return to the status it was in prior 8) it is then possible to: to activation. - Page 45 TH450 TH450 Fig. 76 Fig. 75 - Activate a special programme at the end of that reaches its conclusion the TH450 will go back to the which was previously programmed. status it was in prior to activation. The TH450 stores two different programmes To cancel remote control of the manual short term in memory, one for HEATING mode and one for programme press the...
- Page 46 TH450 TH450 Fig. 77 Fig. 78 Note. When the programme is activated remotely the 21.3 - Press the button once to set the hours (fig. time remaining within the hour or day will be counted 78) or twice to set the days (fig. 80). as a full hour or day.
- Page 47 TH450 TH450 Fig. 79 Fig. 80 This setting cannot be verified by telephone. TH450 Fig. 81...
-
Page 48: Reset
To reset all default settings, proceed as follows: TH450 - simultaneously press buttons and 1÷7; - reset the unit. The TH450 will restart in HEATING mode (or COOLING, if reset in this mode) and AUTOMATIC operating mode. Fig. 82 22 - RESET Operating anomalies, repairs and other technical rea- sons may make it necessary to reset the unit. - Page 49 Data saved after a reset Data not saved after a reset - Calibration temperature - Minutes, hours, days of week - Automatic advance selection - Automatic, manual, frost protection mode or OFF (1) - Differential or proportional integral mode - Manual temperature - Differential temperature - Frost protection temperature - Integral proportional programme...
-
Page 50: Battery Replacement
TH450 TH450 Fig. 83 Fig. 84 23 - BATTERY REPLACEMENT To replace the batteries, proceed as follows: 23.1- Press button A on the base (fig. 85) and open When the indicator flashes on the display, it means the unit. that there is around 1 month left to replace the bat- Performing this operation when the battery low warn- teries (fig. - Page 51 Use only ALKALINE batteries Fig. 85 Fig. 86 Warning! Inserting the batteries the wrong way round could damage the unit. There will be approximately 2 minutes available for replacing the batteries. To restart the unit, proceed as described in chapter 4. Close the unit.
-
Page 52: Cover Replacement
ATTENTION. Inserting the batteries the wrong way round could damage the unit. The use of weak bat- teries may cause operating malfunctions. If this should happen then proceed as set forth in chapter 22. 24 - COVER REPLACEMENT The unit is delivered with different coloured covers which can be used instead of the one supplied. - Page 53 Fig. 89 Fig. 90...
-
Page 54: Technical Features
25 - TECHNICAL FEATURES • The possibility of timer-controlled manual operation. • Range of adjustment: from +3 to +35°C • Unit for domestic use. • Temperature levels: three, programmable between • Independently installed electronic device. +3°C and +35°C • Display: LCD graphic backlit. •... - Page 55 DISPOSAL Do not litter the environment with packaging mate- rials: make sure it is disposed of according to the regulations in force in the country where the product is to be used. When the equipment reaches the end of its life cycle, avoid discarding it within the environment.
- Page 56 BPT S.p.A. a Socio Unico Via Cornia, 1 33079 Sesto al Reghena-PN-Italy www.bpt.it-info@bpt.it...
Need help?
Do you have a question about the TH 450 and is the answer not in the manual?
Questions and answers