Panasonic BL-C111A Integration Notes
Onehome management and control solutions
Hide thumbs
Also See for BL-C111A:
- Operating instructions manual (154 pages) ,
- Service manual (83 pages) ,
- Installation manual (4 pages)
Advertisement
Quick Links
OneHome™
Management and Control Solutions
Manufacturer:
Model Number(s):
Comments:
Document Revision Date:
NOTE: This document refers to Camera setup in software versions below 5.2 ONLY.
Please see the Rev 5.2 Integration Note for systems running 5.2 or greater.
O
VERVIEW AND SUPPORTED FEATURES
Installing the Panasonic camera can be broken down into the following steps:
1. Install cameras at desired locations, and pull power and Cat5 cabling as needed. Refer to the
Panasonic documentation for mounting details.
2. Connect the cameras electrically to the home network and configure the cameras. See Camera
Configuration.
3. Integrate the cameras into the OneHome system and test proper operation. This step is outlined
in HomeLogic Configuration Details.
T
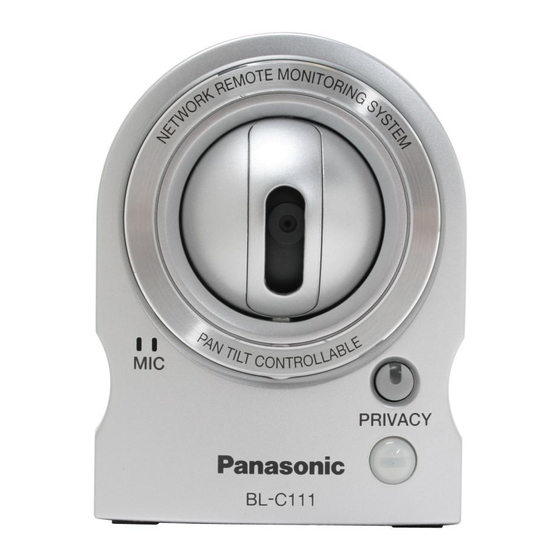
BL-C111A
BL-C131A
HE
AND
Pan / Tilt: These cameras can be turned to see various locations.
Presets: These cameras support presets, allowing the user to store predefined locations such as a
driveway or pool. This feature requires OneHome software version 4.0 or later.
Image Flip: These cameras can be mounted with its base up or down, and the image will appear normal.
Built-in Audio: Audio from the Panasonic cameras built-in microphone is supported in version 4.0 and
later.
Motion Detection: These cameras support motion detection to trigger events in the OneHome system.
T
BL-C111A
BL-C131A DO NOT
HE
AND
Zoom: Cameras lacking optical zoom cannot be zoomed in HomeLogic.
C
C
AMERA
ONFIGURATION
The camera configuration is done with software provided by Panasonic, which must be run from a
computer with Windows also connected to the same network as the camera.
The software program from Panasonic is EasyConfig.exe: the version we checked is shown at the top.
I
N
MPORTANT
OTES
1. Cameras must be configured one at a time: If you are installing more than one camera, setup
the first one completely before powering up subsequent cameras.
2. Setup the camera within 20 minutes: Initial settings must be made within 20 minutes of the
camera being turned on. If the camera has been powered up for more than 20 minutes, cycle
power to the camera before proceeding.
HomeLogic LLC ●
Panasonic
BL-C111A, BL-C131A (wireless)
Network Camera (version 3.10)
5/19/2011
SUPPORT THE FOLLOWING FEATURES
SUPPORT THE FOLLOWING FEATURES
●
100 Hoods Lane
Marblehead, MA 09145
Camera Integration Note
:
:
●
Phone (781) 639-5155
●
Fax (781) 639-9677
Advertisement


Need help?
Do you have a question about the BL-C111A and is the answer not in the manual?
Questions and answers