Table of Contents
Advertisement
Quick Links
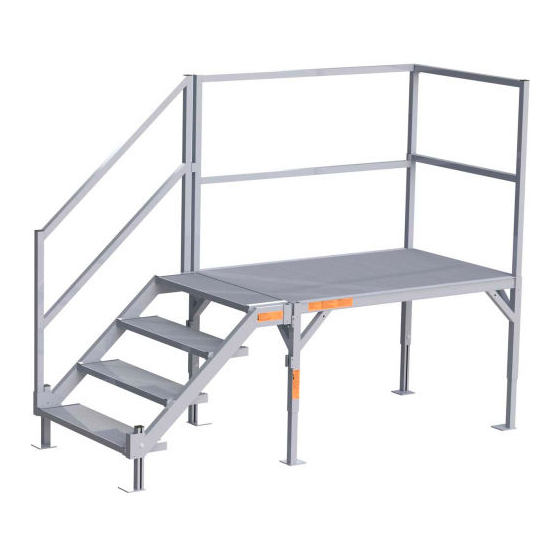
FORTRESS® OSHA Stair System
Adjustable Temporary Stair
Installation Manual
3-TREAD at 25.5"
3-TREAD at 34"
4-TREAD at 34"
4-TREAD at 42.5"
© EZ-ACCESS
®
, a division of Homecare Products, Inc. All rights reserved.
All text and images contained in this document are proprietary and may not be shared, modified,
distributed, reproduced, or reused without the express written permission of EZ-ACCESS.
12963 REV 02-13-2020
Manufactured in the USA
Advertisement
Table of Contents

Related Manuals for EZ-ACCESS FORTRESS OSHA Stair System


Summary of Contents for EZ-ACCESS FORTRESS OSHA Stair System
- Page 1 , a division of Homecare Products, Inc. All rights reserved. All text and images contained in this document are proprietary and may not be shared, modified, distributed, reproduced, or reused without the express written permission of EZ-ACCESS. 12963 REV 02-13-2020...
- Page 2 If any part of the system, including the canopy if present, is damaged, loose, or missing, contact manufacturer and do not use until repairs can be made by an EZ-ACCESS approved technician.
- Page 3 FIG. 1 FORTRESS OSHA Stair Descriptions Diagram Letter 3 Tread Platform (Includes Legs) 4 Tread Platform (Includes Legs) (Not Shown) 3 Tread Platform with Drain Holes (Includes Legs) (Not Shown) 4 Tread Platform with Drain Holes (Includes Legs) (Not Shown) 3 Tread Platform with Oversized Feet (Includes Legs) (Not Shown) 4 Tread Platform with Oversized Feet (Includes Legs)
- Page 4 INSTALLATION 1.1. Set platform on its side. 1.2. Loosen platform leg adjustment bolts in each platform corner pocket, but do not remove. Adjust legs to desired height and securely retighten platform leg adjustment bolts and washers (FIG. 2). If using oversized feet, see ‘OVERSIZED FEET INSTALLATION (OPTIONAL EQUIPMENT)’ section. 1.3.
- Page 5 OVERSIZED FEET INSTALLATION (OPTIONAL EQUIPMENT) Loosen the leg adjustment bolts in each platform and riser corner pocket, but do not remove; then remove the existing legs (FIG. 2). Insert the legs included with the oversized feet into the corner pockets with the open side of the channel oriented toward the leg adjustment bolt &...
- Page 6 PLATFORM CANOPY INSTALLATION (OPTIONAL EQUIPMENT) Remove handrails from system (if installed) and set aside. Use extreme caution on platform when no handrails are present. Insert 1-1/2” square canopy posts into platform corner pockets (FIG. 5). Set canopy roof on canopy posts. Insert top of canopy posts into canopy roof corner pockets and tighten corner pocket set screws (FIG.
Need help?
Do you have a question about the FORTRESS OSHA Stair System and is the answer not in the manual?
Questions and answers