Table of Contents
Advertisement
Quick Links
Advertisement
Table of Contents

Related Manuals for Dudek SIT&FLY 260


Summary of Contents for Dudek SIT&FLY 260
- Page 1 USER'S MANUAL SIT&FLY 260 EDITION NR 1_12/2019...
-
Page 3: Table Of Contents
Congratulations! Thank you for choosing the Sit&Fly 260 harness. We have done our best to present you with a highest quality product, fulfilling all safety requirements. Please read this manual carefully before using the harness for the first time. This will help you utilize all features of the Sit&Fly 260, maximizing comfort and fun you get out of each flight. -
Page 4: Safety
Paragliding is a potentially hazardous sport. When flying a paraglider you have to accept risks of injury and/or even death. Improper and/or incompetent use of the harness may increase those risks. In case of any doubts please ask your dealer or manufacturer. Dudek Paragliders company does not bear any responsibility for damages or injuries resulting from paragliding activities. 2. Description The Sit&Fly 260 harness was designed for up to one hour long flights (both downhill and XC). -
Page 5: Basic And Optional Equipment
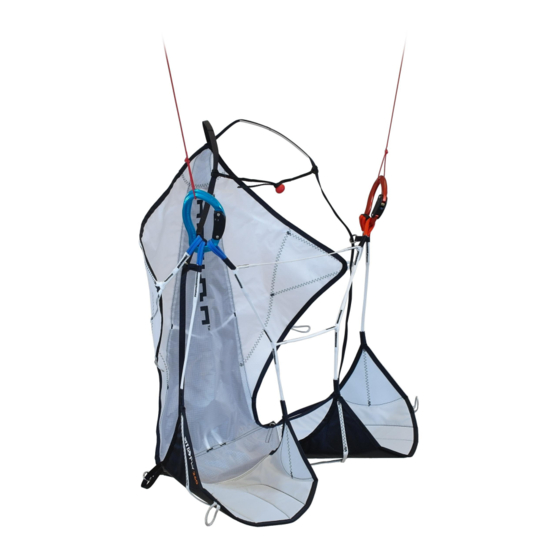
3. Basic and optional equipment This set comprises one Sit&Fly harness and twoAustriAlpin Rocket 22 kN carabiners (one red and one blue) 65 g each. Optional harness equipment includes: speedbar with hooks and pulleys, frontcontainer and Pack&Hike 30 backpack of 30 l volume. 101-106 g 330g... -
Page 6: Straps And Adjustment
4. Straps and adjustment. 1 – chest strap 2 – arm strap – adjustable 3 – arm straps link – adjustable 4 – prepared points for pullleys of the speedsystem In the harness as a whole only the arm straps (2) and the link (3) are adjustable. - Page 7 In order to adjust the arm straps link make a knot on the strap (folded in two) and hide it in the red ball. Firmly tie the knot. The excess of the strap can be clipped off when necessary.
-
Page 8: Closing The Harness And Connecting To Paraglider
5. Closing the harness and connecting to paraglider. To close the harness you just clip the carabiners in the loops on the breast strap and close the arm straps link by putting the red ball through its loop. When closing the breast strap make sure it is not twisted. After closing the harness you can clip the main carabiners in the loops and connect set up the speedbar, if it’s not installed yet. -
Page 9: Speedbar
6. Speedbar In order to install the speedsystem in the harness you need to put its pulleys (of the speedbar kit) in respective loops on both sides of the seating and in the lower part of back support. Then put the line through the pulleys as shown on the right. -
Page 10: Frontcontainer
7. Frontcontainer A frontcontainer for the Sit&Fly 260 harness is simply mounted by clipping the ends of the V-riser in the carabiners. Loops on the V-riser ends do simultaneously fix the frontcontainer itself. Before clipping the frontcontainer in the Sit&Fly 260 harness, make sure that the carabiners are pointing backwartds with their locks. -
Page 11: Before Flight
8. Before flight Before each flight a thorough check of the harness is required. For your own safety make sure that: - the harness is not damaged in any way - the rescue chute container is correctly closed and locked with pins - the rescue chute release handle is correctly set up and has the right shape (quite often it happens to be malformed in transport, so it’s important to check if it’s not flattened and easy to grab) * - the breast strap is closed... -
Page 12: Cleaning And Storage
9. Cleaning and storage Your care and maintenance of the harness will keep in good condition for a long time. The harness is best cleaned with a wet sponge, possibly a bit of soap. Do not use neither detergents nor solvents. If there is a lot of mud, use the brush first before wet cleaning. In case of completely soaked harness (e.g. - Page 13 The harness is made out of synthetic materials, which need to be properly disposed of when worn out.. If you are not able to dispose of your gear properly, DUDEK Paragliders will do that for you. Just send your harness to the address given at the end of the manual,...
-
Page 14: Technical Data
* The weight of the harness without carabiners and speedbar (g) . Since Dudek Paragliders products are subject to constant improvements, minor differences are possible between the manual and actual product. Dudek Paragliders withholds rights to introduce such changes without individual notice. - Page 15 DUDEK PARAGLIDERS S.J. UL. CENTRALNA 2U 86-031 OSIELSKO POLAND PHONE: +48 52 324 17 40 FAX: +48 52 381 33 58 EXPORT@DUDEK.EU WWW.DUDEK.E...
Need help?
Do you have a question about the SIT&FLY 260 and is the answer not in the manual?
Questions and answers