
Related Manuals for Dudek PowerSeat comfort


Summary of Contents for Dudek PowerSeat comfort
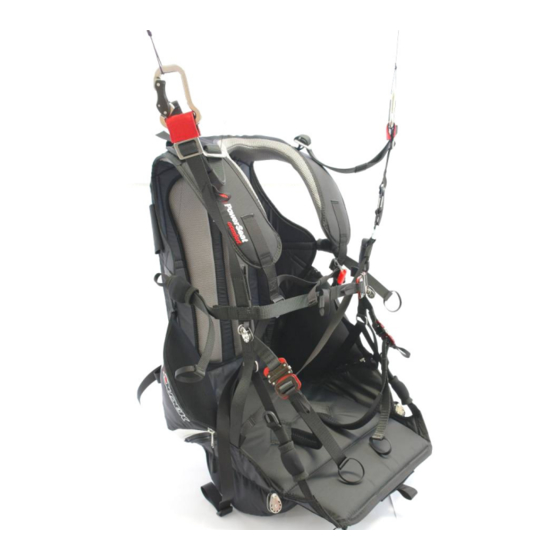
- Page 1 High hangpoint PPG harness User manual Please read this manual carefully before your first flight.
-
Page 2: Table Of Contents
Congratulations ! Thank you for choosing the Powerseat Comfort harness. We have done our best to present you with highest quality product, fulfilling all safety requirements and offering maximum functionality. Please read this manual carefully before using the harness for the first time. This will help you utilize all features provided by the Powerseat Comfort, thus increasing comfort and joy of each flight. -
Page 3: Additional Equipment
3. Additional equipment Carabiners PowerSeat Comfort is sold without carabiners. Cockpit. If you are going to use the cockpit, the rescue chute should be placed on right or left side of the harness. Frontcontainer. Allows for fixing the rescue chute in front. -
Page 4: Installing The Rescue Chute
V-strap, trapeze and rectangle closed quicklinks. Necessary to attach the rescue chute with the harness. If the rescue chute is to be connected to the V-strap without a metal quicklink, then the two closed trapezes will be enough (to connect the V-strap to the harness). Speedbar. - Page 5 Without metal connector Leading the rescue chute connecting strap through the loop of the V-strap. Both ends of the V-strap must be connected with trapezoids to red cloth covered points on the harness as shown below. These are the very points used for main carabiners connecting the harness with paralider’s risers. The ends of the V-strap must be secured with elastic 0-rings.
-
Page 6: Speedbar
V-strap tunnels 5. Speedbar Pushing the speedbar increases your airspeed. PowerSeat Comfort originally is not equipped with a speedbar, it must be purchased as additional equipment. The installation and adjustment of a speedbar must be executed as follows: Attach lines to the speedbar (if not assembled already) Place the lines in the harness, leading them consecutively through: ... -
Page 7: Cockpit
On the front of the seat plate there is a receptacle for the speedbar. It’s there to hold the speedbar in place during take-off. 6. Cockpit The cockpit should be installed with original straps coming in the set. Since the harness has no additional points to fix the frontcontainer, straps must be attached to the riser above the chest strap. -
Page 8: Harness/Paramotor Assembly
8. Harness/paramotor assembly Harness should be fixed to the paramotor frame in four places marked on the pictures. Upper frame part Bar pouch Lower part of the arm straps Lower frame part... - Page 9 Upper frame part Attach the harness to the upper frame part in places designed by the paramotor manufacturer. Adjust it so that it is connected as tight as possible. Bar pouch Insert the bars into pouches on the risers of the harness and rivet them or screw tightly (depending on design). Place a washer under the rivet or the screw.
-
Page 10: Harness/Paraglider Connection
Lower frame part Attach the harness to vertical frame tubes as shown Lower part of the arm straps Attach the harness to the lower frame part in places provided by the paramotor manufacturer. 9. Harness/paraglider connection Paraglider risers must be connected to the harness with carabiners, installed beforehand in the harness suspension points. It is advised to use steel carabiners since they are stronger and more durable than aluminium ones. -
Page 11: Harness Adjustment
10. Harness adjustment Correct adjustment of the harness has considerable effect on comfort and safety of operation. The picture below shows points to be adjusted before first flight. It is necessary to hang somewhere the paramotor with attached harness in order to try it out and conduct initial adjustment. -
Page 12: Pockets
11. Pockets Powerseat Comfort features two side pockets and a bigger one under the seat. Side pockets are accessible in flight and you can place there smaller objects like keys, phone etc. -
Page 13: Landing
Slide out of the harness shortly before entering water to avoid tangling in lines or other parts of the paraglider. 16. Tandem flying Powerseat Comfort was not designed for tandem flying and it is not advisable to use this harness for passenger.. 17. Clearing and storing the harness All materials for the harness were carefully selected for their quality and durability. - Page 14 Dudek Paragliders s.j. ul. Centralna 2 U 86- 031 Osielsko Poland tel +48 52 324 17 40 fax +48 52 381 33 58 export@dudek.eu...
Need help?
Do you have a question about the PowerSeat comfort and is the answer not in the manual?
Questions and answers