
Related Manuals for Samsung SC-DX103


Summary of Contents for Samsung SC-DX103
-
Page 1: Dvd Camcorder
DVD Camcorder user manual imagine the possibilities Thank you for purchasing this Samsung product. To receive more complete service, please register your product at www.samsung.com/global/register SC-DX100 SC-DX103 SC-DX105... - Page 2 2.7” wide (16:9) LCD screen (112K pixels) The 2.7” wide (16:9) LCD screen provides excellent viewing clarity with improved resolution. The 112K pixels LCD screen rotates up to 270 degrees for multiple viewing angles providing sharp, detailed images for monitoring or playback, and the widescreen format makes shooting in 16:9 mode and composing shots even easier.
-
Page 3: Safety Warnings
To Reduce The Risk Of Fire Or Electric Shock, Do Not Expose This Apparatus To Rain Or Moisture.” Caution Apparatus shall not be exposed to dripping or splashing and no objects filled with liquids, such as vases, shall be placed on the apparatus. -
Page 4: Important Safety Instructions
6. Clean only with dry cloth. 7. Do not block any ventilation openings. Install in accordance with the manufacturer’s instructions. 8. Do not install near any heat sources such as radiators, heat registers, stoves, or other apparatus (including amplifiers) that produce heat. - Page 5 17. POWER SOURCES: The CAMCORDER should be operated only from the type of power source indicated on the label. If you are not sure of the type of power supply at your home, consult your appliance dealer or local power company.
- Page 6 Never push objects of any kind into this CAMCORDER through openings as they may touch dangerous voltage points or short out a part that could result in a fire or electric shock. Never spill liquids of any kind onto the CAMCORDER. Should spillage occur, unplug unit and have it checked by a technician before use.
- Page 7 29. To prevent damage which may result in fire or shock hazard, do not expose this appliance to rain or moisture. 30. If this power supply is used at 240V ac, a suitable plug adaptor should be used. 31. This product is covered by one or more of the following U.S.
- Page 8 DVD camcorder or memory card. Samsung cannot be responsible for your recorded video and audio. - Recorded contents may be lost due to a mistake when handling this DVD camcorder or memory card, etc. Samsung shall not be responsible for compensation for damages due to the loss of recorded contents.
- Page 9 Make a backup of important recorded data. Protect your important recorded data by copying the files to PC. We also recommend you copy it from your PC to other recording media for storage. Refer to the software installation and USB connection guide.
- Page 10 • Handle the liquid crystal display (LCD) with care: The LCD is a very delicate display device: Do not press its surface with force, hit it or prick it with a sharp object. If you push the LCD surface, unevenness in display may occur. If unevenness does not disappear, turn the camcorder off, wait for a few moments, then turn it on again.
- Page 11 • Do not touch the lens in the laser pickup block. If you touch the lens in the laser pickup block directly it may cause a malfunction. The laser pickup block is not warranted for damage caused by misuse. Therefore, pay much attention when operating this camcorder.
-
Page 12: Table Of Contents
Screen indicators Using the display ( Using the joystick Using the LCD screen Using the viewfinder Initial setting: OSD language & date and time Selecting the storage media (SC-DX103/ DX105 only) Inserting and removing a disc Recordable time ) button... - Page 13 Recording with ease for beginners (EASY.Q mode) Capturing still images during movie image playback (SC-DX103/ DX105 only) Zooming Playing movie images Deleting images Deleting a section of a movie image (partial delete) Playlist Disc finalize Disc unfinalize Disc format Disc information...
- Page 14 PRINTING PHOTO IMAGES (SC-DX103/ DX105 ONLY) 04_ English Inserting and ejecting a memory card Recordable time and number of images Recording movie images on a memory card Taking photo images Playing movie images Viewing photo images Protection from accidental erasure...
- Page 15 MAINTENANCE & ADDITIONAL INFORMATION TROUBLESHOOTING SPECIFICATIONS WARRANTY (SEA USERS ONLY) Connecting to a TV Dubbing images from the Camcorder to a VCR or DVD/ HDD recorder Using Voice Plus System requirements Installing DV Media PRO Connecting the USB cable Viewing the contents of storage media (memory card)
- Page 16 page 30 You can record movie and photo images. You can take a photo only on the memory card. DVD discs do not support photo mode. Refer to pages 52~54 for the supported memory cards before purchasing them. When recording movie images on a DVD disc Select the proper disc for use.
-
Page 17: Recording
Step 4: Viewing on DVD devices You must finalize the disc in advance to view the movie images recorded on a DVD camcorder on other DVD devices. (Finalize is a function that enables a disc recorded on the DVD camcorder to be playable on DVD devices such as DVD players.) - Page 18 • We are not responsible for data loss on a disc. • We do not warranty any damage or loss incurred due to recording and playback failure caused by disc or card malfunction. • We take no responsibility and offer no compensation for any recording failure, loss of recorded or edited material and/or damage to the recorder arising from the misuse of discs.
-
Page 19: Getting To Know Your Dvd Camcorder
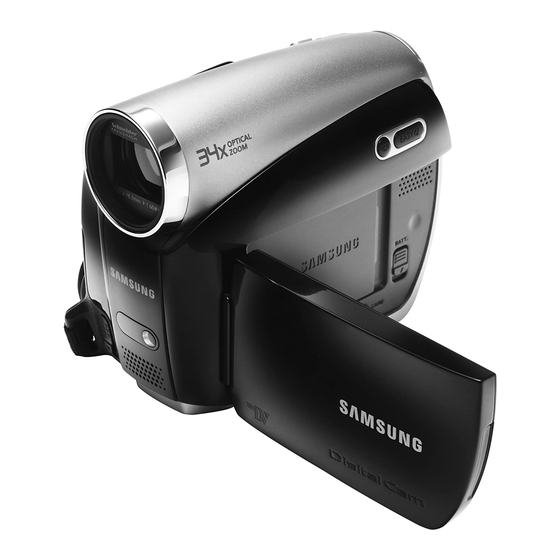
DVD camcorder WHAT’S INCLUDED WITH YOUR DVD CAMCORDER Your new DVD camcorder comes with the following accessories. If any of these items is missing from your box, call Samsung’s Customer Care Center. ✪ The exact appearance of each item may vary by model. - Page 20 DVD camcorder FRONT AND RIGHT VIEW Lens open/close switch Lens Remote sensor (SC-DX105 only) Light (SC-DX105 only) Internal microphone 10_ English CLOSE OPEN ���� Grip belt hook Grip belt Swivel handle Disc cover...
- Page 21 EASY Q button Built-in speaker FINALIZE button BATT. (battery release) switch Storage mode switch (DISC/CARD) (SC-DX103/ DX105 only) Battery pack LCD screen Recording start/stop button Joystick (up/down/right/left/Select, W/T) MENU button Tripod receptacle Memory card slot (SC-DX103/ DX105 only) English _11...
-
Page 22: Rear And Top View
MODE button / Mode indicator (Record ( )/Play ( ) mode) Recording start/stop button ACCESS/CHG indicator 12_ English OPEN switch AV jack USB jack (SC-DX103/ DX105 only) DC IN/ USB (SC-DX103/ DX105 only) / AV jack cover DC IN jack POWER switch... - Page 23 This section provides information on using this DVD camcorder; such as how to use the provided accessories, how to charge the battery, how to setup the operation mode and initial setup. REMOTE CONTROL (SC-DX105 only) START/STOP button DISPLAY button...
-
Page 24: Installing The Button-Type Battery
• There is a danger of explosion if button type battery is incorrectly replaced. Replace only with the same or equivalent type. • Do not pick up the battery using tweezers or other metal tools. This will cause a short circuit. -
Page 25: Holding The Dvd Camcorder
Recording start/stop button with your thumb. 1. Pull and detach the grip belt. Insert the grip belt into its hook as shown in the figure. 2. Insert your hand into the grip belt and adjust its length. 3. Close the grip belt. -
Page 26: Charging The Battery Pack
CHARGING THE BATTERY PACK • There are two types of power source that can be connected to your DVD camcorder. • Do not use provided power supply units with other equipment. - The battery pack: used for outdoor recording. - Page 27 • When fully discharged, a battery pack damages the internal cells. The battery pack may be prone to leakage when fully discharged. • Remove the battery from the camcorder when it is not in use. Even when the power is switched off, the battery pack will still discharge if it is left attached to the DVD camcorder.
- Page 28 DC IN jack on your DVD camcorder. • Even with the power switched off, the battery pack will still discharge if it is left attached to the DVD camcorder. It is recommended that you remove the battery pack from the DVD camcorder.
- Page 29 Assume that the recordable time with a fully charged battery pack is between 1/2 and 1/3 of the time in the table, so prepare enough battery packs to allow for the time you are planning to record on the DVD camcorder.
- Page 30 Using the DVD camcorder with the AC power adaptor It is recommended that you use the AC power adaptor to power the DVD camcorder from a household AC outlet when you perform settings on it, finalize a disc, play back, or edit images, or use it indoors. page 18 ...
-
Page 31: Basic Dvd Camcorder Operation
When using this camcorder first time • When you use your DVD camcorder for the first time or you reset it, you will see the “Date/Time Set” screen for the startup display. If you do not set the date and time, the “Date/Time Set”... -
Page 32: Screen Indicators
0:00:00 [30 min] Insert Disc 1/60 JAN/01/2008 12:00 AM • This OSD indicators are based on using a DVD- RW disc. • The above screen is an example for explanation: It is different from the actual display. • Functions marked with * will not be retained when the DVD camcorder is powered on after turning it off. - Page 33 Movie play mode Operating status (Play/Pause) 0:00:59 Warning indicators and messages Time code (elapsed time) Storage media (disc) Battery info (remaining battery level) Disc Format (-RW Video/VR mode only) Activate Remote Control Quality Voice plus Movie No. JAN/01/2008 12:00 AM Date/Time...
- Page 34 STBY 0:00:00 [64 min] Insert Card JAN/01/2008 12:00 AM The digital camera mode is for models SC-DX103/ DX105 only. 24_ English Digital camera (memory card) record mode Record mode Operating mode (STBY (standby) or ●(recording)) Warning indicators and messages...
- Page 35 (current image/total number of recorded images) Warning indicators and messages Storage media (memory card) Battery info (remaining level) Erase Protection File Name (folder-file name) Date/Time Print Mark(DPOF) Photo size The digital camera mode is for models SC-DX103/ DX105 only. English _25...
-
Page 36: Using The Display ( ) Button
If the DVD camcorder has warning information, a warning message will appear. USING THE JOYSTICK The Joystick is used to make a selection and to move the cursor left, right, up and down. Using the Joystick, you can easily make your selection and navigate the menu. -
Page 37: Using The Lcd Screen
1. Close the LCD screen. 2. Use the focus adjustment knob of the viewfinder to focus the picture. Viewing the sun or any strong light source through the viewfinder for a prolonged period may be harmful, or cause temporary impairment. -
Page 38: Initial Setting: Osd Language & Date And Time
To store the date and time during record, set the date/time. • Set the date and time when using this camcorder for the first time. page 21 You can also set the date and time using the setting menu. page 29 Selecting the OSD language You can select the desired language to display the menu screen and the messages. -
Page 39: Setting The Date And Time
Turning the date and time display on/off To switch the date and time display on or off, access the menu and change the date/time mode. page 79 STBY 0:00:00 [30 min]... -
Page 40: Inserting And Removing A Disc
SELECTING THE STORAGE MEDIA (SC-DX103/ DX105 only) You can record movies onto a DVD disc, and you can record both movies and photos onto a memory card. With models SC-DX103/DX105, you must select the desired storage media before starting recording or playback. - Page 41 • Move the grip belt so it does not interfere with inserting or ejecting the disc. • The disc cover can be opened when the device is connected to an AC power adaptor or the battery pack, even if the power is off.
-
Page 42: Recordable Time
• It may take longer to open the cover when using a DVD+RW. More than 5 minutes may be required if there are a lot of movie images recorded on the disc. RECORDABLE TIME... - Page 43 • You can record movie images using the remote control. (SC-DX105 only) page 13 • This DVD camcorder provides two Recording start/stop buttons. One is on the rear side of the camcorder and the other is on the LCD panel. Select the Recording start/ stop button that works best for you.
- Page 44 • For various functions available when you record movie images. pages 65~77 • Do not operate the power switch or remove a disc while accessing it. Doing so may damage the disc or the data on it.
- Page 45 Press the EASY Q button once again. • The ( and Anti-Shake(DIS) ( • Almost all the settings will return to the settings that were set prior to activating EASY.Q mode. • You cannot cancel the EASY.Q mode during recording. • Unavailable buttons during EASY.Q operation.
- Page 46 The selected file fills the screen and is played automatically. 4. Press the PHOTO button at the desired point. • A shutter sound is heard. The photo image is recorded on the memory card and the “Photo capture” message appears.
- Page 47 You can set the digital zoom up to 1200x in movie mode. • Be sure to keep your finger on the Zoom lever. If you move your finger off the zoom lever, the operation sound of the Zoom lever may be also recorded.
-
Page 48: Playing Movie Images
)button to toggle the OSD (On Screen Display) function on and off. • Depending on the amount of data to be played back, it may take some time for the playback images to appear. • Movies edited on a PC may not be displayed on this DVD camcorder. -
Page 49: Adjusting The Volume
• You can hear the recorded sound from the built-in speaker. • The level can be adjusted anywhere between 0 and 19. If you close the LCD screen while playing, you will not hear the sound from the speaker. Various playback operations Playback / Pause / Stop •... -
Page 50: Deleting Images
3. Press the MENU button. 4. Move the Joystick right or left to select “Delete.” 5. Move the Joystick up or down to select the desired option (“Select file” or “Select All”), then press the Joystick. • “Select file”: Deletes the individual image. - Page 51 8. Move the Joystick left to select “Yes,” then press the Joystick. • The selected part of the movie image will be deleted. • Do not remove the battery pack or the AC power adaptor while the partial deletion is in progress. The file can be damaged.
- Page 52 You should format the DVD-RW to VR mode before recording. page 50 Example: You have recorded a few scenes on a DVD disc. You want to save the original recording, but you also want to create a digest by putting your favorite scenes together.
-
Page 53: Creating A Playlist
• The ( ) indicator is displayed on the selected movie images. • Pressing the Joystick toggles between the movie thumbnail image being selected for creating a playlist (the ( ) indicator appears on image) or not (the ( ) indicator is removed from image). - Page 54 • The ( ) indicator is displayed on the selected movie image. • Pressing the Joystick toggles between the movie thumbnail image being selected for arrangement within the playlist (the ( ) indicator appears on image) or not (the ( ) indicator is removed from image).
- Page 55 • The ( ) indicator is displayed on the selected movie image. • Pressing the Joystick toggles between the movie thumbnail image being selected for deleting from the playlist (the ( ) indicator appears on image) or not (the ( ) indicator is removed from image).
- Page 56 8. Move the Joystick left to select “Yes,” then press the Joystick. • The selected part of the movie image will be deleted. • Do not remove the battery pack or the AC power adaptor while the partial deletion is in progress. The file can be damaged.
- Page 57 • To play the contents of a DVD-RW/-R/+R DL on other DVD players/recorders/drives, you must finalize the disc. When finalizing, there should be enough power in the battery. If the AC power adaptor is to be used, make sure that the jack is properly connected. A power cut during finalizing may prevent the disc from playing.
- Page 58 • Microsoft, Windows and Windows logo are registered trademarks of Microsoft Corporation incorporated in the United States and/or other countries. • Video and audio may pause or skip when you play back a DVD disc on your PC. If this occurs, copy the data into your hard disk drive.
-
Page 59: Disc Unfinalize
• This function works only in the Record mode. page 21 • If a DVD-RW disc had been finalized in the VR mode or Video mode, you can unfinalize the disc for further recording. When unfinalizing, there should be enough power in the battery. If the AC power adaptor is to be used, make sure that the jack is properly connected. -
Page 60: Disc Format
• Formatting will delete all the recorded contents on a disc. Be careful not to delete data by mistake. • Do not turn the power off in the middle of the formatting. The data recorded on a disc may be damaged. - Page 61 1. Move the Joystick right or left to select “Rename,” then press the Joystick. • Disc Name screen will appear. 2. Use the Joystick to move the cursor to “Delete,” then press the Joystick to delete the existing disc name.
-
Page 62: Selecting A Suitable Memory Card
- RS MMC or Mini SD should be inserted by using an Adapter (not supplied). • On this DVD camcorder, you can use memory cards of the following capacity: Up to 2GB • For movie recording, use a memory card that supports faster write speed (at least 1.25 MB/s). - Page 63 Note that formatting erases all information on the memory card. • A memory card has a certain life span. If you cannot record new data, you have to purchase a new memory card. • Do not bend, drop, or cause a strong impact to your memory card.
- Page 64 • We recommend using a memory card case to avoid losing data from moving and static electricity. • After a period of use, the memory card may become warm. This is normal and is not a malfunction. • Photo image files recorded on a memory card by your DVD camcorder conform to the “DCF (Design rule for Camera File system)”...
-
Page 65: Recordable Time And Number Of Images
Photo Quality Super Fine Approx. 600 Actual formatted capacity may be less as the internal firmware uses a portion of the memory. • The above figures are measured under Samsung’s standard recording test conditions and may differ depending on actual use. -
Page 66: Recording Movie Images On A Memory Card
• You can record movie images using the remote control. (SC-DX105 only) page 13 • This DVD camcorder provides two Recording start/stop buttons. One is on the rear side of the camcorder and the other is on the LCD panel. Select the Recording start/ stop button that works best for you. -
Page 67: Taking Photo Images
• You can use the zoom function while recording. page 37 • The number of photo images that can be stored depends on the quality and size of the image. page 55 • The photo image is taken only in the 4:3 aspect ratio on the memory card. - Page 68 ) button to toggle the OSD (On Screen Display) function on and off. • Depending on the amount of data to be played back, it may take some time for the playback images to appear. • Movies edited on a PC may not be displayed on this DVD camcorder.
-
Page 69: Viewing Photo Images
Set the slide show function for continuous display. 1. Press the MENU button in the single image display mode. 2. Move the Joystick right or left to select “Slide Show” “Start” then press the Joystick. • The ( ) indicator is displayed. The slide show will start from the current image. -
Page 70: Protection From Accidental Erasure
3. Use the Joystick to select the image to protect, press the MENU button. 4. Move the Joystick right or left to select “Protect.” 5. Move the Joystick up or down to select the desired option (“Off” or “On”), then press the Joystick. - Page 71 3. Use the Joystick to select the image to delete, then press the MENU button. 4. Move the Joystick right or left to select “Delete.” 5. Move the Joystick up or down to select the desired option (“This File” or “All Files”), then press the Joystick.
-
Page 72: Using The Menu Button
HANDLING MENUS ✪ Follow the instruction below to use each of the menu items listed on this page. For example: setting the Focus Using the MENU button 1. Slide the POWER switch downwards to turn on the power. -
Page 73: Menu Items
Some items will not appear depending on the storage media type. (SC-DX103/ DX105 only) • There are some functions you cannot activate simultaneously in the menu. You cannot select the gray menu items. Refer to the Troubleshooting for examples of the inoperable combinations of functions and menu items. -
Page 74: Playback Menu Items
Playback menu items Operating mode Delete Edit Partial Delete Protect Card Manage Print Mark(DPOF) Slide Show (in the single image display) Setting menu items Operating mode Date/Time Set Date/Time LCD Brightness LCD Color Beep Sound Shutter Sound (SC-DX103/ DX105 only) -
Page 75: Recording Menu Items
You can set up the menu items for recording. Scene Mode(AE) This DVD camcorder automatically sets the shutter speed and aperture according to the subject brightness for optimum recording: You can also specify one of six modes depending on conditions, recording environment or purpose of filming. -
Page 76: White Balance
1. Move the Joystick up or down to select “Custom WB,” then press the Joystick. The “Set White Balance” indicator is displayed. 2. Frame a white object such as a piece of white paper so that it fills the screen. Use an object that is not transparent. - Page 77 • A subject can be shot under various types of lighting conditions indoors (natural, fluorescent, candlelight, etc.). Because the color temperature is different depending on the light source, the subject tint will differ depending on the white balance settings. Use this function for a more natural result.
- Page 78 • It is recommended that you specify “Anti-Shake(DIS): Off” when using the DVD camcorder on a desk or tripod (not supplied). • When you record pictures with 34x or more magnification and the “Anti-Shake(DIS)” is set to “On” in dark locations, after-images may stand out. In this case, we recommend using a tripod (not supplied) and turning the “Anti-Shake(DIS)”...
-
Page 79: Digital Effect
Digital Effect The digital effect enables you to give a creative look to your recording. Select the appropriate digital effect for the type of picture that you wish to record and the effect you wish to create. There are 10 different digital effect options. - Page 80 • The manual focus adjustment indicators appear. 2. Move the Joystick right or left to select the desired indicator to adjust focus, then press the Joystick. right or left to select the desired indicator to adjust focus, then press the Joystick...
- Page 81 • “Focus” function will alternate between manual focus and auto focus. With auto focus, no indication will appear on the screen. • If you are inexperienced in the use of DVD camcorders, we recommend that you use auto focus. •...
- Page 82 DVD camcorder or 16:9 aspect ratio screen, the displayed picture may appear wider than the actual size. Quality You can select the quality of a movie to be recorded. This DVD camcorder can film in the SF (Super Fine), F (Fine) and N (Normal) modes. The Fine mode is set as the factory default.
-
Page 83: Wind Cut
You can reduce wind noise when recording sound from the built-in microphone. If “Wind Cut” is set to “On,” the low-frequency components in the sound picked up by the microphone will be cut off during recording: this makes it easier to hear voices and sound during playback. -
Page 84: C. Nite
Records a clear image in a dark place without sacrificing color with the light. • The LED light can become extremely hot. Do not touch it while in operation or soon after turning it off, otherwise serious injury may result. - Page 85 When you want to stop recording with fade out, set “Fader” to “On” again during recording. Then press the Recording start/stop button. Recording stops as the image and sound are faded out (fade out), image and sound are faded in (fade in).
-
Page 86: Digital Zoom
Digital Zoom You can select the maximum zoom level in case you want to zoom to a level greater than 34x (the default setting) during recording. Zooming more than 34x is achieved digitally, up to 1200x when combined with optical zoom. - Page 87 Assigns file numbers in sequence even if the memory card is replaced with Series another one or after formatting, or after deleting all files. The file number is reset when a new folder is created. Resets the file number to 0001 even after formatting, deleting all or inserting a Reset new memory card.
-
Page 88: Playback Menu Item
• This function can be set only in the digital camera play mode. SETTING MENU ITEMS You can set up the date and time, OSD language and display settings of the DVD camcorder. Date/Time Set Set the current date and time so that they can be recorded correctly. page 29... -
Page 89: Lcd Brightness
• The date/time will read “JAN/01/2008 12:00 AM” in the following conditions. - If a movie or photo recording was made before setting the date/time in the DVD camcorder. - When the button type battery for internal clock becomes weak or dead. -
Page 90: Beep Sound
When on, the shutter will sound with each press of the PHOTO button. Auto Power Off You can set the DVD camcorder to turn off automatically when there is no operation for 6 minutes in the STBY mode and thumbnail index view. -
Page 91: Default Set
The TV Display function works in recording and play modes. You can select the output path of the OSD (On Screen Display). This allows you to set the OSD for viewing on the viewfinder, LCD screen or an external TV. - Page 92 • Demonstration starts in the following cases: - Right after “Demo” is set to “On.” - With “Auto Power Off”set to “Off,” if there is no operation for about 6 minutes in the STBY mode whether a disc is inserted or not.
-
Page 93: Dpof Print Setting
Joystick right or left to select “Print Mark (DPOF).” Move the Joystick up or down to select the number of prints. Up to 99 copies can be set to print of each image. To exit, press the MENU button. -
Page 94: Direct Printing With A Pictbridge
Joystick left or right. • Each press of the MENU button toggles the PictBridge menu screen on or off. 5. Press the MENU button. Move the Joystick right or left to select “Print,” and then press the Joystick to print. - Page 95 Setting the date/time imprint option Move the Joystick right or left to select “Date/Time,” then move the Joystick up or down to select the desired option. To exit, press the MENU button. To print using the DPOF setting If the printer is compatible with DPOF, you can use the DPOF setting.
-
Page 96: Connecting To A Tv
1. Turn on the TV and set the input selector to the Input connection the DVD camcorder is connected to. - This is often referred to as “line.” Refer to the TV instruction manual for how to switch the TV input. - Page 97 • The remote control is useful when operating the DVD camcorder while viewing an image on TV screen. (SC-DX105 only) • If only a mono audio input is available on the connected device (TV, etc.), use the audio cable with the white jack (Audio L).
- Page 98 • Audio is heard from the speaker. If the volume is too high, noise may enter the dubbed image. • Be sure to use the AC power adaptor to power the DVD camcorder to prevent battery power from shutting off during recording on another video device.
-
Page 99: Using Voice Plus
AV device, instead of copying the pre-recorded sound on a disc. 7. To cancel, press the Recording start/stop button again. • Voice Plus is available only when the AV cable is connected. If a USB cable is connected, the Voice Plus function may not operate properly.(SC-DX103/DX105 only) •... -
Page 100: System Requirements
• The above system requirements information is not a guarantee that the provided software will work on all personal computers meeting those requirements. • On a slower PC than recommended, movie playback may not be smooth or video editing may take a long time. -
Page 101: Installing Dv Media Pro
• Insert the provided CD into the CD-ROM drive. The setup screen appears automatically soon after the CD is inserted. If the setup screen does not appear, click on “Start” on the bottom left corner and select “Run” to display a dialog. Type “D:\autorun.exe” and then press ENTER, if your CD-ROM drive is mapped to “D:Drive”. - Page 102 Application Installation – Quick Time 1. Click “Quick Time” on the Setup screen. • QuickTime is Apple’s technology for handling movie, sound, animation, graphics, text, music, and even 360-degree virtual reality (VR) scenes. • Please install by using the Software CD that came with this DVD camcorder.
-
Page 103: Disconnecting The Usb Cable
• If you connect the USB cable to a PC via a USB HUB or simultaneously connect the USB cable along with other USB devices, the DVD camcorder may not work properly. If this occurs, remove all USB devices from the PC and reconnect the DVD camcorder. -
Page 104: Viewing The Contents Of Storage Media (Memory Card)
PC VIEWING THE CONTENTS OF STORAGE MEDIA (MEMORY CARD) • You can transfer or copy the files saved on the memory card onto the PC using a USB cable. 1. Slide the POWER switch downwards to turn on the power, then set the Storage mode switch to CARD. -
Page 105: Image Format
• The image size is 800x600. • Up to 99 files are created in one folder. New folder is created when more than 99 files are created. • You may modify the name of a file/folder stored in the memory card using a PC. This DVD camcorder may not recognize modified files. -
Page 106: Connecting To A Pc
TRANSFERRING FILES FROM ON THE MEMORY CARD THE DVD CAMCORDER TO YOUR PC You can copy the movie and photo images to your PC and play them back. 1. Execute the procedure in “Viewing the contents of storage media.” pages 94~95 •... -
Page 107: Using The Pc Cam Function
- 640X480(VGA) pixels for USB 2.0 connection. • If PC is connected to the DVD camcorder with a USB cable, only the POWER switch and Zoom lever can be operated. • Run a video chatting application such as Windows Messenger and enjoy the video utilization. - Page 108 Wipe gently with a soft dry cloth. Be careful not to damage the screen. To clean the lens Use an optional air blower to blow out dirt and other small objects. Do not wipe the lens with cloth or your finger. If necessary, wipe gently with lens cleaning paper.
-
Page 109: Additional Information
• Do not use benzene, thinner, detergent, alcohol or anti-static spray when cleaning the disc. It may cause a malfunction. • Press the supporting holder in the center of the disc case for easy removal of the disc. -
Page 110: Lcd Screen
When not using the DVD camcorder for an extended period: It is recommended that you fully charge the battery pack once a year, attach it to the DVD camcorder and use it up; then remove the battery pack and store it in a cool and dry place again. - Page 111 When loading a DVD+RW disc, you must format it. We cannot guarantee that you will be able to play back in all other manufacturer’s DVD camcorders, DVD players/ recorders, or PC’s. For compatibility information, please refer to the manual of the device you wish to play back on.
-
Page 112: Using Your Dvd Camcorder Abroad
Your camcorder is an NTSC-system-based camcorder. If you want to view your recordings on a TV or to copy it to an external device, it must be an NTSC-system-based TV or an external device and have the appropriate Audio/Video jacks. Otherwise, you may need to use a separate video format transcoder (NTSC-PAL format converter). -
Page 113: Troubleshooting
TROUBLESHOOTING Before contacting a Samsung authorized service center, perform the following simple checks. They may save you the time and expense of an unnecessary call. Warning indicators and messages Overall Message Icon Informs that... Low Battery The battery pack is almost discharged. - Page 114 Action If the DVD camcorder is turned off while recording, turn it on again with the disc or memory card inserted in it: Repair of the disc or memory card will be executed automatically. Do not turn the DVD camcorder off when data recovery is in progress.
- Page 115 • What can I do? Turn the power off and detach the battery pack, and leave it in a dry area for 1~2 hours before using it. • When does the dew condensation occur? When the device is relocated to a place with a higher temperature than the previous location, or when using it in a hot area suddenly, it will cause condensation.
- Page 116 Explanation/Solution • Is “Auto Power Off” set to “6Min”? If no button is pressed for about 6 minutes in STBY mode, the DVD camcorder is automatically turned off. To disable this option, Set “Auto Power Off” to “Off.” page 80 •...
- Page 117 Explanation/Solution • Insert a memory card into your camcorder properly. page 52 • If you use a memory card formatted on a computer, format it again directly on your camcorder. page 78 • Release the lock on the write-protect tab of the memory card (SD card), if any.
- Page 118 page 30 • Release the lock on the write-protection tab of the memory card if any. • The memory card is full. Use a new memory card or format the memory card. pages 52-54 Or remove unnecessary images. page 61 •...
- Page 119 • This happens when viewing an image recorded in 16:9 wide mode on a 4:3 TV. If you want to display properly on your TV, check out your TV type and set the proper screen mode (“16:9 Wide”) before recording. page 72 •...
- Page 120 • You can not use the camcorder in DVD camcorder mode with a Macintosh. • Make sure you insert the connector in the correct direction, and connect the USB cable to the USB jack on your camcorder firmly.
- Page 121 Overall operations Symptom Explanation/Solution The date and time are • Has the camcorder been left unused for a long period of time? The backup memory incorrect. battery(button type battery) may be discharged. Replace with a new battery. page 14 Menu...
-
Page 122: Specifications
439 g (0.92 lb, 14.71 oz) (Except for lithium-ion battery pack) Omni-directional stereo microphone Internal MIC Remote control Indoors: greater than 49 ft (15 m) (straight line), outdoors: about 16.4 ft (5 m) (straight line) (SC-DX105 only) - These technical specifications and design may be changed without notice. 112_ English... -
Page 123: Warranty (Sea Users Only)
SAMSUNG Electronics America Inc. (SEA), warrants that this product is free from defective material and workmanship. SEA further warrants that if product fails to operate properly within the specified warranty period and the failure is due to improper workmanship or defective material, SEA will repair or replace the product at it’s option. - Page 124 1-800-SAMSUNG (726-7864) www.samsung.com RoHS compliant Our product complies with “The Restriction Of the use of certain Hazardous Substances in electrical and electronic equipment,” and we do not use the 6 hazardous materials- Cadmium(Cd), Lead (Pb), Mercury (Hg), Hexavalent Chromium (Cr +6), Poly Brominated Biphenyls Code No.