Table of Contents
Advertisement
Available languages
Available languages
Quick Links
QUIET B LENDER
WITH CYC LONE GLASS JA R
LICUAD ORA SI LENC I OSA CO N JA R RA D E
VIDRIO C IC LÓNICA
u s e a n d ca re manua l
m an u al d e u s o y c ui d ad o
BL1400DG-P
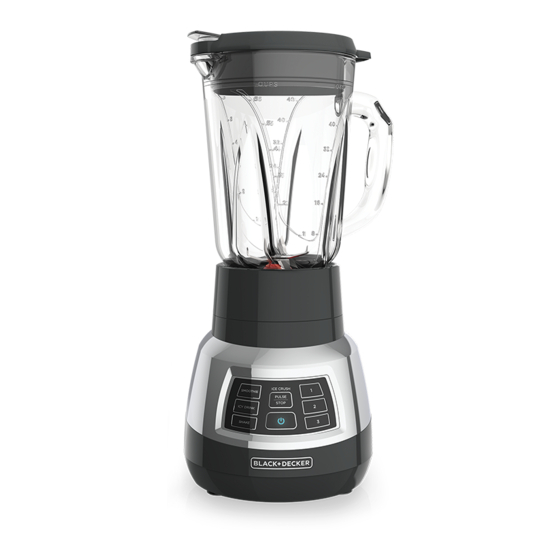
PARTS AND FEATURES
2
1
4
3
5
10
6
7
11
8
9
12
1.
Dual-opening lid
7.
Jar base (part no. BL1250-02)
(part no. BL1250-01)
8.
Base
2.
Pour Spout
9.
Digital Control Panel
3.
Ingredient Slot
10. Single serve jar travel lid
4.
Blending jar (part no. BL1250-02)
(part no. BL1250-03)
5.
Handle
11.
Single serve jar
(part no. BL1250-04)
6.
Blade assembly
(part no. BL1250-01)
12. Cord storage (under base)
Product may vary slightly from what is illustrated. This product is for household use only.
U SIN G T HE SIN G LE S ERV E
B LEND E R JAR
Note: Do not blend hot liquids in the single serve jar.
1. Place the single serve blender jar on a flat surface with the
open end facing up. Fill the jar with ingredients. Do not fill
ingredients past the Max fill line.
Note: For best results, add ingredients in the following order:
1. Liquids 2. Powders 3. Soft foods 4. Hard foods 5. Ice
2. Place blade assembly in the jar opening with blades down.
3. Place jar base onto jar and rotate clockwise until it is tight. It is
important to tighten to prevent leaking during blending.
4. Turn single serve jar upside down and place on the blender
base.
5. Select speed 1 or use PULSE/Ice Crush to blend to desired
consistency. While blending, keep one hand holding the single
serve jar.
6. Once blending has finished, remove the single serve jar by
lifting off the base. Turn the jar over and place it on a flat
surface.
Note: Always make sure blades have stopped moving before
removing jar.
Important: If the jar gets stuck on the blending base or begins to
loosen from the jar base, follow these steps:
a.
Unplug the unit
b.
Turn the jar clockwise to tighten jar onto the jar base
7. Remove the jar base from the single serve jar by turning
counterclockwise. Then carefully remove blade assembly
8. Place the single serve jar drinking lid on the single serve jar
and enjoy your delicious drinks on-the-go.
Caution: Blades are sharp. Handle carefully.
www.BlackAndDeckerAppliances.com
Note: The maximum rating is based on the blending jar attachment.
The power input of the optional personal jar is less than the allowable
deviation.
Nota: La clasificación máxima es basada en el acesorio de jarra de la
licuadora. La potencia de entrada del vaso personal opcional es menor que
la desviación permitida.
BLACK+DECKER and the BLACK+DECKER logos and product names are trademarks of The Black
& Decker Corporation, used under license. All rights reserved. All other marks are Trademarks of
Spectrum Brands, Inc.
BLACK+DECKER y los logos y nombres de productos de BLACK+DECKER son marcas registradas
de The Black & Decker Corporation, usados bajo licencia. Todos los derechos reservados. Todas la
Demas marcas son Marcas Registrades de Spectrum Brands, Inc.
Made in China.
Fabricado en China.
© 2019 The Black & Decker Corporation and Spectrum Brands, Inc., Middleton, WI 53562
Congratulations on your purchase of the BLACK+DECKER™ Quiet Blender with
Cyclone
‰
Glass Jar!
From delicious smoothies to creamy soups, the PowerCrush blender's powerful motor
and unique QuadPro blade design work together to ensure superior blending and
crushing results—for home or on the go.
¡Felicitaciones por su compra de la Licuadora Silenciosa BLACK+DECKER™ con jarra
de Vidrio Ciclónica!
Desde batidos deliciosos hasta sopas cremosas, el potente motor y el diseño único de
la cuchilla QuadPro de la licuadora PowerCrush trabajan en conjunto para asegurar un
licuado y resultados de tritruración superiores—en casa o en el camino.
We want you to have a 5-star experience!
Should you have any questions or concerns about your new product, please call our Customer
Service Line at 1-800-465-6070 (U.S. and Canada). Please do not return to the store.
¡Deseamos que disfrute de una experiencia de 5 estrellas!
Si usted tiene alguna inquietud o pregunta con su producto, por favor llame a nuestra línea de
servicio al cliente una atención inmediata 1-800-465-6070 (EE.UU/Canadá)
01-800-714-2503 (México). No devuela a la tienda.
G E T T I N G STA RT E D
• Remove all packing material, any stickers, and the plastic band
around the power plug.
• Remove and save literature.
• Please visit www.prodprotect.com/blackanddecker to register
your warranty.
• Wash all removable parts as instructed in CARE AND CLEANING
section of this manual.
BL E ND I N G JA R ASS E MB LY
1. Turn blending jar upside down and place flat on
counter top or work surface.
2. Place the blade assembly in bottom opening of the jar
with blades down. (A)
Caution: Blades are sharp. Handle carefully.
3. Place the jar base onto the blending jar
(A) and rotate clockwise until tight. It
is important to tighten to avoid leaking
while blending
4. Turn assembled jar right side up.
5. Place the dual-opening lid on blender
jar.
6. Uncoil power cord from storage area
under the blender base.
7. Place the jar assembly on blender
base.
8. Blender is now ready for use.
B L E N D I N G T I P S A N D T EC H N I Q UE S
•
Cut food into pieces no larger than ¾" for use in the blender.
•
When preparing foods that have several different kinds of
ingredients, always add liquid ingredients first.
•
When ingredients splatter onto the sides of the jar or the mixture is
very thick, press the ON/OFF button to turn appliance off. Remove
the lid and use a rubber spatula to scrape down the sides of the
jar and to redistribute the food, pushing food toward the blades.
Replace the lid and continue blending.
•
When making bread crumbs or blending dry goods, make sure
blending jar and blade assembly are completely dry.
•
The PULSE/ICE CRUSH function is helpful when short bursts of
power are needed, such as when preparing thick smoothies or
milkshakes. Do not use pulse for more than 10 seconds at a time.
Release the PULSE/ICE CRUSH button regularly, allow the blender
to rest briefly, then continue.
•
Do not run blender for longer than 1 ½ minutes at a time.
•
Do not use if blender jar is chipped or cracked.
•
It is helpful to begin the blending process on the lowest speed and
then increase to a higher speed, if necessary.
•
To stop blending at any time, press the ON/OFF button.
•
When blending hot ingredients open the ingredient slot. Cover
lid with a cloth to avoid splattering and use speed 1. Do not blend
more than 2 ½ to 3 cups at a time.
•
Always operate the blender with the lid on the jar.
•
Do not store foods in the blending jar.
•
Do not overfill the blender (the blender is more efficient with less
rather than more).
Comercializado por:
Importado por / Imported by:
Spectrum Brands de México, SA de C.V
Spectrum Brands de México, SA de C.V
Avenida 1° de Mayo No. 120
Avenida 1° de Mayo No. 120
Piso 7, Oficina 702.
Piso 7, Oficina 702.
Colonia San Andres Atoto, C.P. 53500
Colonia San Andres Atoto, C.P. 53500
Naucalpan de Juárez, Estado de México,
Naucalpan de Juárez, Estado de México,
México
México
Servicio y Reparación
Para atención de garantía marque:
Art. 123 No. 95
01 (800) 714 2503
Col. Centro, C.P. 06050
Importado por / Imported by:
Deleg. Cuauhtemoc
Household Products Chile Commercial
Servicio al Consumidor
Ltda
Av. Del Valle 570, Ofic. 704
Venta de Refacciones
Ciudad Empresarial, Huechuraba
y Accesorios
Santiago - Chile
01 800 714 2503
Fono: (562) 2571 3700
Importado y Distribuido por:
Importado por / Imported by:
RAYOVAC ARGENTINA S.R.L. Humboldt
Spectrum Brands Corp, S.A.S.
2495 Piso# 3 C1425FUG) C.A.B.A.
Transversal 23 #97-73
Argentina C.U.I.T NO. 30-70706168-1
Oficinas 403-404-405,
Bogotá, Colombia
Línea Servicio al Cliente: 018000510012
120V~ 60Hz. 4.1A Max
Código de fecha / Date Code / Le code de date:
Sello del Distribuidor:
Fecha de compra:
Modelo:
When using electrical appliances, basic safety precautions should always be followed, including the following:
• Read all instructions.
• To protect against risk of electrical shock do not immerse cord, plugs or
appliance in water or other liquid.
• Close supervision is necessary when any appliance is used by or near
children.
• Unplug from outlet when not in use, before putting on or taking off parts
and before cleaning.
• To unplug, grasp the plug and pull from the outlet. Never pull from the
power cord.
• Avoid contacting moving parts. Keep hands, hair and clothing- as well as
spatulas and other utensils- away from beaters during operation to reduce
the risk of injury to persons, and/or damage to the mixer.
• Do not operate appliance with a damaged cord or plug, or after the
appliance malfunctions or has been dropped or damaged in any manner.
Contact Consumer Support at the toll-free number listed in the warranty
section. This appliance has important markings on the plug blade. The
attachment plug or entire cordset (if plug is molded onto cord) is not
suitable for replacement. If damaged, the appliance must be replaced.
• The use of attachments, including canning jars, not recommended by the
manufacturer may cause a risk of injury to persons.
POLARIZED PLUG (120V models only)
This appliance has a polarized plug (one blade is wider than the other). To
reduce the risk of electric shock, this plug is intended to fit into a polarized
outlet only one way. If the plug does not fit fully into the outlet, reverse the
plug. If it still does not fit, contact a qualified electrician. Do not attempt to
modify the plug in any way.
TAMPER-RESISTANT SCREW
Warning: This appliance is equipped with a tamper-resistant screw to prevent
removal of the outer cover. To reduce the risk of fire or electric shock, do not
attempt to remove the outer cover. There are no user-serviceable parts inside.
Repair should be done only by authorized service personnel.
US ING YOUR BL E ND E R
Important: Appliance should always have lid in place when in use.
Caution: Do not place blender jar onto base when motor is running.
1. Make sure appliance is OFF.
2. Place ingredients to be blended into jar. For best results, add
ingredients in the following order:
1. Liquids 2. Powders 3. Soft foods 4. Hard foods 5. Ice
Tip: When using frozen fruits it is not necessary to also add ice.
3. Place lid on jar; make sure the pour spout and ingredient slot are
closed.
4. Plug power cord into outlet. Press ON/OFF button. LED should
turn a solid color to signify the blender is in standby mode.
After 2 ½ minutes the unit will automatically power off if no
buttons are pressed.
Note: When in use, do not leave blender unattended. When using hard
foods, such as ice or cheese, keep one hand on the lid to keep blender in
place.
5. Select the speed that best suits your desired task. (See SPEED
CHART)
Important: Do not hold speed button. Simply press the desired
speed, watch, and press ON/OFF when the desired consistency is
achieved. Holding the button for longer than 30 seconds will cause
the blender to shut off. Unit must be shut off to reset.
6. When blending thick mixtures, such as smoothies and milkshakes,
use the PULSE/Ice Crush button for several seconds, then release.
Repeat to mix ingredients and then run continuously until food has
reached desired consistency. Releasing pulse stops the blending
and the unit returns to STANDBY. You may use a spatula or utensil
to move ingredients and thick mixtures around in the blender jar,
but only after stopping the blender. Turn the blender OFF before
using a utensil.
DO NOT USE BLENDER TO BLEND:
•
Large pieces of frozen foods
•
Tough foods such as raw turnips, sweet potatoes and potatoes
•
Bones
•
Hard salami, pepperoni
•
Boiling liquids (cool for 5 minutes before placing in blending jar)
•
Egg whites
•
Dough
•
Meats
C AR E A ND C LE A NI NG
This product contains no user serviceable parts.
Refer service to qualified service personnel.
1. Before cleaning, turn off and unplug the appliance.
2. Lift the blending jar by the handle off the base.
3. Remove jar base by turning it counterclockwise until loose.
4. Remove the blade assembly.
Caution: Blades are sharp. Handle carefully.
5. Remove lid.
6. Wash removable parts by hand or in the dishwasher. Place the
jar on the bottom rack and the rest of the parts on the top rack
only.
C LE A NING T IPS:
•
For quick cleanup, combine 1 cup hot water and a drop of liquid
dish soap in the blending jar.
•
Cover and blend on Speed 2 for about 30 seconds.
•
Discard liquid and rinse thoroughly.
S PE ED AND FUNC TI ON C H ART
Function
Food Type
1
Stir
Mix
Crumb
2
Chop
Whip
Blend
3
Dressings
Batters
Dips
Pulse/Ice Crush
Pulse
Ice
30 Second
Smoothies
Smoothie
Icy Drinks
Margaritas
Daiquiris
Mix/Shakes
Mix
Milkshakes
E/S 26892
T22-9001752-B
Please Read and Save this Use and Care Book.
IMPORTANT SAFEGUARDS
• Do not use outdoors.
• Do not let cord hang over edge of table or counter.
• Do not let cord contact hot surface, including the stove.
• Keep hands and utensils out of container while blending to reduce the risk
of severe injury to persons or damage to the blender. A scraper may be
used but must be used only when the blender is not running.
• Blades are sharp. Handle Carefully.
• To reduce risk of injury, never place cutter-assembly blades on base
without jar attached properly.
• Always operate blender with cover in place.
• This appliance is not intended for use by persons (including children) with
reduce physical, sensory or mental capabilities, or lack of experience
and knowledge, unless they have been given supervision or instruction
concerning use of the appliance by a person responsible for their safety.
• Children should be supervised to ensure that they do not play with the
appliance.
• The maximum rated wattage for this product was obtained with the glass
blending jar. Other recommended attachments may draw significantly less
power or current.
SAVE THESE INSTRUCTIONS.
This product is for household use only.
ELECTRICAL CORD
a) A short power-supply cord is provided to reduce the risks resulting from
becoming entangled in or tripping over a longer cord.
b) Extension cords are available and may be used if care is exercised in their
use.
c) If an extension cord is used:
1) The marked electrical rating of the extension cord should be at least as
great as the electrical rating of the appliance; and
2) The cord should be arranged so that it will not drape over the counter
top or tabletop where it can be pulled on by children or tripped over.
Note: If the power cord is damaged, please contact the warranty
department listed in these instructions.
7. Open the ingredient slot to add ingredients while the blender is running.
Drop ingredients through the opening.
Important: Do not remove the lid while the blender is running.
8. When finished, press ON/OFF to stop blending. Make sure blades
have completely stopped before attempting to remove the
blending jar from the base (refer to TROUBLESHOOTING for any
issues).
9. Press ON/OFF to power off and unplug the blender.
10. To remove the jar, grasp the handle and lift up.
11. Open pour spout to serve.
Note: Unit will auto shutoff after 2 ½ minutes without use.
12. Always unplug the appliance when not in use.
USI NG TH E PRE P RO GRA M ME D FUNCT I ONS
•
Fill the assembled blender jar with the desired ingredients.
•
Place the dual-opening lid on the jar.
•
Place the jar on the base.
•
Press desired preprogrammed button. The blender will
automatically mix and blend the following recipes with the press of
a button:
- Smoothie: 30 seconds to blend fruits and vegetables to a smooth
consistency.
- Icy drinks: Perfect for classic icy drinks like Margaritas with small
ice crystals.
- Shake/Mix: Create thick, smooth and creamy frozen treats or use
to combine other ingredients together.
Important:
•
Do not place the jar parts in boiling liquids.
•
Do not immerse the base in liquid. Wipe the base with a damp
cloth and dry thoroughly.
•
Remove stubborn spots by rubbing with a damp cloth and
nonabrasive cleaner.
Note: If liquids spill onto the base, wipe with a damp cloth and dry
thoroughly. Do not use rough scouring pads or cleansers on parts
or finish.
TROUB LE SH OOT ING
Problem
Possible Cause
LED blinking quickly
Blender overheated or
button held longer
than 30 seconds.
Blender stops/goes
Blending time exceeds
into
2.5 minutes.
STANDBY mode
Blender is having
Mixture is too thick or
difficulty blending
air bubble has formed
between mixture & blade.
RECI PE S
CLASSIC SMOOTHIE
Speed Setting
1 ½ cups apple juice
Prepare salad dressings.
2 large bananas
Mix ingredients for baked goods.
3
cups frozen whole strawberries
1
/
Make crumbs: cookie, cereal, bread.
3
Blend in the single serve jar.
Place ingredients in blender in order shown above.
Cover and blend for 15 seconds, or until smooth.
Chop fruits, vegetables.
Makes 6 (1 cup) servings
Whip whipped cream or butter.
Blend smoothies, sauces
Tip: Substitute orange juice for apple juice
Puree fruits and vegetables.
EASY FROZEN MARGARITA
Blend milkshakes and malts.
Grind hard cheeses and coconut.
½ cup orange flavored liquor
1 cup tequila
Pulse to desired consistency.
Crush ice to snow texture.
1 (6 oz.) can frozen limeade mix
4 cups ice cubes
Preset function
Place ingredients in blender with liquids first and ice last; cover.
Blend on AUTO setting 1. Serve with lime wedges if desired.
Preset function
Makes 6 servings
VANILLA MALTED MILKSHAKE
Preset function
4 large scoops Vanilla Ice cream
1 cup cold milk
¼ cup malted milk powder
1 tsp vanilla extract
Place ingredients into blender jar in order shown above; cover.
Blend on AUTO setting 3.
Makes 4 (1 cup) servings
Tip: Substitute your favorite ice cream flavor in place of vanilla.
Solution
Unit must be reset. Unplug to
reset. Let unit cool for at least
20 minutes.
Re-select appropriate speed
setting to start blender.
Turn blender off. Use rubber
spatula to scrape down sides of
jar and redistribute, pushing food
towards blades. Add more liquid
if needed.
Advertisement
Table of Contents

Related Manuals for Black & Decker BL1400DG-P


Summary of Contents for Black & Decker BL1400DG-P
- Page 1 If damaged, the appliance must be replaced. licuado y resultados de tritruración superiores—en casa o en el camino. blending jar. Other recommended attachments may draw significantly less BL1400DG-P • The use of attachments, including canning jars, not recommended by the power or current.
- Page 2 PIEZAS Y CARACTERÍSTICAS Por favor lea este instructivo antes de usar el producto. PRI ME R OS PASOS INSTRUCCIONES IMPORTANTES DE SEGURIDAD • Retire todo material de empaque y cualquier etiqueta adherida al producto. Cuando se usan aparatos eléctricos, siempre se deben respetar las siguientes medidas básicas de seguridad: •...
Need help?
Do you have a question about the BL1400DG-P and is the answer not in the manual?
Questions and answers