
Related Manuals for Cincoze MXM-T1000 Series


Summary of Contents for Cincoze MXM-T1000 Series
- Page 1 MXM-T1000 Module Quick Installation Guide Embedded MXM GPU Module Nvidia Quadro Embedded T1000 MXM Kit with Heatsink and Thermal Pad Version: V1.00...
-
Page 2: Table Of Contents
Contents Preface Revision……………………………………………..……………….……………...……………...03 Copyright Notice.…………………………………………………………………………………...03 Acknowledgement.………………………………………………………………......03 Disclaimer.………………………………………………………………….………………...03 Declaration of Conformity.………………………………………………….……………………03 Product Warranty Statement …………………………………………………………….....04 Technical Support and Assistance.…………………………………………….…………………05 Conventions Used in this Manual …………………………………………….…………....06 Safety Precaution …...……………………………………………….………….………....06 Package Contents ………………………………………………………….…….………...……08 Ordering Information …………………………………...…………………….…….……...……...08 Chapter 1 Product Introductions 1.1 Product Pictures……...……………………………………….……………………....10 1.2 Key Features …………………....………………….…………………….…..11 1.3 Specifications ……….……..………………………………….……...………………..……11 1.4 Mechanical Dimension …………………………………….………...………..……..12... -
Page 3: Revision
2020/10/30 Copyright Notice © 2020 by Cincoze Co., Ltd. All rights are reserved. No parts of this manual may be copied, modified, or reproduced in any form or by any means for commercial use without the prior written permission of Cincoze Co., Ltd. All information and specification provided in this manual are for reference only and remain subject to change without prior notice. -
Page 4: Product Warranty Statement
Product Warranty Statement Warranty Cincoze products are warranted by Cincoze Co., Ltd. to be free from defect in materials and workmanship for 2 years from the date of purchase by the original purchaser. During the warranty period, we shall, at our option, either repair or replace any product that proves to be defective under normal operation. -
Page 5: Technical Support And Assistance
Limitation of Liability Cincoze’ liability arising out of the manufacture, sale, or supplying of the product and its use, whether based on warranty, contract, negligence, product liability, or otherwise, shall not exceed the original selling price of the product. The remedies provided herein are the customer’s sole and exclusive remedies. -
Page 6: Conventions Used In This Manual
Conventions Used in this Manual Safety Precautions Before installing and using this device, please note the following precautions. Read these safety instructions carefully. Keep this Quick Installation Guide for future reference. Disconnected this equipment from any AC outlet before cleaning. For plug-in equipment, the power outlet socket must be located near the equipment and must be easily accessible. - Page 7 damage by transient overvoltage. 12. Never pour any liquid into an opening. This may cause fire or electrical shock. 13. Never open the equipment. For safety reasons, the equipment should be opened only by qualified service personnel. If one of the following situations arises, get the equipment checked by service personnel: ⚫...
-
Page 8: Package Contents
Package Contents Before installation, please ensure all the items listed in the following table are included in the package. Item Description Q’ty NVIDIA® Quadro® Embedded T1000 GPU card GPU Heatsink GPU Thermal Pad Kit Screws Pack Utility DVD Driver Note: Notify your sales representative if any of the above items are missing or damaged. Ordering Information Model No. -
Page 9: Chapter 1 Product Introductions
Chapter 1 Product Introductions -T1000 Series | Quick Installation Guide... -
Page 10: Product Pictures
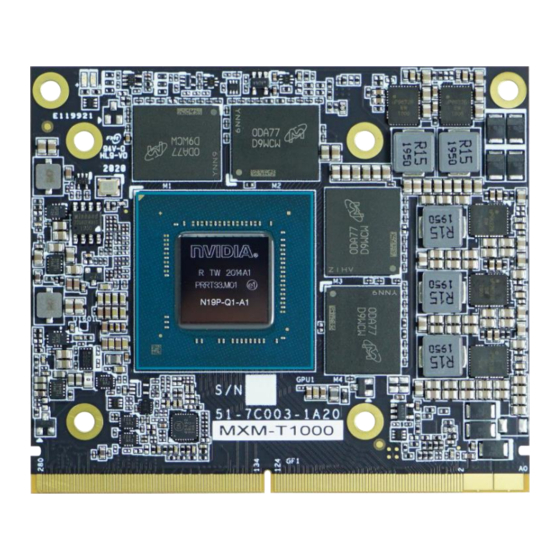
1.1 Product pictures Front Rear -T1000 Series | Quick Installation Guide... -
Page 11: Key Features
1.2 Key Features NVIDIA® Quadro® T1000 Embedded Graphics ⚫ ⚫ Standard MXM 3.1 Type A Form Factor (82 x 70 mm) ⚫ 896 NVIDIA® CUDA® Cores ⚫ 2.6 TFLOPS Peak FP32 Performance ⚫ 4GB GDDR6 Memory, 128-bit ⚫ 5-year Availability 1.3 Specifications NVIDIA®... -
Page 12: Mechanical Dimension
1.4 Mechanical Dimension Unit: mm -T1000 Series | Quick Installation Guide... -
Page 13: Chapter 2 Module Setup
Chapter 2 Module Setup -T1000 Series | Quick Installation Guide... -
Page 14: Install An Mxm Module
2.1 Install an MXM Module This chapter is to demonstrate how to setup an MXM Module onto an MXM Module supported system. Before this chapter gets started, users need to follow the instructions of the system’s user manual to remove the system’s chassis cover and to install the MXM carrier board. - Page 15 Insert the MXM Module into the slot on the MXM carrier board at 45 degrees. 45° Fasten the two screws (M3X5L). Note: Before putting on the thermal block (in the next step), please make sure the protective films on the Thermal Pads have been removed! -T1000 Series | Quick Installation Guide...
- Page 16 Put on the thermal block with aligning the screw-holes, and fasten the 4 screws (M3X8L). Place the thermal pad on the thermal block. Note: Before assembling the system’s chassis cover, please make sure the protective film on the Thermal Pad has been removed! -T1000 Series | Quick Installation Guide...
- Page 17 © 2020 Cincoze Co., Ltd. All rights reserved. The Cincoze logo is a registered trademark of Cincoze Co., Ltd. All other logos appearing in this catalog are the intellectual property of the respective company, product, or organization associated with the logo.
Need help?
Do you have a question about the MXM-T1000 Series and is the answer not in the manual?
Questions and answers