Kohler Clearflo K-7160 Installation Instructions
Bath drain
Hide thumbs
Also See for Clearflo K-7160:
- Installation and care manual (24 pages) ,
- Homeowner's manual (21 pages)
Advertisement
Quick Links
BEFORE YOU BEGIN
HOW TO USE THESE INSTRUCTIONS
Please read these instructions carefully to familiarize
yourself with the required tools, materials, and installation
sequences. Follow the sections that pertain to your
particular installation. This will help you avoid costly
mistakes. In addition to proper installation, read all
operating and safety instructions.
NOTES
S
Observe all local plumbing and building codes.
S
Inspect waste and supply tubing; replace if
necessary.
S
If you are installing a new bath, install the drain
before installing the bath. Refer to the
manufacturer's installation instructions.
TOOLS REQUIRED
S
Assorted screwdrivers
S
Adjustable or open end wrench
S
Pipe wrenches
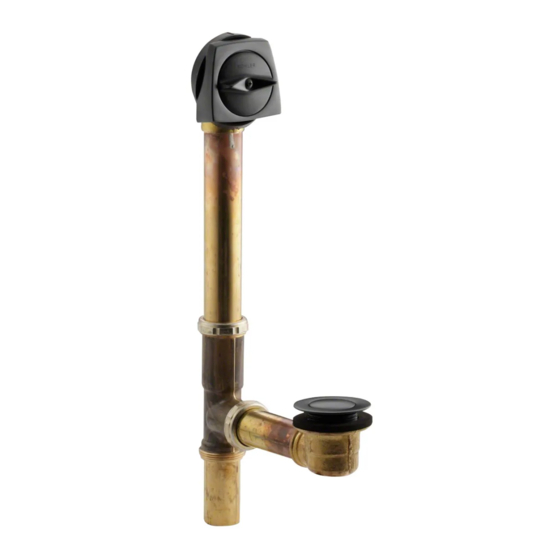
ROUGHING-IN
14" (35.6cm) BATH =
11-1/2" (29.2cm)
16" (40.6cm) BATH =
14" (35.6cm)
1-1/2" O.D.
BC
113176-2-
R
7" (17.8cm)
2-7/8" (7.3cm)
3" (7.6cm)
1-1/2" N.P.S.
K-7160
Fig. #1
K-7160M
All information in these instructions is based on the latest
product information available at the time of publication.
Kohler Co. reserves the right to make changes in product
characteristics, packaging, or availability at any time
without notice.
S
Adjustable pop-up drain has removable parts.
S
Drain "T" is reversible for vertical or horizontal
drainage.
S
K-7166 and K-7166M is for Seawall 6' (1.5m)
bath or whirlpool and 14" (35.6cm) Mayflower
bath.
S
Pliers
S
Plumbers putty
17" (43.2cm) BATH =
14-3/4" (37.5cm)
24" (61cm) BATH =
21-1/2" (54.6cm)
1-1/2" O.D.
1 1
CLEARFLO
BATH DRAIN
7" (17.8cm)
2-7/8" (7.3cm)
3" (7.6cm)
1-1/2" N.P.S.
K-7161
K-7161M
E2000 Kohler Co.
Advertisement

Related Manuals for Kohler Clearflo K-7160


Summary of Contents for Kohler Clearflo K-7160
- Page 1 Follow the sections that pertain to your Kohler Co. reserves the right to make changes in product particular installation. This will help you avoid costly characteristics, packaging, or availability at any time mistakes.
- Page 2 Align the overflow ell with the Gasket overflow hole in the bath. Overflow Ell Tube Fig. #4 From inside the bath, assemble hold down plate to overflow ell with screws provided. Tighten all screws. Hold Down Plate Fig. #5 113176-2- Kohler Co., Kohler, WI U.S.A.
- Page 3 NOTE: For installations where the overflow hood will be exposed to high volumes of direct water spray, apply silicone sealant around the overflow hood. Fig. #9 113176-2- Kohler Co., Kohler, WI U.S.A.
- Page 4 Lift Rod increase the clearance, or down to decrease the Assembly clearance. Tighten the screw, and insert the lift rod assembly back into the overflow ell. Screw Adjusting Block Adjusting Rail Fig. #13 113176-2- Kohler Co., Kohler, WI U.S.A.
Need help?
Do you have a question about the Clearflo K-7160 and is the answer not in the manual?
Questions and answers